
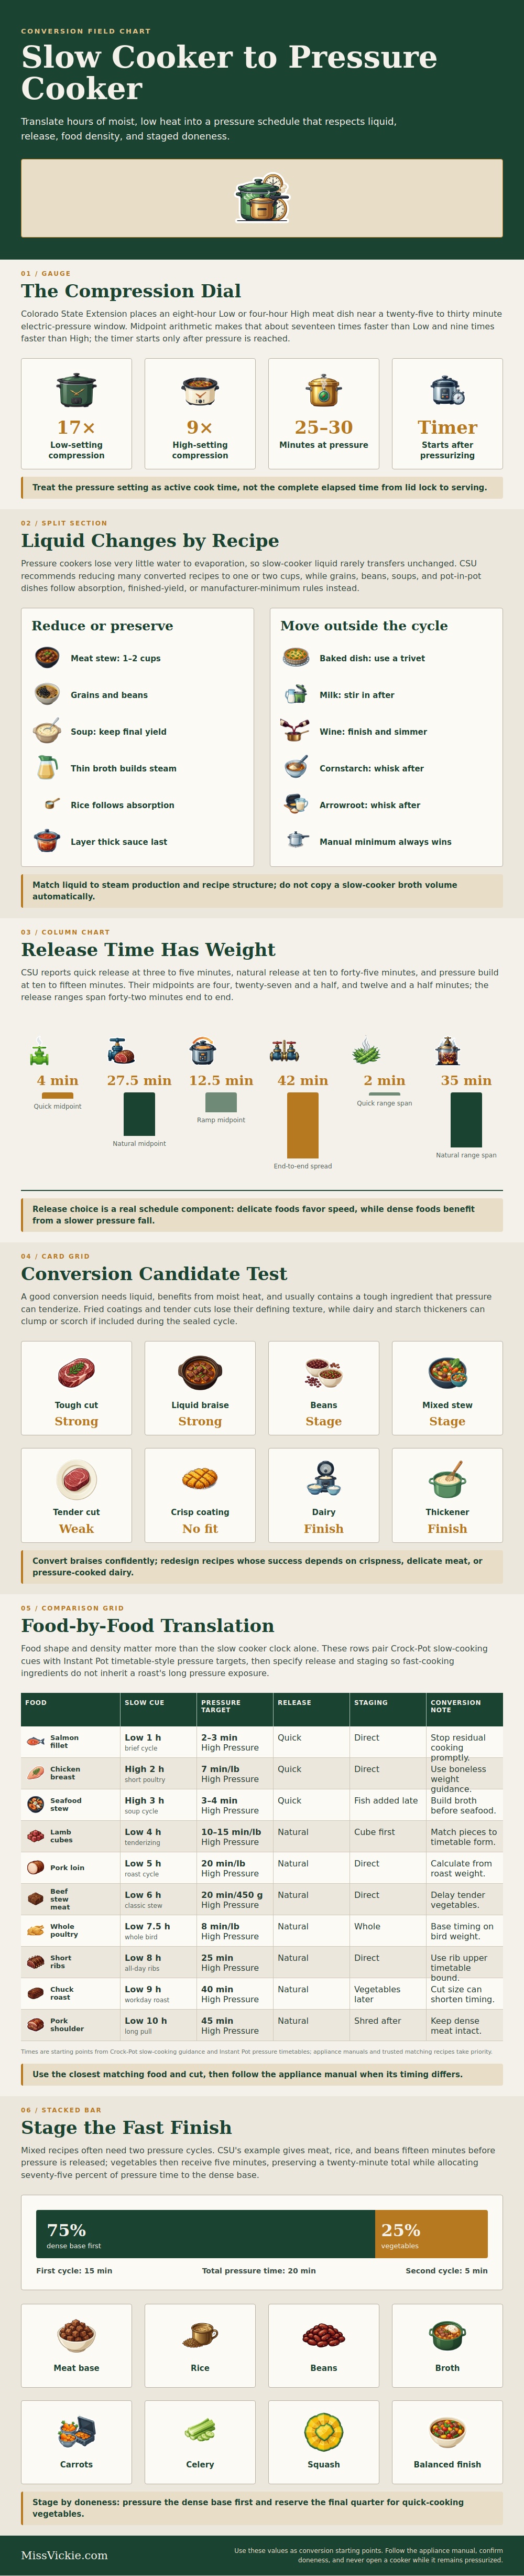
While slow cooker is chugging away on low, you stare at the clock, waiting for dinner to be ready. Sure, pressure cookers do it quicker, but turning an eight-hour braise into a twenty-five-minute pressure session seem like a leap of faith. What’s really needed is more than a simple time multiplier; it’s knowing how liquid, heat, and pressure react within the limits of a closed vessel, different than an open crock.
On low setting, the chart indicates a standard meat dish cook about 17 times faster (less than half an hour compared with a full day). Sounds good (except there are caveats about how fast). Consider the minutes spent building pressure and then releasing it. Though the timer isn’t ticking, those minutes adds up. That is still actual cooking time. The ramp-up stage matter. If you ignore it, you will run into trouble: Food will be undercooked no matter how accurate the pressure window.
How to Change Slow Cooker Recipes for Pressure Cookers
Most conversion failures occurs in liquid management. Liquid evaporates in a slow cooker. A pressure cooker doesn’t. Transfer a straight recipe and you’ll probably wind up with a waterlogged soup rather than a deep braise. Most commonly, you want to cook down your liquid quite far, to a cup or even less depending on what’s being cooked. This is different for soup or grains. Grains has their own absorption rules, so you retain their water levels. The braises? Less liquid.
Why does that matter? Because there isn’t enough thin stuff to touch the heating element, and without that buildup of steam, what happens when you try to heat the pot is not dinner; it’s a burn notice.
You should of also consider texture. Pressure cooking works best on tougher meats, the ones with lots of collagen. Collagen dissolves quickly when exposed to moist heat under pressure, making short ribs tender in minutes. But it’s not so great for delicate foods. Put chicken breast or fish through the same process, and they’ll go either mushy or dry.
That’s where the visual cue comes in. It tells you what to layer in what order. The collagen-rich meats (brisket, short ribs) goes in first, followed by long-cooking legumes. Close the lid, get them up to pressure, then let them cook away. When time is up, vent the pot and throw in some veggies; steam for a couple more minutes. Carrots and celery retains their crunch, but the beef falls apart at the poke.
And then there’s how you release it. For something delicate such as a vegetable or piece of fish, quick releasing is good, because you don’t want them sitting around in leftover heat while they overcook. Dense meats benefits from a natural release (letting the pressure drop by itself), which helps relax the fibers so they can reabsorb their juices. Ten minutes of natural release isn’t wasted time. If you ignore it, your finished dish may be tough and stringy, despite what the timer tells you.
Special mention goes for dairy and thickeners. High pressure can causes milk to curdle; cornstarch will lump. The solution is to not put any thickening agents in until after pressure cooking. Then, while the pot is still warm but no longer pressurized, add the cream or thickener, and whisk it in.
You won’t have to scrape burned-on solids out of the bottom of the pot anymore. So how does one convert? In terms of math, it’s not so much a matter of numbers as it is a matter of learning to think in terms of how heat gets transferred. With the pressure cooker, it’s fierce, contained steam; with the slow cooker, it’s slow, easy evaporation. Get that through your head, and the timer stops being scary.
You realize the pressure cooker isn’t just a speeded-up slow cooker. It’s its own instrument that requires careful attention to time and liquids. However, it repays you by having dinner on the table while you’re still chopping vegetables for your side salad. The minutes goes quicker, yes, but the rules of great cooking don’t change.