Reverse Sear Calculator
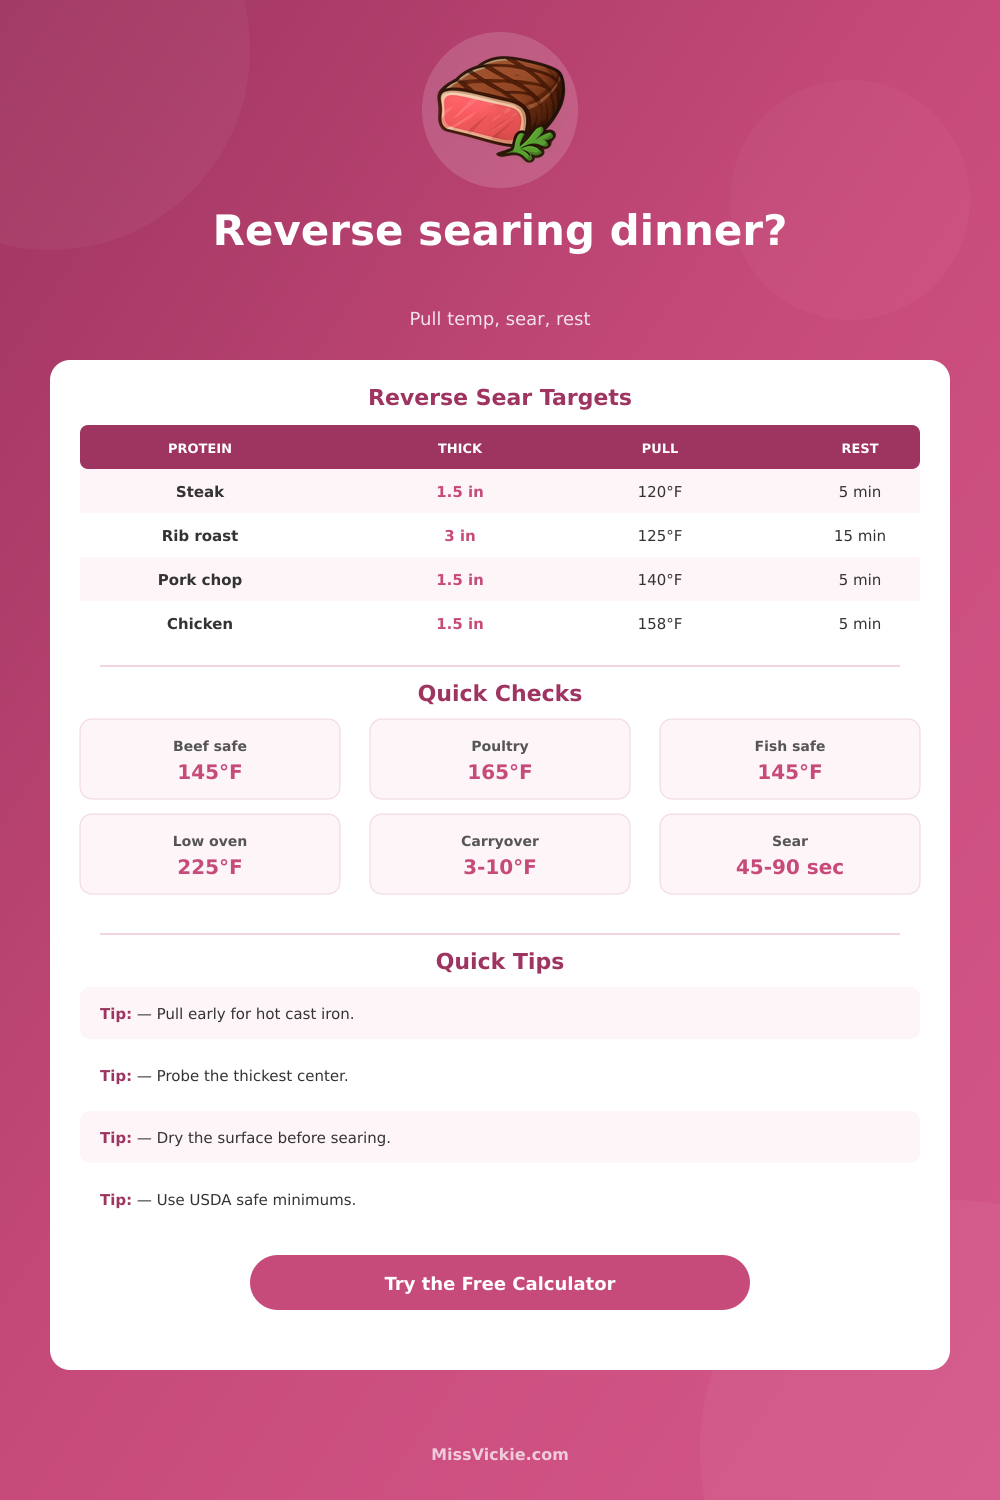
Plan low-temperature cooking, pull temperature, carryover, sear time, and rest time for thick steaks, roasts, chops, fish, and poultry with safety checks based on USDA-style minimum internal temperatures.
🔥Reverse sear presets
Choose a protein and thickness, then adjust starting temperature, oven or smoker heat, target doneness, expected carryover, sear surface, rest time, and weight.
⚖Temperature and weight units
🥩Protein, thickness, and starting temperature
🌡Doneness target, pull temp, carryover, and rest
Reverse sear plan
Timing and temperature breakdown
Use a calibrated thermometer and check the thickest center.
📌Safe temperature reference grid
Beef, pork, veal, lamb, and fish safety reference with proper rest.
USDA-style rest time for many whole cuts cooked to 145°F.
Ground beef, pork, veal, and lamb need a higher safe minimum.
Chicken, turkey, duck, and stuffing should reach this temperature.
📋Reverse sear pull temperature table
| Final target | Typical protein | Carryover allowance | Suggested pull point |
|---|---|---|---|
| 125°F rare | Beef or lamb steak | 5 to 8°F | 117 to 120°F before sear |
| 130°F medium-rare | Thick steak, lamb rack, duck breast preference | 6 to 9°F | 121 to 124°F before sear |
| 140°F medium | Pork chop, tenderloin, steak preference | 5 to 8°F | 132 to 135°F before sear |
| 145°F safe whole cut | Beef, pork, lamb, fish safety reference | 4 to 7°F | 138 to 141°F before sear |
| 160°F well done or ground | Well-done beef or ground meat safety reference | 3 to 6°F | 154 to 157°F before sear |
| 165°F poultry | Chicken, turkey, duck safety reference | 3 to 6°F | 159 to 162°F before sear |
⏲Oven and smoker timing table
| Low heat setting | Best use | Timing effect | Reverse sear note |
|---|---|---|---|
| 200°F / 93°C | Very even steaks, smoked roasts | Slowest | Gentle gradient; add time and monitor carefully. |
| 225°F / 107°C | Classic reverse sear temperature | Moderate slow | Good balance of even center and manageable timing. |
| 250°F / 121°C | Weeknight thick steaks and chops | Moderate | Still even, but carryover can rise slightly faster. |
| 275°F / 135°C | Roasts when timing matters | Faster | Useful for larger pieces; check early near pull temp. |
| 300°F / 149°C | Not ideal for delicate reverse sear | Fastest | Less edge-to-edge pink; reduce sear carryover allowance. |
🍳Sear surface comparison
| Sear surface | Typical time per side | Carryover impact | Best practice |
|---|---|---|---|
| Cast iron skillet | 45 to 75 seconds | High | Preheat hard, oil lightly, and dry the surface first. |
| Carbon steel pan | 45 to 70 seconds | High | Moves fast like cast iron with slightly quicker response. |
| Hot grill grates | 60 to 90 seconds | Medium | Use direct high heat and rotate only if grill marks matter. |
| Plancha or flat top | 50 to 80 seconds | Medium-high | Great full-surface browning for steaks, chops, and fish. |
| Broiler finish | 90 to 150 seconds | Medium | Keep the surface close to the element and watch constantly. |
| Torch plus pan | 30 to 60 seconds | Low-medium | Useful for delicate pieces when the center is nearly perfect. |
📚Common reverse sear scenarios
| Scenario | Thickness and weight | Low heat plan | Finish cue |
|---|---|---|---|
| Weeknight ribeye | 1.5 in, 1.2 to 1.6 lb | 225°F to 120°F pull | Cast iron 60 seconds per side for 130°F preference. |
| Prime rib dinner | 3 to 4 in roast, 5 to 8 lb | 225 to 250°F to 125°F pull | Rest longer, then sear hot for a browned exterior. |
| Thick pork chop | 1.5 to 2 in, 12 to 18 oz | 225°F to about 139°F pull | Finish near 145°F with at least 3 minutes rest. |
| Rack of lamb | 2 to 3 in, 1.5 to 2.5 lb | 225°F to preference pull | Sear fat cap and edges; verify center between bones. |
| Salmon fillet | 1 to 1.5 in, 1 to 2 lb | 200 to 225°F, check early | Use a gentler sear or broiler to avoid overcooking. |
🧪Carryover and rest reference
Thin fillets and delicate pieces climb the least after searing.
Most thick steaks and chops rise in this range with a hot pan.
Large roasts can climb more because stored heat keeps moving inward.
Small steaks rest briefly; rib roasts need a longer equalizing rest.
💡Reverse sear notes
Check early near pull temp. Thickness, bone, fat cap, oven cycling, and probe placement can move real timing away from any estimate.
Use the thickest center. Insert the thermometer away from bone, heavy fat pockets, and the pan-facing edge for the most useful doneness reading.
If you’ve ever sliced into a thick steak and discovered that everything on the outside was gray but the perfect medium-rare center never quite showed up, you know what I’m talking about: Ordinary cooking approaches tend to overcook the outsides before they can penetrates deep enough to reach inside.
By inverting the sequence, as the reverse sear does, you first gently warm your meat all over and then give it a final burst of high heat to finish it off. This results in an evenly cooked steak from end to end and a good crust, since the outside is now dry enough to brown quickley.
How to Cook Steak Perfectly with Reverse Sear
The secret lies in switching at just the right time. This brings us to importance of planning. Most folks underestimate the low-heat phase. Slowly moving heat from 225-degree smoker or oven makes the interior and exterior of meat pretty equal in temperature. The thicker it is (e.g., a bigger roast with more weight), the longer it will take. There’s just a lot more distance for the temperature gradient to cover.
All you need to do is input your settings (oven, starting temp, etc.), the thickness, the starting weight, and let the calculator go to work. Those inputs estimates when you should of checked the probe. No guessing required.
That’s why you need to know about the pull temperature: When you take meat out of the oven, carryover cooking doesn’t just turn off. Because surface is hotter than the interior, as long as it sits there resting, it will continue to conduct heat into core. A thin piece of salmon fillet will rise very little; a thick rib roast can gain another ten degrees once removed from oven. That one variable. How much you think your pulled meat might still cook, is the reason the calculator asks for an estimated carryover figure. Too small and you’ll undercook; too large and you’ll overcook it.
Even if you’re going for a preference temperature, there’s still safety lurking in the background. There’s a reason why the USDA reference temp is 145 for whole cuts of meat like lamb, pork, and beef (with a brief rest). Poultry comes in at 165. If your target falls short of these temperatures, the calculator let you know, it’s up to you to determine if the tradeoff is worth it.
The other side of resting, beyond juiciness, is that it gives us some time before surface temperature cools enough such that subsequent bites won’t burn our tongues. That minimum rest associated with each type of protein are displayed as well.
The tool doesn’t account for real-world kitchen variables: The bone in your beef, pork, or lamb shifts things by a couple of minutes; so does the thickness of fat cap; so do whether or how many times you crack open the oven door; so does exactly where the thermometer sits on meat. This is why it’s presented as a planning guide (not a hard-and-fast schedule). Pull it out once the center reaches the target temperature; not when the timer goes off, so keep an eye on the thermometer, too.
And then there’s the last bit: the sear. It takes less than two minutes per side on a ripping hot grill grate or cast-iron pan to finish up the crust. Don’t crowd it. Make sure the pan is fully preheated and dry. If the calculator tells you the sear will be brief, use that as a reminder to prep everything else while the meat cook at lower temperatures.
So yes: Speed at the end, patience at the start. But all that does is reward patience at the start and speed at the end. This tool takes that math out of equation for you. It lets you concentrate on the stuff that counts: watching that temperature rise and knowing precisly when to turn the script on a dime from gentle heat to blistering crust.