
There’s something about taking a pork roast out of your fridge on a Sunday afternoon with company due in three hours that sends you into a certain kind of panic. Looking at this thing of density, you don’t know if it’ll cook up in time for the last drop of appetizer. It is a familiar kitchen nightmare.
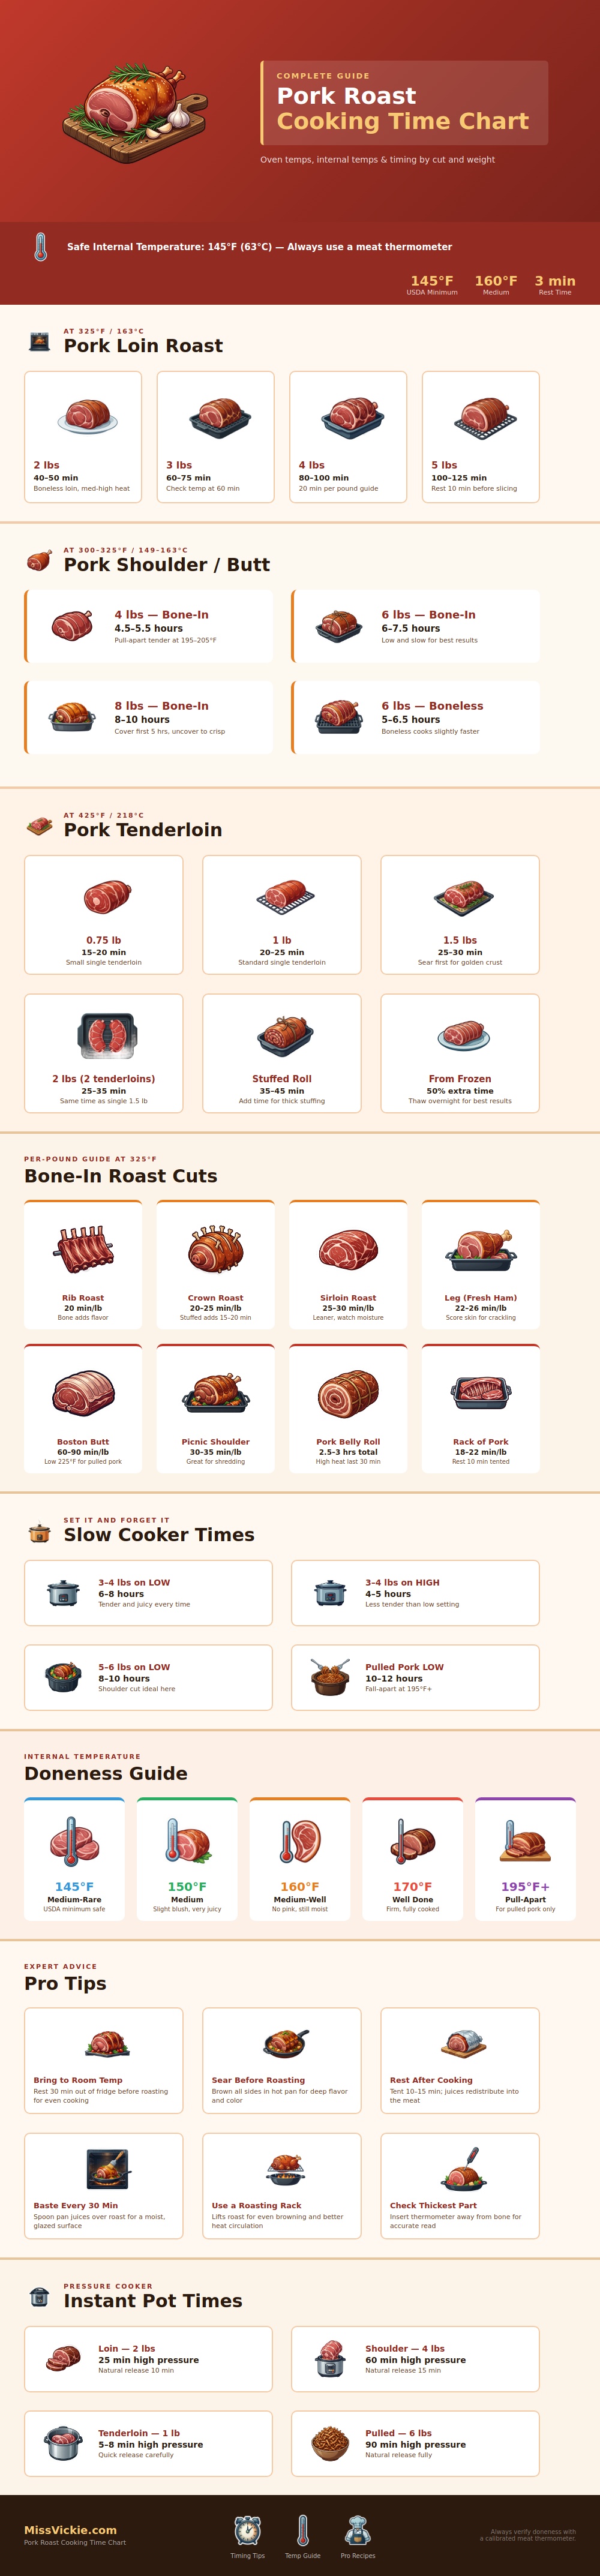
Here’s the good news: Pork isn’t rocket science. Pork is arithmetic wrapped in biology. When you quit guessing and look at what variables realy are, the fear evaporates. How all that works is spelled out above, in the infographic. It break down the timing for every major cut of meat.
How to Cook Perfect Pork Roast
But one of the biggest changes in moddern pork cooking came years ago with an update on safety guidelines: Where once the only way to know if your pork was done safely was to cook it until it turned entirely dry and white, now we know that you can pulls it at a lower temperature and be just as safe. That alone has saved countless holiday meals from being transformed into cardboard.
Consider the tenderloin as another case in point. Because of its lack of dense connective tissue, it’s an easily overcooked, fast-cooking muscle. Since you’re going for pink on the inside with a tasty browned outside, you need to sear the hell out of it in a smoking-hot pan first. Otherwise it’ll go dry on the outside, and toughen up inside if cook slowly for too long. That’s why the chart shows a high-heat cooking method for smaller roasts (it help seal in the surface), preventing the meat from drying before it’s done.
On the other hand, take the Boston butt (aka pork shoulder). That’s a near-perfect slow-cooking cut. It has plenty of collagen, which converts to gelatin when exposed to hours of low and slow heat. Rush your shoulder roast? The meat will be tough. As the graphic above illustrates, the bigger, tougher cuts needs much longer cooking times per pound. In fact, they can takes many hours; even in the pressure cooker. This is why it pays to be patient: Patience lets the fibers soften thoroughy and the fat melt away.
Using a timer alone is a rookie mistake among many home cook. While timers help estimate cooking time, they’re far from being an accurate indicator of when something will be done. The only way to determine whether or not your roast is done is by checking its internal temperature with a trusted meat thermometer. Place the thermometer in the center of the thickest portion of the meat, and ensure that it isn’t coming into contact with any bone. Because bones conduct heat at a different rate than the surrounding muscle tissue, they can provides you with a false readout.
Most roasts (sirloin, loin) should be cooked to roughly 145 degrees Fahrenheit, the USDA minimum safe temperature, which also happens to produce the juiciest results. If you like your roast well done, maybe shoot for 160 degrees but keep in mind that those additional fifteen degrees will extract a lot of moisture. It is a choice between texture and tradition. With pulled pork on the other hand, we’re shooting way up there. Ideally, you want to get it up to almost 200 degrees to realy break down all the connective tissues, allowing the meat to shred effortlessly with a fork.
And finally. One piece of advice that can make all the difference: Don’t cut into it right away. Pork cooked in high heat pulls its juices inward. So if you slice it now, you’ll be spilling all of that delicious liquid on your cutting board rather than keeping it inside the meat! Let the roast rest under a tent of foil for 10-15 minutes before serving. This allows the juices to flow back into muscle fibers.
Sounds like more work. But it’s that little break which turns a good meal into a great one. Cooking the perfect roast doesn’t require you to become a professional chef. It simply requires a bit of time for your meat, a pinch of trust in your thermometer, and some patience as it recovers before serving. You should of waited, but it is always worth the wait.