Pressure canner jar capacity, rack layers, water depth, and batch planner
Jars Per Pressure Canner Calculator
Estimate how many jars fit in a pressure canner from the canner model or inside diameter, jar size, rack layers, headspace, product density, water depth, and total batch count.
📌Pressure Canner Presets
Choose a common home-canning load, then adjust the jar style, layers, clearances, water depth, headspace, product density, and total jars. Capacity is an equipment fit estimate, not a substitute for tested process times.
⚖Canner, Jar, Rack, And Batch Inputs
Pressure Canner Load Plan
Enter canner and jar details to calculate capacity.
Fit Breakdown
Batch And Safety Checks
Pressure-Canning Guardrails
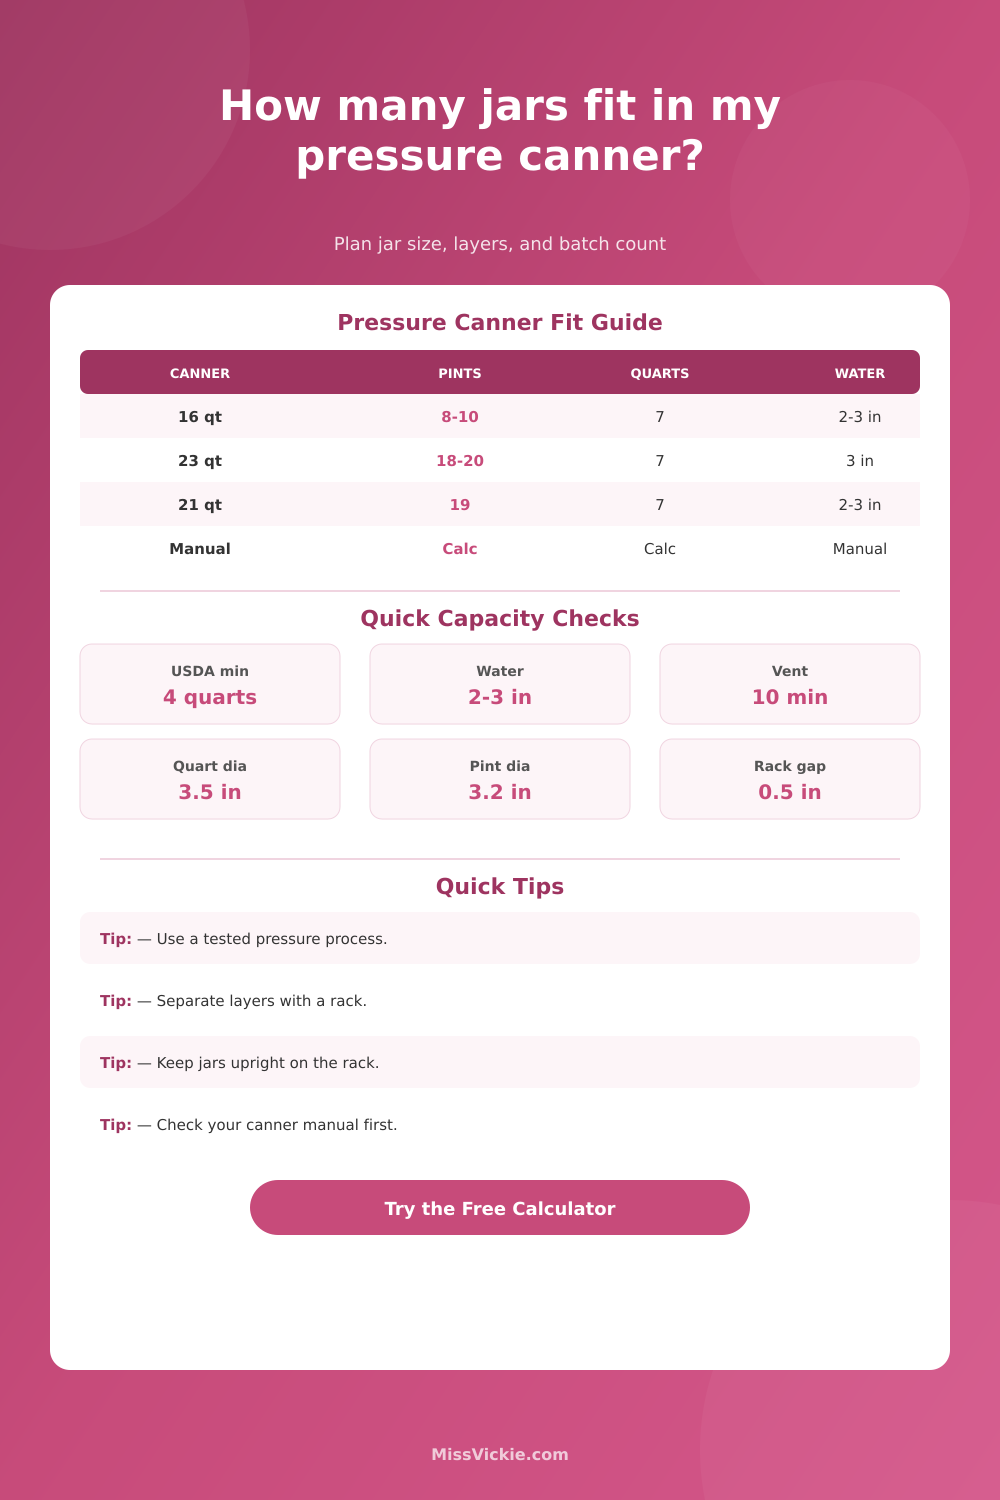
🧮Common Canner Capacity Reference
Pressure canner should hold at least four quart jars upright for USDA pressure processes.
Typical pressure-canner startup depth before jars; check the canner manual.
Many pressure-canning directions call for venting before pressurizing.
Use a rack under jars and between layers when stacking is allowed.
📘Jar Size And Headspace Table
| Jar Size | Approx Outside Diameter | Approx Filled Height | Nominal Volume | Headspace Reminder |
|---|---|---|---|---|
| Half-pint regular mouth | 2.75 in / 7.0 cm | 4.0 in / 10.2 cm | 8 fl oz / 237 ml | Use the headspace named in the tested recipe. |
| Pint regular mouth | 3.2 in / 8.1 cm | 5.2 in / 13.2 cm | 16 fl oz / 473 ml | Often 1 inch for many low-acid foods, but verify by product. |
| Quart regular mouth | 3.5 in / 8.9 cm | 6.9 in / 17.5 cm | 32 fl oz / 946 ml | Quart jars commonly fit one layer in tall pressure canners. |
| Wide-mouth quart | 3.9 in / 9.9 cm | 6.7 in / 17.0 cm | 32 fl oz / 946 ml | Wider shoulders can reduce the floor count. |
Jar dimensions vary by maker and style. Measure the actual jars and use the manual mode when a jar fits tightly, has square shoulders, or differs from standard mason jar dimensions.
🌡Pressure-Canning Safety Reference Table
| Reference Check | Typical Rule | Calculator Use | What Not To Change | Source Type |
|---|---|---|---|---|
| Canner size | Holds at least 4 quart jars upright | Flags undersized loads and small cookers | Do not use a small pressure saucepan for USDA pressure processes | USDA / NCHFP |
| Startup water | Usually 2 to 3 inches for pressure canning | Estimates water volume and load weight | Do not cover pressure-canner jars like a water bath | USDA Guide |
| Layering | Rack under jars and between jar layers | Separates floor capacity from stacked capacity | Do not stack jars directly on top of lids | Extension guidance |
| Process settings | Recipe, jar size, food, pack, and altitude decide time and pressure | Shows capacity only | Do not shorten time, lower pressure, or improvise low-acid recipes | Tested recipe |
🍛Product Density And Load Weight Table
| Product Type | Planning Density | Quart Jar Food Weight | Pint Jar Food Weight | Safety Note |
|---|---|---|---|---|
| Broth or stock | 2.05 lb/qt / 0.98 kg/L | About 1.9 lb after headspace | About 0.95 lb | Use tested poultry, meat, or vegetable stock directions. |
| Vegetables in liquid | 2.1 lb/qt / 1.01 kg/L | About 1.95 lb after headspace | About 0.98 lb | Low-acid vegetables require pressure canning. |
| Beans or legumes | 2.2 lb/qt / 1.05 kg/L | About 2.05 lb after headspace | About 1.03 lb | Hydration and pack style affect density. |
| Meat, poultry, or fish | 2.35 lb/qt / 1.13 kg/L | About 2.18 lb after headspace | About 1.09 lb | Follow product-specific pressure tables exactly. |
💡Fit And Safety Tips
So there you go: You’ve got 40 pounds of green beans to put up. You’ve got all the jars. And you even have the pressure canner that’s supposedly big enough for them. But will it actualy hold all those jars, without turning your kitchen into a disaster zone?
It sounds like elementary math, but home canning throws some variables at us that make filling a round pot with cylinders more difficult then you might imagine. Jars is rigid cylinders. Canners are round pots with odd obstructions. Then there’s the gauge stem taking up space. There’s the toothy rack getting in the way. Try to cram too many jar in there, and you risk breaking a jar, or preventing proper circulation of the steam. That’s not just inconvenient; it’s a safety issue.
Why Jars Do Not Fit Perfectly in Your Canner
The online tool (above) eliminates the guesswork from converting and coefficients; simply select your type of jar and your canner model and let it do the math for you. But it is just as much, or maybe even more, valuable to know why the number changes as it is to know how many you will make.
Most of us think that capacity is set, right? Not true. Capacity vary depending on several factors: water depth you begin with; rack layers; and jar diameter. For example, a wide-mouth jar take up more floor space than a regular mouth jar. But the wide-mouth occupies a larger amount of floor space. One layer of quart jars; two layers (potentially, using a separator rack) of pint jars. The tool knows all this about reality so you don’t need to imagine it in your head when you’re livig with those hot jars.
The other silent capacity killer: Water depth. Starting recipes say “fill your canner pot 2-3 inches with water.” That’s water displacement. So if you just fill it one inch deep instead…you might be able to get an additional jar in there. And maybe not. Now you’re leaving yourself open to running out of water during the process. This could leave you with a dry canner that won’t build up pressure and will crack your glass. You’re trading safety for yield. The calculator will let you tweak that water depth number, so you can see how many jars it loses on your behalf when you do things correctly at the beginning of the process.
It will also account for your headspace. Headspace refers to that last bit of empty air inside the jar, above the food. One inch of headspace? Your jar has a higher total height than what’s inside it. Which means fewer layers you can pack onto each other. It is a small thing, but it matters when you want to get ten pints of something into a pot designed to hold nine.
And there’s also density. And that doesn’t matter in terms of fit. But it matters in terms of weight. There is a difference between lifting a canner full of meat versus one full of broth. Hefting a twenty-three quart pot of glass and water around is no easy task. Knowing how heavy something will be helps you know what you can lift on your own. This applies to timing your processing and also to when you have to carry the canner to the stove. Should I break it down into smaller batches so I don’t ruin my back? Or do I need some help getting it over here?
The myth is that you can stack jars on top of each other to save space. Nope. They need some airflow so heat can circulate. All surfaces should be reached by steam. This is why you enter a gap into the tool… It forces the layers to stay separate. Using no separator rack does not save time. It risks underprocessing your food.
Look at the reference table on the page. It compares height and width of various jar diameters. This is handy for double-checking your own jars if you’re working with odd sizes or custom ones.
Allow yourself some wiggle room. I know, I know: you want to fill every last inch of the pot with as many jars as you can theoretically fit. Don’t do it! Allowing some extra space will make them easier to lift. It’ll also prevent your jars from pressing against the sides of the hot metal pot. There’s always a slight variation in the shape of each jar, too… And a tiny bit more room will accommodate those differences nicely.
Once you’ve got things running, you’ll be able to visualize your process and know exactly how many batches you’ll need to do. Knowing that takes the pressure off the day. You don’t have to think about it; you simply know how many runs you’re looking at, how much water to include, and what to bring along.
Math time is over. Time to get down to business.