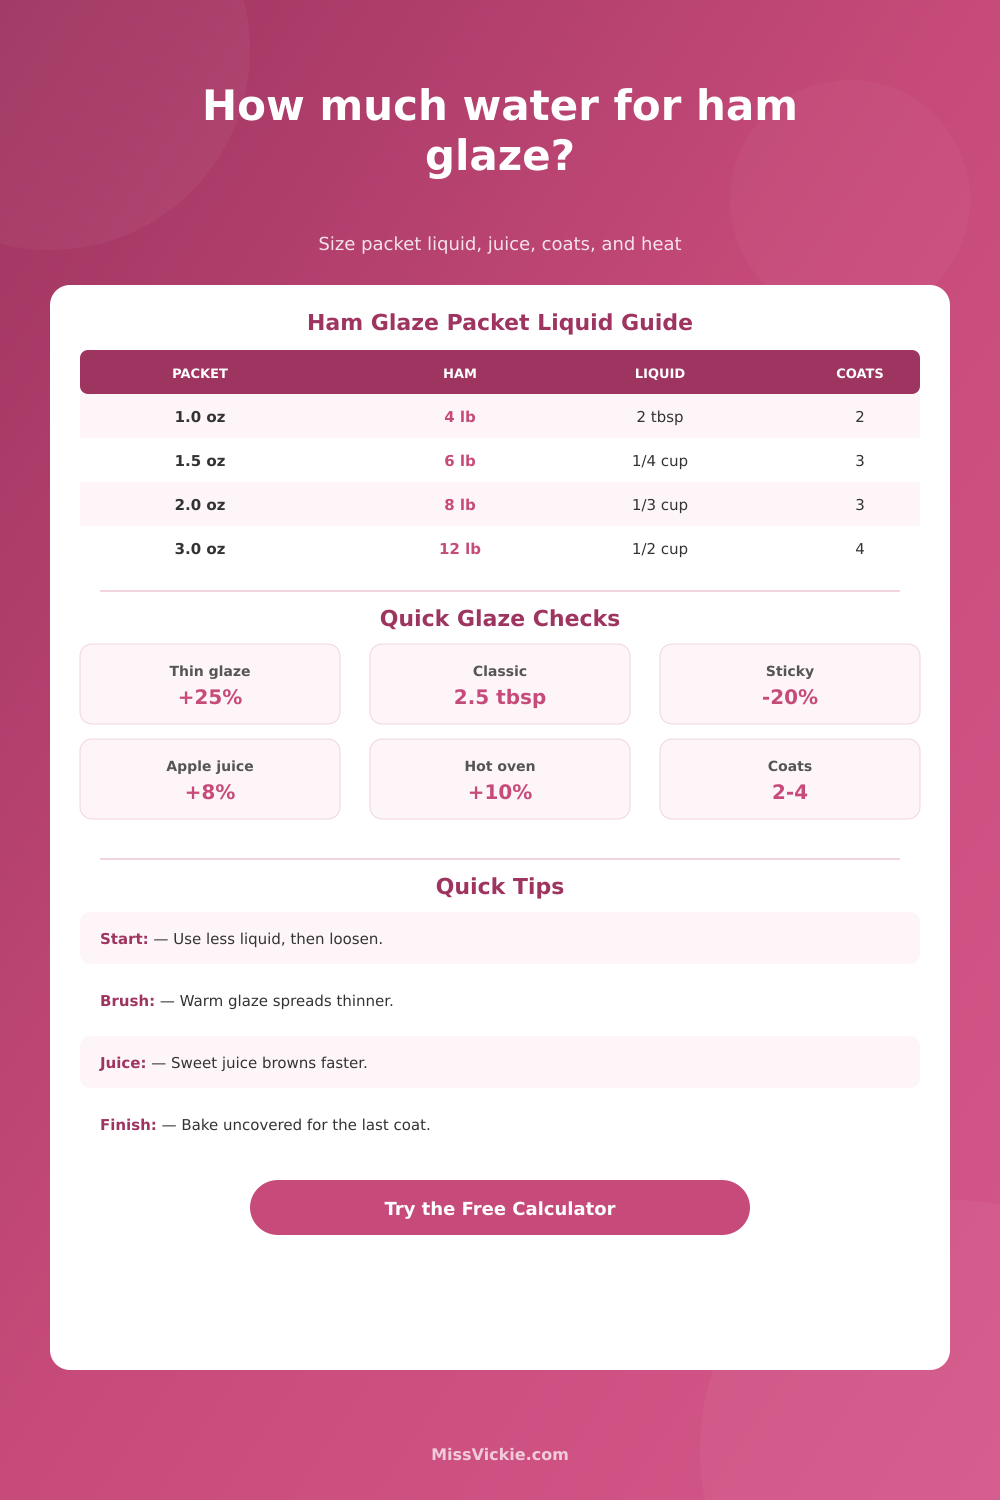
Packet hydration, juice swaps, sugar strength, basting coats, and oven evaporation planner
Ham Glaze Packet Water Calculator
Calculate how much water, juice, or other liquid to mix with a ham glaze packet based on packet weight, ham size, glaze thickness, heating time, oven temperature, basting coats, and sugar concentration.
📌Ham Glaze Presets
Pick a common ham glazing situation, then adjust packet size, liquid choice, ham weight, coating style, oven heat, basting count, extra sugar, and simmer reduction.
⚖Packet, Ham, Liquid, and Oven Inputs
Glaze plan
Your liquid, sugar strength, and basting plan will appear here.
Liquid and Packet Math
Ham, Heat, and Coating Plan
Glazing Cues
🧂Glaze Packet and Liquid Reference
Many ham packets are small dry sugar-spice envelopes.
A glossy packet glaze often starts in this liquid range.
Thin repeated coats set better than one heavy layer.
Most color develops near the end of heating.
📊Ham Glaze Tables
Packet Liquid By Texture
| Texture | Liquid Per 1.5 oz Packet | Best For | Brush Cue |
|---|---|---|---|
| Thin brush-on | 3 to 4 tbsp | Spiral slices and early coats | Runs slowly from spoon |
| Classic shiny | 2 to 3 tbsp | Most packet directions | Coats brush evenly |
| Thick spoonable | 1.5 to 2.5 tbsp | Boneless and carved hams | Leaves a ribbon trail |
| Sticky lacquer | 1 to 2 tbsp | Final high-heat coating | Clings without dripping |
Water and Juice Swap Effects
| Liquid | Liquid Adjustment | Sugar Effect | Flavor Note |
|---|---|---|---|
| Water | Baseline | Neutral | Clean packet flavor |
| Apple juice | Add about 8% | Mild sugar boost | Round fruit sweetness |
| Pineapple juice | Add about 10% | Fast browning | Bright acidity |
| Orange juice | Add about 12% | Moderate sugar | Citrus sharpness |
| Cola | Add about 15% | Strong sugar | Darker caramel color |
Ham Size Glaze Planning
| Ham Size | Packet Range | Coats | Finished Glaze |
|---|---|---|---|
| 3 to 5 lb | 1 small packet | 2 coats | 3 to 5 fl oz |
| 6 to 8 lb | 1 regular packet | 3 coats | 5 to 7 fl oz |
| 9 to 12 lb | 1 to 2 packets | 3 to 4 coats | 7 to 11 fl oz |
| 13 to 18 lb | 2 packets | 4 coats | 10 to 16 fl oz |
Oven Temperature and Glaze Timing
| Oven | Glaze Start | Liquid Note | Watch For |
|---|---|---|---|
| 275 to 300 F | Last 30 to 45 min | Low loss | Pale shine |
| 325 F | Last 25 to 35 min | Baseline | Glossy set |
| 350 to 375 F | Last 15 to 25 min | Add a splash | Edge browning |
| Broil finish | Last 2 to 5 min | Keep thicker | Rapid dark spots |
💡Packet Glazing Tips
This calculator estimates liquid for dry ham glaze packets. Packet brands, starches, sugar crystal size, pan shape, ham moisture, oven calibration, and actual glazing time can change the final texture.
The package in wrapper may seem easy to use, just add water, stir and hope for a glossy finish that sticks to the plate. But instead, more often than not, you have a runny mess of glaze or a burnt gooey paste.
Rarely does the packet fail. More likely, it is amount of liquid used, the oven temperature, or how many coats you has applied. Nailing this down will make your ham look good and taste good. It will also make you look like a pro.
How to Make the Perfect Ham Glaze
But most dry glazes are 75 percent sugar by weight. This matter because sugar behaves differently depending on how much water you dilute it with. Depending on the amount of water you add, the sugar behave differently. Too much water will result in a thin, clear glaze. It doesn’t adhere to the meat. Too little water and your glaze is too thick to spread on the ham, it sticks to the spoon.
The calculator above is designed to help you determine the correct quantity. Simply input your desired ham size and glaze thickness, and it do the math for you. It even recognizes that a bone-in ham has less surface area different than a spiral-sliced one. This means more room for absorbing liquid, but more exposure to losing it while baking.
What kind of liquid do you apply? That affects the makeup of the glaze. The neutral option is water. It doesn’t hide the flavor of whatever’s in the packet. Instead, it lets it shine naturaly. Most cooks substitute some other liquid for all or part of the water: cola, pineapple juice, or apple juice.
Each add its own combination of acids and sugars. For example, apple juice mellows the sharpness of mustard-based packets while adding a hint of fruitiness. Pineapple juice, with more acid than apple, promotes browning because of its higher acid content. Cola adds more depth and darkens color of the glaze.
If you opt for one of these sweeter liquids, the tool adjust down the amount of water accordingly. Using less water helps you reach same sugar concentration. It also takes into account the oven temperature. The higher the setting, the quicker the moisture will evaporate. This hastens the thickening of the glaze, but can also cause the sugars to burn before they have time to set.
Where most cooks go awry is basting technique. The urge is to slap on a heavy coat and hope for the best. This almost never happen. Before the ham has time to caramelize, the thick coat slide down the hot meat.
What’s better? Apply several very thin coats. Brush on a slight coat. Let it heat for ten or fifteen minutes, then repeat with another coat. Build upon each previous coat. This will create a glossy surface that stick.
The calculator determines the approximate amount of glaze required per coat. This way you won’t run out at the last minute. And it recommends having some back-up in case you want to mix more. Adding a teaspoon of warm water to a thick glaze is far easier than trying to salvage one that’s too runny. You should of used less water if it was that thin.
The last variable is timing. Glaze too soon and the sugars will burn, going bitter. Glaze too late, and the ham appear pale. According to most recipes, begin glazing during the final 30 to 45 minutes of cooking time. That allows the sugars to melt and caramelize, but not burn.
The higher the oven temperature, the closer you should keep an eye on the ham (think: 375 degrees) so you’ll want to reduce the glazing time. The tool can show you this time line. By adjusting it for how long the ham is in the heat, it calculate the amount of liquid required.
A well-glazed ham reflects light and holds its shape. On the other hand, when the ham isn’t well-glazed, it will appear pale and fall apart. You can achieve the difference between a simple packet and a professional finish by practicing how to balance heat, liquid, and patience. It’s actualy worth the effort for such a luxurius meal.