Safe Thaw Planner
Ground Beef Thawing Time Calculator
Estimate thawing time for frozen ground beef by package weight, patty or block shape, thickness, method, fridge temperature, cold-water changes, cook deadline, and batch count.
📌Choose a frozen ground beef preset
Each preset fills a realistic ground beef thawing situation. Adjust the package size, thickness, method, fridge temperature, water-change plan, deadline, and batch count after loading.
🥩Package and thawing details
Ground beef thawing plan
Enter your package details to estimate a safe thawing window.
Thawing breakdown
📊Ground beef thawing reference cards
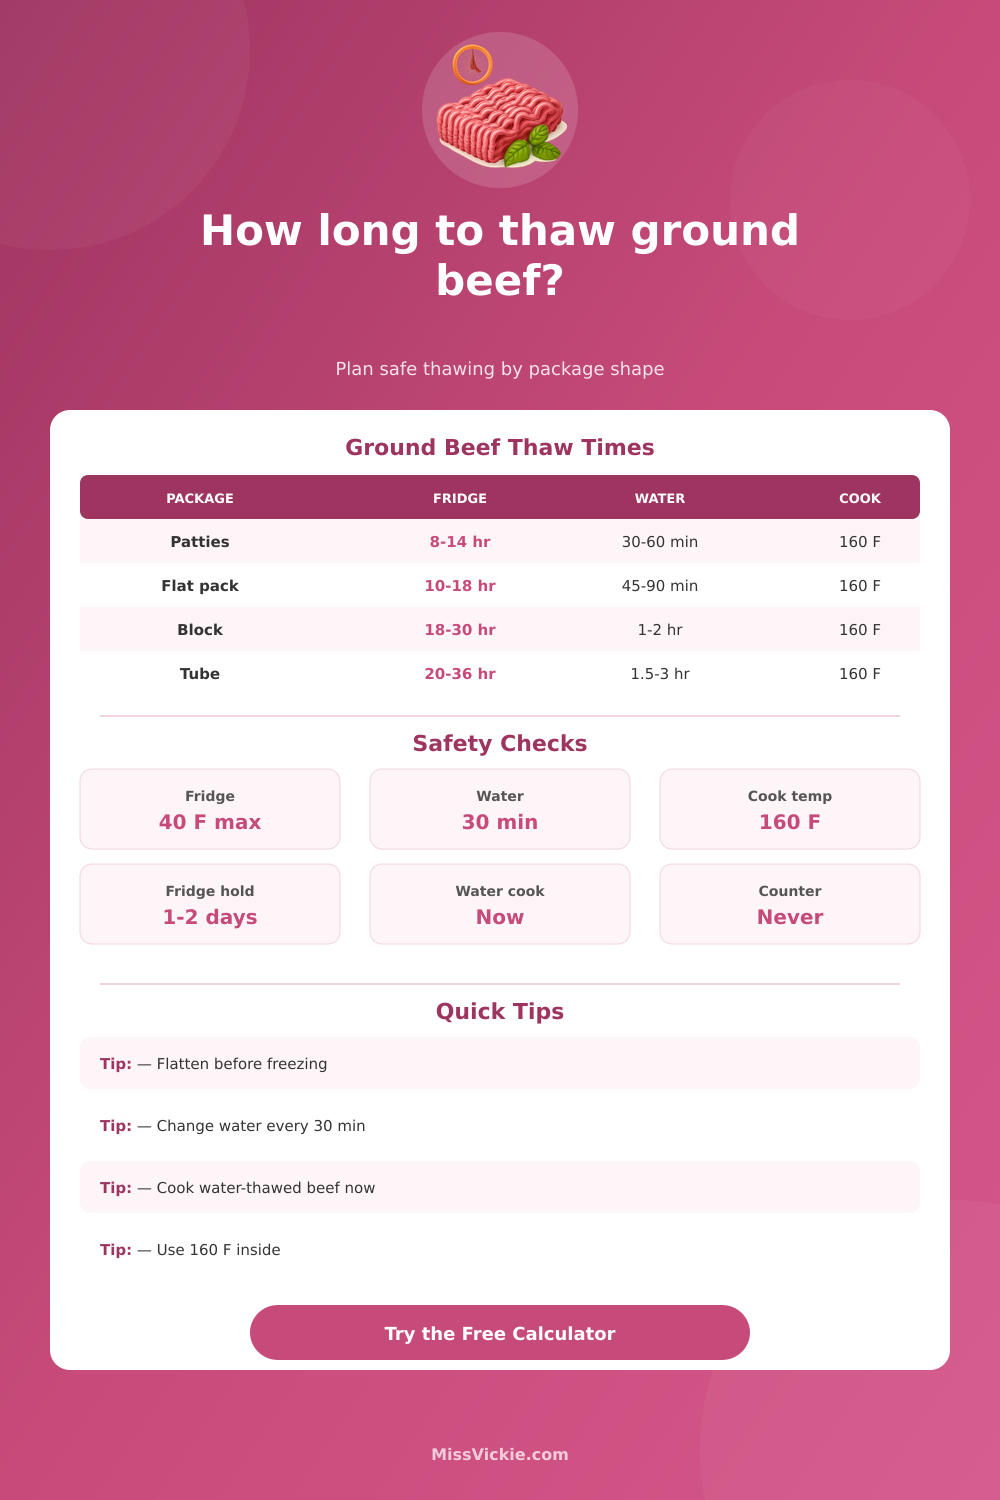
⏱Ground beef thaw time by shape
| Ground beef package | Best method | Typical 1 lb timing | Why it changes |
|---|---|---|---|
| Separated patties | Refrigerator or cold water | 8-14 hr fridge, 30-60 min water | Air gaps and thin centers thaw faster than a solid block. |
| Flat freezer bag | Refrigerator | 10-18 hr fridge, 45-90 min water | A wide thin shape has less frozen depth. |
| Store tray pack | Refrigerator | 14-24 hr fridge, 60-120 min water | Foam tray and compacted center slow heat transfer. |
| Dense butcher block | Refrigerator | 18-30 hr fridge, 90-150 min water | Thicker corners stay icy after the outside softens. |
| Round chub tube | Refrigerator then cook | 20-36 hr fridge, 1.5-3 hr water | The round core is the last part to thaw. |
Times are planning estimates for sealed packages. Always cook ground beef to a measured 160°F internal temperature.
🧊Safe thawing method table
| Method | Calculator timing model | After thawing | Best use |
|---|---|---|---|
| Refrigerator | Slowest; adjusted by thickness, shape, fridge temp, and batch spacing. | Cook within 1-2 days and keep at 40°F or below. | Best quality and easiest safety margin. |
| Cold water | Fast; assumes sealed bag, submerged package, and 30-minute water changes. | Cook immediately after thawing. | Same-day dinner when package is leakproof. |
| Fridge then cold water | Uses a partial refrigerator thaw, then finishes with cold water close to cooking time. | Cook immediately after the water finish. | Useful when the center is still icy near dinner. |
| Microwave defrost | Minutes per pound plus a standing period, with extra time for thick blocks. | Cook immediately because edges may warm. | Backup plan for small packages only. |
| Cook from frozen | No thaw window; adds cooking time and assumes crumbles or thin patties. | Cook fully to 160°F. | Skillet crumbles, sauce, or soup when texture is flexible. |
🌡Ground beef safety checkpoints
| Checkpoint | Use this limit | Calculator response | Reason |
|---|---|---|---|
| Refrigerator temperature | 40°F or below | Adds time above 38°F and warns above 40°F. | Cold storage slows bacterial growth while the beef thaws. |
| Cold-water changes | Every 30 minutes | Shows required changes and flags short water-change plans. | Fresh cold water keeps the thaw moving without warm soaking. |
| Counter thawing | Do not use | Not offered as a thawing method. | The outside can enter the danger zone while the center stays frozen. |
| Cook temperature | 160°F | Always displays 160°F as the final ground beef target. | Ground meat needs a higher measured internal temperature. |
| Refreezing | Fridge-thawed only | Water and microwave results say cook immediately. | Cold-water and microwave thawing shorten the safety window. |
📦Package size and batch planning table
| Batch situation | Suggested package shape | Thaw planning move | Calculator input to watch |
|---|---|---|---|
| One pound for tacos | Flat freezer bag | Start in the fridge the night before or use cold water before cooking. | Thickness under 1 inch and deadline under 24 hours. |
| Two pounds for chili | Two flat bags instead of one block | Separate packages in the fridge so air reaches both sides. | Batch count and spacing. |
| Burger patties | Wax-paper separated patties | Thaw in the fridge on a tray or cook from frozen if grilling. | Patty shape and 0.5-0.75 inch thickness. |
| Large chub tube | Round tube | Use refrigerator thawing; expect an icy core near the center. | Shape, thickness, and cook deadline. |
| Meal prep batch | Several flat packs | Lay out in a single layer and rotate package positions if needed. | Batch count and stacked spacing. |
⚖Thawing method comparison grid
Slow, steady, and easiest to fit into a cook-later plan when the refrigerator stays at 40°F or below.
Good for sealed small packs, but water must be changed every 30 minutes and the beef should be cooked right away.
Starts safely in the fridge, then uses cold water only as a short finish when the center is still firm.
Fast but can warm edges, so it works best for crumbles going straight into a skillet or sauce.
💡Ground beef thawing tips
Safety references reflected in this calculator follow USDA/FSIS guidance for safe thawing methods, 30-minute cold-water changes, 40°F refrigerator storage, and a 160°F cooking temperature for ground beef.
It is nearly eight o’clock on a Tuesday evening and hunger strikes with sudden violence. It’s almost eight and all you see in the freezer are rocks. There’s a brick of frozen ground beef in there somewhere though. What do you do? Do you plop it onto the counter while you wash clothes? Run some hot water over the package?
This will result in food safety risks, as thawing is a type of active thermal process, meaning one which need to be managed, rather than being passively waited out. But what do the numbers mean, and how does knowing them help you save more meals than just working hard without a plan? Geometry are the main thing you’re grappling with here.
How to Defrost Meat Safely
Your meal-planning doesn’t matter to heat transfer: it matters if something is thin or thick, and it matters what surface area of that thing is. That’s why a dense block of frozen food will take longer to thaw than a flat freezer bag (the cold inner stuff has further to go). Thawing is a heat method, not merely an organizational one; flattening out your meat beforehand isn’t just more convenient it also speeds up defrost time.
And if you have chunky tube, and then leave it as-is instead of flattening, the outer part might be unfrozen, but the middle could still be rock-hard ice. This is not good since any bacteria will start reproducing on the warmer sides well before the colder interior are safe to touch. This is where the tool come in: it asks you about the thickness and shape of your package, and tweaks the timeline to match based off how far back down the frost needs to recede.
Thawing in the refrigerator is always best because the ice melts slowly and meat stays at a steady cold temperature, so bacteria can’t grow too quickly. But it will take some time, typically around 12 hours or longer (larger packages takes longer). So if you need your package ready sooner rather then later, cold water thawing can help speed up the process.
Cold water thawing speeds up the transfer of heat from one object to another. Specifically, water transmits heat about 25 times faster than air. That said, you have to stay on top of things when using this method as you have to replace the water every half hour (otherwise, it’ll be warm enough to move the meat past its danger zone). Using this method can turn your sink into a bacterial petri dish without care. To avoid losing track while waiting for package to loosen, the calculator will alert you to any changes.
The microwave is a wildcard. Fast and chaotic. Microwave energy directly heats water molecules, so the thinner parts of your food (edges, etc.) will begin cooking long before the frozen middle have thawed at all. This leads to hot spots, perfect environments for pathogens to breed. If you defrost using a microwave, you need to cook right away (no holding time).
Because of this need for speed, the calculator flags any plan with microwave defrost as an immediate cook task. That’s not really meant to be part of your meal prep plan; rather think of it like a rescue plan for when everything else fails.
That’s one more wrinkle: batch planning. It’s not as simple as “five pounds takes five times longer” to thaw. When multiple packages is stacked together, they block the airflow between the water and the air, creating small pockets that don’t heat up as well. Laying them flat in a single layer ensures the environment can reach all sides evenly, more important than most people think! See the table on the page? That breaks it down for you, explaining how stacking affect your timeline.
Guessing blind here on when dinner actualy hits the stove is a recipe for failure. As a final checkpoint, always check with an instant-read food thermometer. Ground beef need to reach an internal temp of 160 degrees F for the pathogen to be destroyed, no matter how carefully it’s been defrosted. Grinding spreads the bacteria inside the meat, so color isn’t a reliable guide; a burger that looks pink may actualy be safe (and one that’s brown could still be underdone). Use a thermometer, not eyeballing, to gauge doneness.
That discipline will transform a daunting freezer problem into a doable kitchen routine in which you map out the thaw, track its progress, and confirm the outcome. Beef defrosts safely and you dine guilt-free.