
Sometimes your campfire bread gets charred on the exterior while remaining gooey in the center. Maybe you’ve carefully measured out the flour and kneaded dough just right, even following recipe to the letter. But no matter what, it’s all for nothing. You’ve been treating this thing as if it has a thermostat. Which it doesn’t. Charcoal is what provides heat. And learning to master that variable will make difference between ash and a feast.
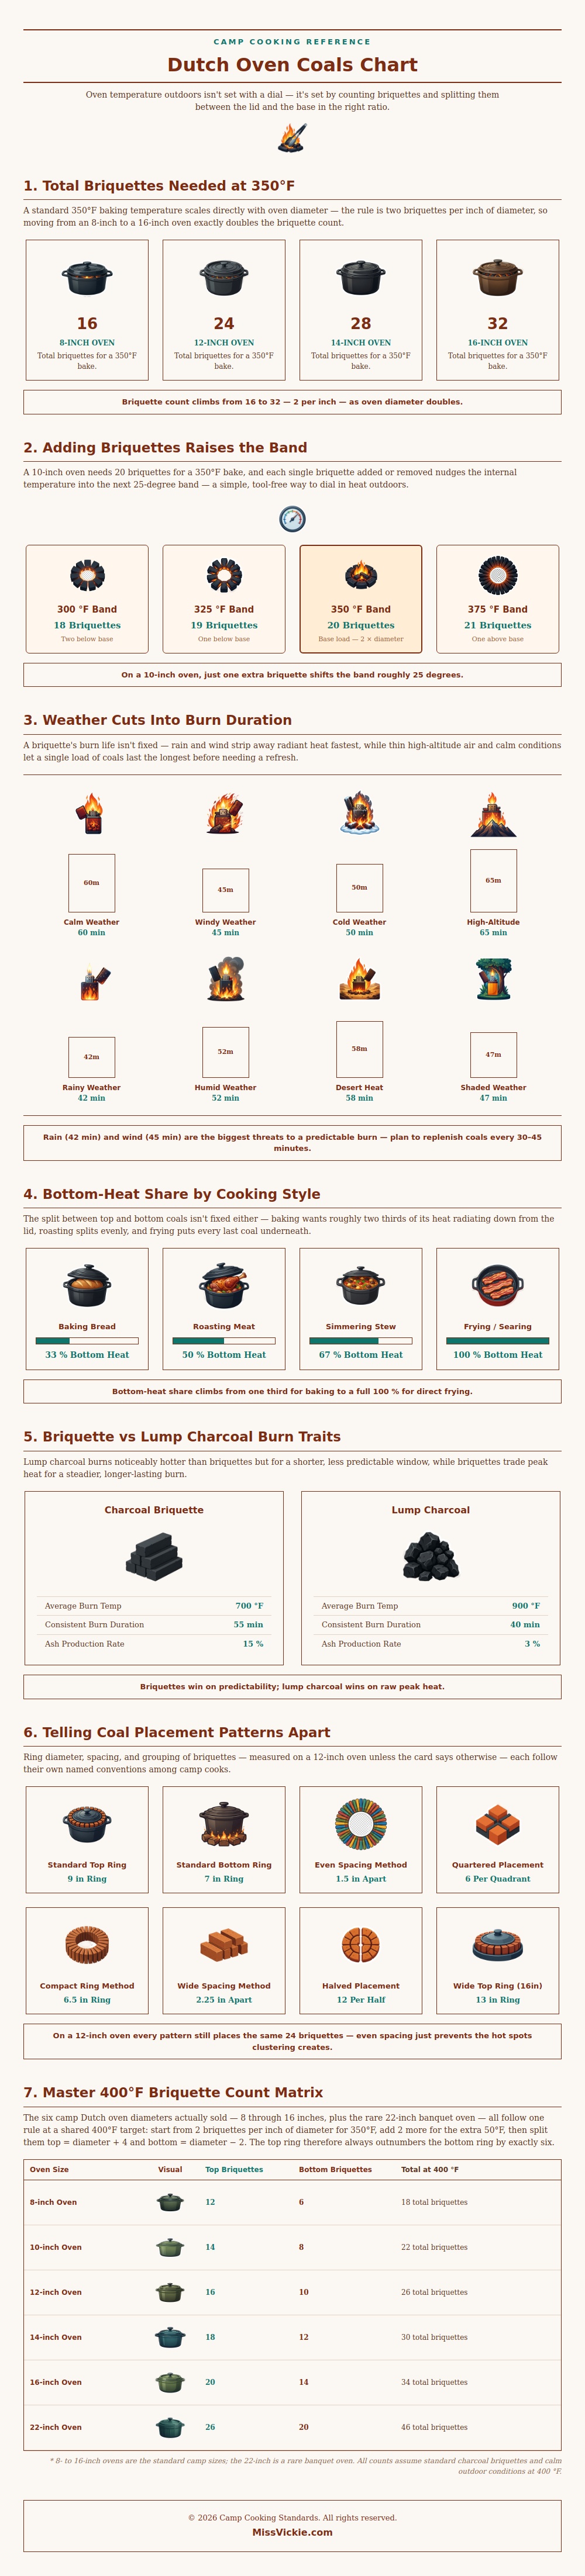
This chart tell you exactly how many briquettes are necessary depending on the size of the oven. It makes it a science rather than guessing game. The basic formula is this: Two briquettes per inch of the Dutch oven’s diameter will gets you to 350 degrees Fahrenheit, roughly what you’re looking for. (A linear relationship.) So, if you have an eight inch pan and want bigger surface area, say a sixteen, just double up on the briquettes. This is where the picture gets so helpful. You don’t have to second guess and risk burning things, or worse, having them turn out uncooked. There are no intuitions here, it’s geometry.
How to Master Your Campfire Oven
Now that you’ve got the base calculation, adjust as needed. For every briquette added or removed, you’ll gain or lose about twenty-five degrees inside. It is a small change but it still matters. Need it hotter? Pop another coal onto the pile. Is there too much scorch? Knock one off. Think of it like dialing-in heat manually.
Most novices mess up the placement: “Don’t dump all the coals under the pot and think it’s going to cook like an oven.” It cooks based off ratio of heat coming off the base versus the lid. For baking bread, which is mostly top heat, that means stacking more coals atop the pot. For roasting, which is roughly half-and-half (even), put an equal number of coals on each side. For frying, which is direct searing with all the heat beneath, every last coal goes under the pot. These ratios are clear in the infographic; a stew might require nearly as much heat from below as a roast, whereas a bread only wants a third of its heat from bottom. Get this right and you avoid rookie error of burning the bottom and leaving the top raw.
All this planning is weather dependent, too. Without any outside factors, a briquette doesn’t burn exactly x number of minutes. A brisk wind will take heat off quickly and reduce your burn duration to forty or even forty-five minutes. High altitude with no wind will allow you to get through a load almost up to an hour. That’s why I put those variables on the chart, to remind you that sunny days need different refill plan than rainy days. Plan ahead for how much heat will be lost before you mess up your dinner. If it’s nasty out, plan to replenish coals every half-hour; that’ll save the meal.
Take into account the fuel. If you’re new to this and just want some sure thing, then the briquette would of been your go-to, offering a steady, reliable flame, longer than any other type. Lump charcoal is less variable because it burns slower and cooler, and it produces less ash. And, as the numbers indicate, burning hotter (though quickly fading), whereas the briquettes reaches approximately seven-hundred degrees in about an hour and maintain that level of heat for nearly an hour longer. This predictability is something a novice prizes over the maximum temperature; you don’t need to guess when the pot will drop out of the three-hundred-fifty range during the hour or so needed for baking a loaf of bread.
There’s no mistaking it: when you finally figure it out, there’s satisfaction. No, you’re not just cooking food, you’ve created an environment. You moved the coals in place, calculated their number, and considered the direction of wind. Out pops the bread, light and crispy like you wanted it. It was worth learning the numbers. Now you don’t have to worry about the fire being unpredictable. It’s a tool. One you control.
How about your loaf of bread? It tastes all the better for having been made by you, actualy as you made it.