
Maybe you’ve been there. You’re standing at the counter with a glob of gooey dough on your fingers when you realize that not all your cookies is the same. Some are burnt around the edges, some raw in the center, others crisp. The culprit is rarely the recipe itself; it’s actualy the size of your scoop. No, it’s not necessarily the recipe: The problem is almost always the scoop size. Portion control is a single most important factor for determining bake time and controlling texture. Yet, most home cooks give it no thought whatsoever.
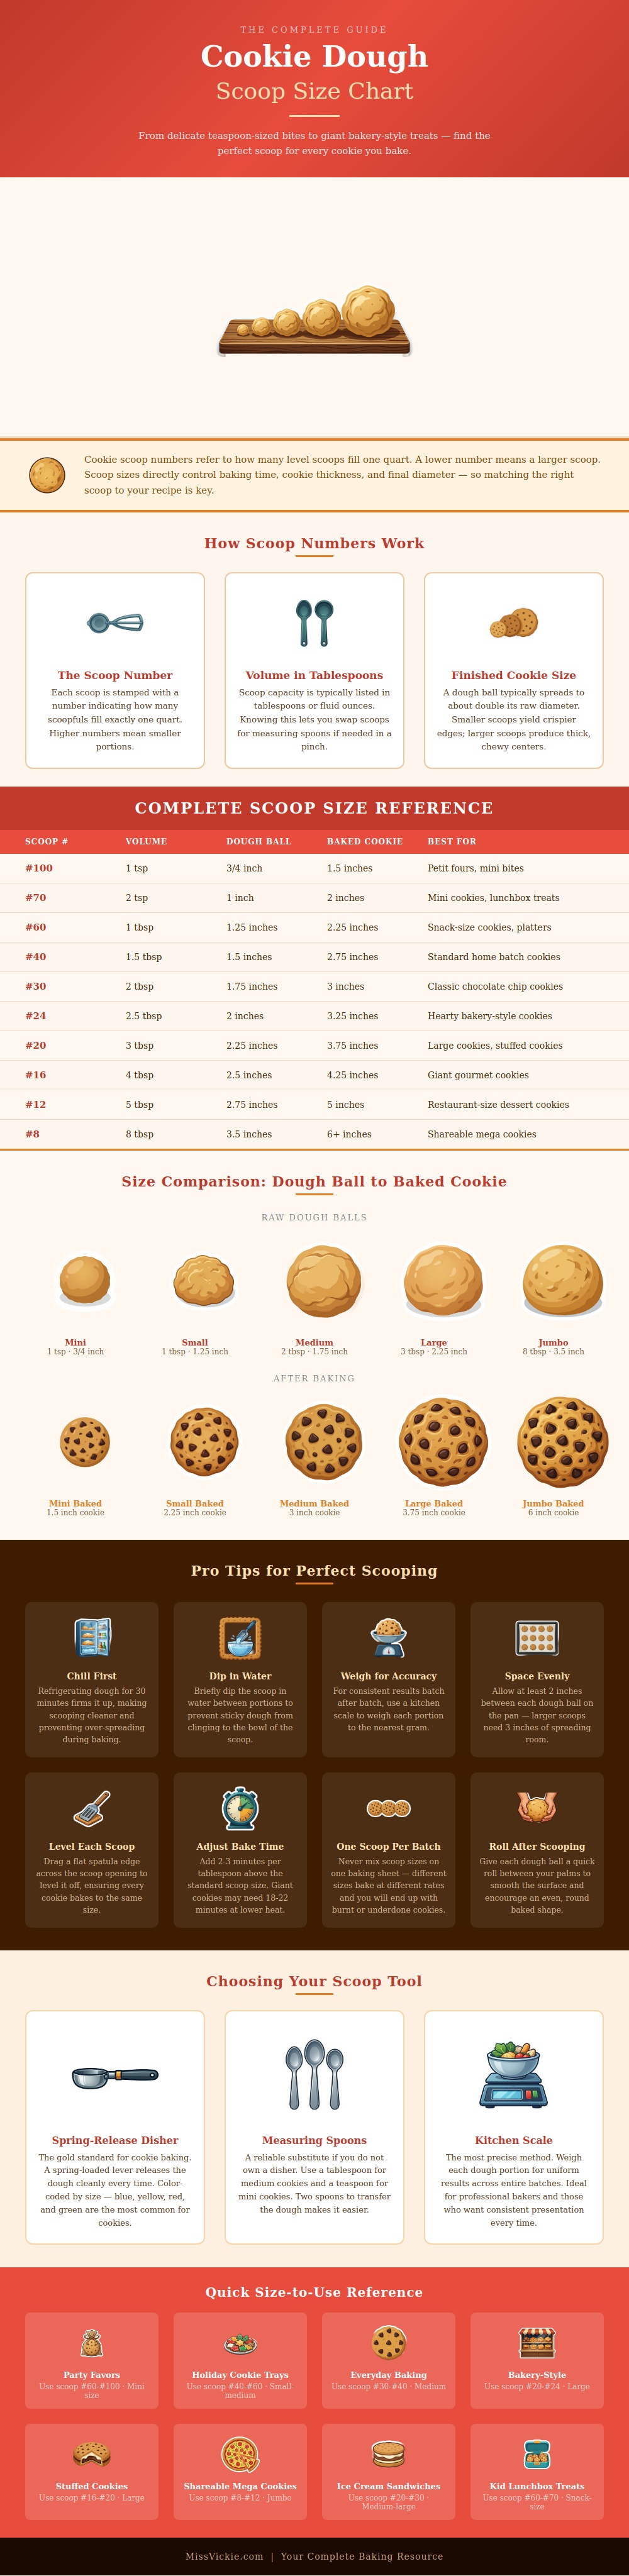
At first glance, scoop numbers can be counterintuitive. That’s why the infographic above explains scoop numbers. What does it mean? It means to look on your disher and see the number stamped on it. That is how many level scoops fits in a quart of volume. If you have a number hundred scoop, that is a very tiny scoop. If you have a size ten scoop, that is large. This reverse relationship leads to confusion. For large cookies, you want a smaller number. For small cookies, you want a large number.
Why Scoop Size Matters for Baking Cookies
This math will help you avoid guessing by measuring spoonfuls. It will also keep you from buying the wrong tool. Think about your desired texture. Smaller scoops has more surface area relative to their volume than bigger scoops, which means they bake faster and develop crispier edges, while larger scoops takes longer for heat to penetrate the center. This is why mini cookies are nice for those holiday platters requiring a solid bite.
Baking a larger scoop in an oven set at high temp results in burnt outsides before the insides is cooked through. Why? Because it takes time for heat to penetrate into the center. This results in a thick, gooey center that many find delicious. How do I know all this? Look at the chart (above). It illustrates the change in diameter from raw dough to baked cookie.
Spreading are unavoidable. Cold dough will help you get consistent results. The fat doesn’t melt as fast in the oven when it’s cold and allows structure time to set up before spreading out. If your dough is warm, it will spread very quickly even if you scoop it precisely, and the cookies will turn into flat discs instead. Refrigerate your dough at least a half hour before scooping. This will make the dough easier to handle because cold dough doesn’t stick to the scoop as much and it will also help the portions comes out consistent.
If you do not have a spring-loaded disher, use a measuring tablespoon (or two spoons) to spoon out even amounts into each cookie by pressing down firmly and then scraping the edge cleanly with the spoon until all the cookies is portioned evenly. The pros measure by weight on a kitchen scale for consistent results but that’s really slow. A scoop system also works great for weekend baking. Just remember to stay consistent in scoop size, per batch. Don’t mix different sizes on the same tray or small cookies will bake faster then large ones.
To prepare the scoops, level out each one before placing it onto the baking pan for the best appearance. Use a spatula to smooth out the tops of the dough ball; just drag across the surface to knock off any peaks. It sounds like nitpicking but it helps everything bake evenly and look more uniform. Also, space your cookies sufficiently apart. Leave enough room for them to spread. Crowding the pan result in a single sheet of merged cookie.
The point of baking is to control for variables, repeating your success. If you select the size of scoop that fits your ideal thickness, everything else falls into place. Chill the dough, adjust the time and believe in it. Before you turn the oven on next time, hold onto the tool before reaching for the scoop. And when that first batch emerges perfectly round, evenly browned, and exactly as thick as you intended, thank yourself for being patient and think about how much your future self would of appreciate this trick.