Blanching Kale Time Calculator
Estimate kale blanching time by variety, leaf maturity, chopped or whole leaves, stem removal, batch weight, boiling or steaming, altitude, ice bath strength, squeeze yield, freezer puck size, bitterness reduction, and final texture.
🥬Kale Blanching Presets
Choose a real kale scenario, then adjust variety, maturity, stem handling, weight, pot ratio, altitude, cooling, squeeze target, and freezer puck size.
⚖Kale, Pot, And Yield Inputs
Kale blanching plan
Adjust the inputs to calculate a batch-specific time.
Timing Breakdown
Yield Breakdown
📊Kale Variety Reference
Tender leaves wilt fast and usually need only a short blanch for same-day cooking.
Flat leaves soften evenly and turn silky without as much trapped water as curly kale.
Ruffled leaves hold air, so press them under water and time after the pot rebounds.
Slice stems thin or give them a head start before adding leaves to the pot.
⏱Reference Tables
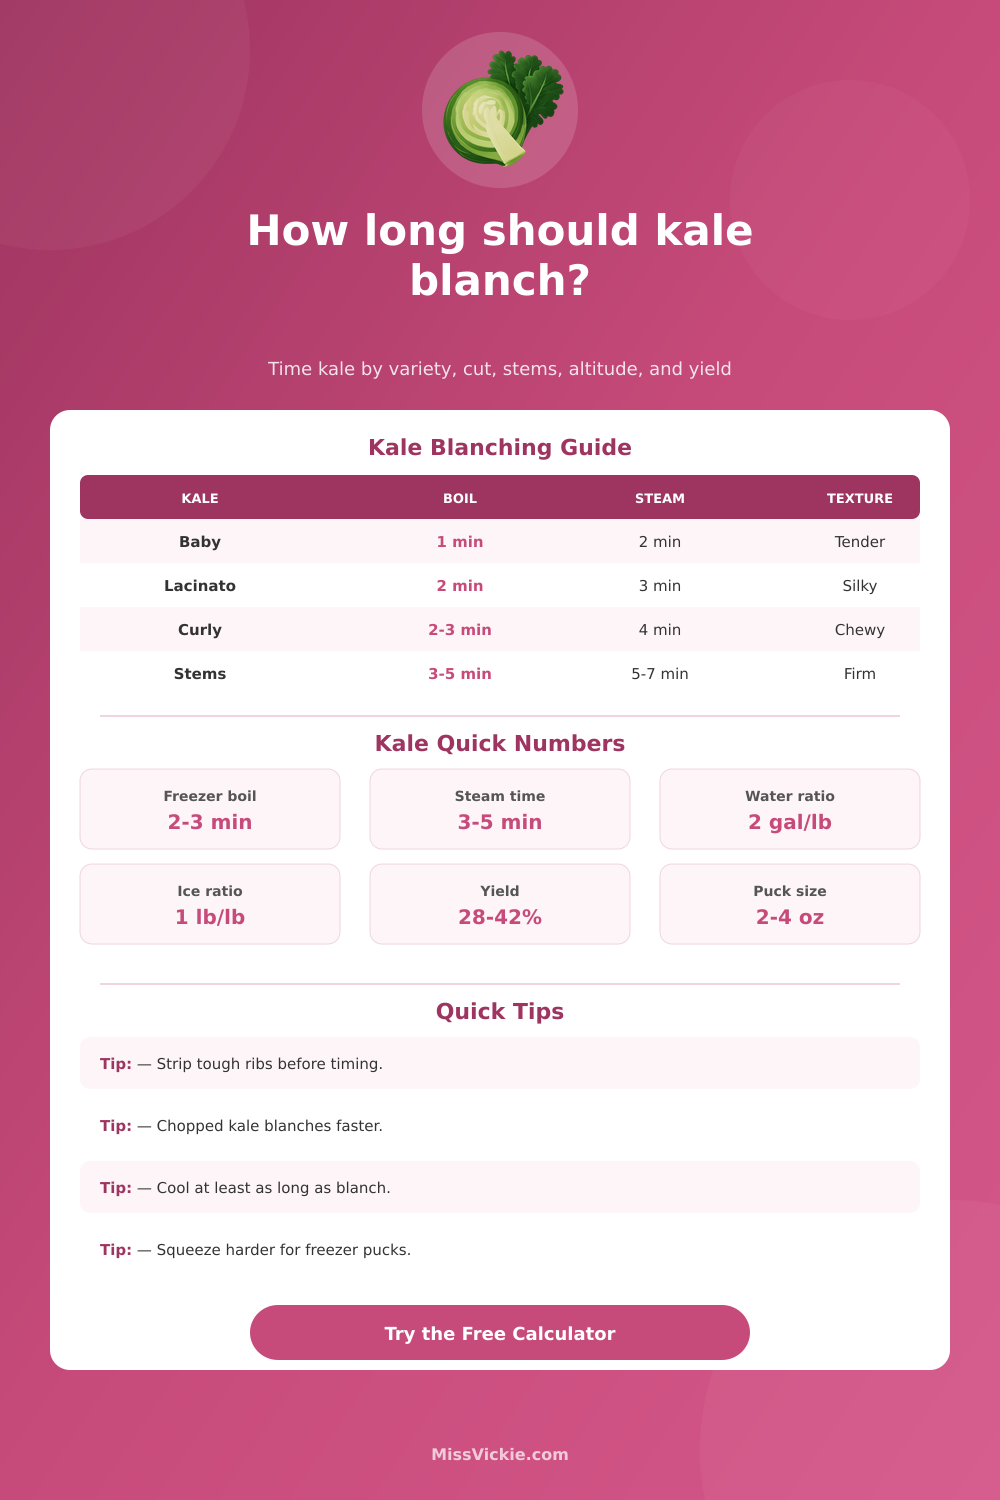
Use these kitchen references as chart-style anchors. The calculator adjusts them for cut size, maturity, stem handling, altitude, water volume, ice bath, and final use.
| Kale type | Leaf prep | Boil blanch | Steam blanch | Best use |
|---|---|---|---|---|
| Baby kale | Loose leaves | 45 sec to 1.5 min | 1.5 to 2.5 min | Saute, salad, pasta |
| Lacinato kale | Ribbons, ribs removed | 1.75 to 2.5 min | 3 to 4 min | Soup, beans, freezer bags |
| Curly kale | Chopped or torn leaves | 2 to 3 min | 4 to 5 min | Freezer storage, meal prep |
| Red Russian kale | Tender leaves, thin ribs | 1.5 to 2.25 min | 2.5 to 3.5 min | Side dish, quick freeze |
| Winter or mature kale | Large stripped leaves | 2.75 to 3.75 min | 4.5 to 6 min | Freezing, braises, soups |
| Kale stems | Thin sliced ribs | 3 to 5 min | 5 to 7 min | Chopped greens, soup base |
| Batch and pot condition | Kitchen target | Timing adjustment | Yield effect | Practical cue |
|---|---|---|---|---|
| 2 gal water per lb kale | Fast boil recovery | No extra time | Brightest color | Leaves move freely |
| 1 gal water per lb kale | Normal home pot | Add 10 to 20 sec | Slightly softer | Boil returns within 45 sec |
| Under 0.75 gal per lb | Crowded batch | Add 25 to 45 sec | More compression | Split batch if dull green |
| Steam basket, loose | Drier leaf surface | Add 1 to 2 min | Less water pickup | Steam must be vigorous |
| Altitude over 5000 ft | Lower boil temp | Add 15 to 45 sec | Similar yield | Use texture cue too |
| Delayed ice bath | Carryover heat | Subtract next batch time | Softer greens | Chill immediately |
| Drain target | Cooked yield from 1 lb raw | Good puck size | Storage use | Texture note |
|---|---|---|---|---|
| Wet drained | 6.5 to 7.5 oz | 4 to 6 oz | Soups and beans | Juicy, loose leaves |
| Light squeeze | 5.5 to 6.5 oz | 3 to 4 oz | Meal prep bowls | Tender but leafy |
| Firm squeeze | 4.5 to 5.5 oz | 2 to 3 oz | Freezer bags | Compact chopped greens |
| Hard squeeze | 3.5 to 4.5 oz | 1 to 2 oz | Smoothies and fillings | Dense pucks, less ice |
🧊Cooling, Texture, And Bitterness Cues
Kale should brighten first, then soften. Dull olive color means it stayed hot too long.
Leaves should fold without snapping but still show some structure unless pureeing.
Boiling water reduces bitter edge more than steam, especially for mature leaves.
Flatten bags or freeze pucks so kale chills and thaws quickly without icy clumps.
💡Kale Blanching Tips
Food safety note: blanching supports freezer quality, but it is not a sterilizing step. Keep cooked greens cold, drain cleanly, and freeze promptly in labeled portions.
A bunch of perfect-looking kale goes into the refrigerator drawer on day one, and by day four it’s become a slimy mystery. If you’ve ever attempted to store leafy greens without blanching, this has happened to you. By blanching (briefly boiling and then shocking in ice water), you deactivate enzymes that can absorbs these veggies to degrade in texture and lose color during frozen storage.
How long? It depends a lot. Too little time won’t preserve quality, and too much time makes everything taste like a boiled mess. Enter the calculator up top, which do the math for you when you enter what kind of kale you’re using, how you cut it, and at what altitude you live. No more winging it to see if “two minutes” should be “three” for your particular batch.
How to Blanch Kale Correctly
Not all kale is created equal when it comes to heat conduction. Lacinato (the flat leaves) move heat more evenly than the curled types, which create insulation through trapped air pockets within the leaf. Because of this, they take a little longer to reach the deeper cell structure of the inner leaf tissues. Boil them too long and these leaves get soft and go mushy, just as you would with those curly-leaf kale. This explains why the base time depends on the type you choose, as the tool does, with longer for the curled types.
Leaf maturity matter, too: Tender baby greens will cook down immediately. Thick winter-harvest leaves demand hearty treatment to overcome their fibrous toughness. The volume of water matters more then many home cooks know. A pound of kale dropped into two quarts of water lowers the water’s temperature considerably; it almost stops the blanching clock until boiling resumes. Start your timer when the bubbles resume and you’ll get the right results whether you use an eight-quart or a four-quart pot. That’s clear from the table of references on the page, which also makes it clear that if batches are crowded, they require an adjusting change in cooking times to make up for the lost heat. Aim always to have sufficient water so that leaves move freely during cooking; otherwise, they will steam themselves in their own released moisture, and not cook evenly.
If you like your greens dryer (and yes, steamed greens are a valid option), then steam is another possibility, though it’s important to note that steam isn’t as effective at getting into the leaf tissue as boiling water. One additional minute to two minutes, depending on the size of the leaves, is usually needed for blanching via steam instead of water. It doesn’t pull nutrients out of the leaves or keep them a nice green color, which might be a waste for some since you don’t use the cooking water. Boiling also tends to get rid of the bitter taste found in older leaves better by releasing the bitter-tasting compounds along with the steam. It all comes down to what you want in terms of texture versus taste in the finished meal.
To freeze successfully, there’s no way around it: There must be an ice bath. Even when you remove kale from the hot cooking water, its remaining heat will keep it going until it cools down on its own. Left to sit at room temp, the kale will get soggy and start discoloring. To quickly chill it, you have to have as much water as ice (by weight) in your bowl of cooling water. The sudden impact of the tough chill stops all enzyme activity. The result: Kale stays bright green, which is what gives frozen greens their fresh appearance months down the road. If the kale is not cooled well enough, it turns mealy and takes on dull olive tones. Defeating the point of being so careful with the blanching process.
The rest is in how tightly you can get rid of free water. Wet kale will have bigger ice crystals that damage cell walls when stored frozen, and it will take up more room, too. If you squeeze the leaves hard before making pucks or packing into bags, the denser portions will thaw faster for soups or smoothies. Yes, squeezing so hard makes the kale taste a little less bright right away. But in cooked preparations (less important to preserve exact moisture content), kale works better like this. The tighter the squeeze, the less freezer space you use, but there is no loss in nutrients.
The lower atmospheric pressure also reduces the boiling point of water. Water boils at a lower temperature if you’re living above five thousand feet in altitude. That means it takes longer to get it hot enough to deactive enzymes. Not accounting for this can mean that you under-blanche and run into freezer burn problems later on down the road. Adjusting for elevation ensures consistent results no matter what kitchen you find yourself in.
Freeze kale in thin layers for fast freezing so there is less ice crystal damage and less bruising of leaf tissue, and in manageable, flat shapes so you don’t have clumps to thaw. Just pull out as much as needed). Pucks of about 2 (4 oz). Are good for adding to soups and smoothies. Are large enough.
When you boil down blanching kale (pun intended), it’s not so much about when as how: how long? How hard? How hot? What does it feel like? Why? How do I adjust for my desired end use or the type of kale I’m using? The little changes most folks miss make all the difference between good preserved vegetables and great ones. Blanching kale properly transforms a delicate crop of summer gold into a dependable source of winter food. And it tastes fresh, not like something that got lost in the freezer. Stopping the cook just-in-time marks the beginning of this change.