MissVickie ham reheating planner
Ham Reheating Time Calculator
Estimate reheating time for whole ham, half ham, spiral ham, boneless ham, ham steaks, and slices using weight, bone style, oven temperature, starting temperature, foil cover, glaze timing, and target internal temperature.
🍖 Ham Reheating Presets
Choose a common ham situation, then adjust the exact weight, oven temperature, glaze timing, foil cover, and target temperature. This calculator is for cooked ham reheating, not raw fresh ham cooking.
🧮 Ham, Oven, Glaze, Foil, and Temperature Inputs
Ham reheating plan
Adjust the inputs to build a timing plan.
Timing Factors
Kitchen Plan
Step-by-step Reheat Plan
📌 Ham Reheating Quick Grid
Gentler heat helps sliced faces stay moist under tight foil.
Reliable for most whole, half, boneless, and picnic hams.
Common serving target for fully cooked packaged ham.
Use for leftover, repacked, or uncertain cooked ham.
📊 Ham Time, Foil, Glaze, and Target Tables
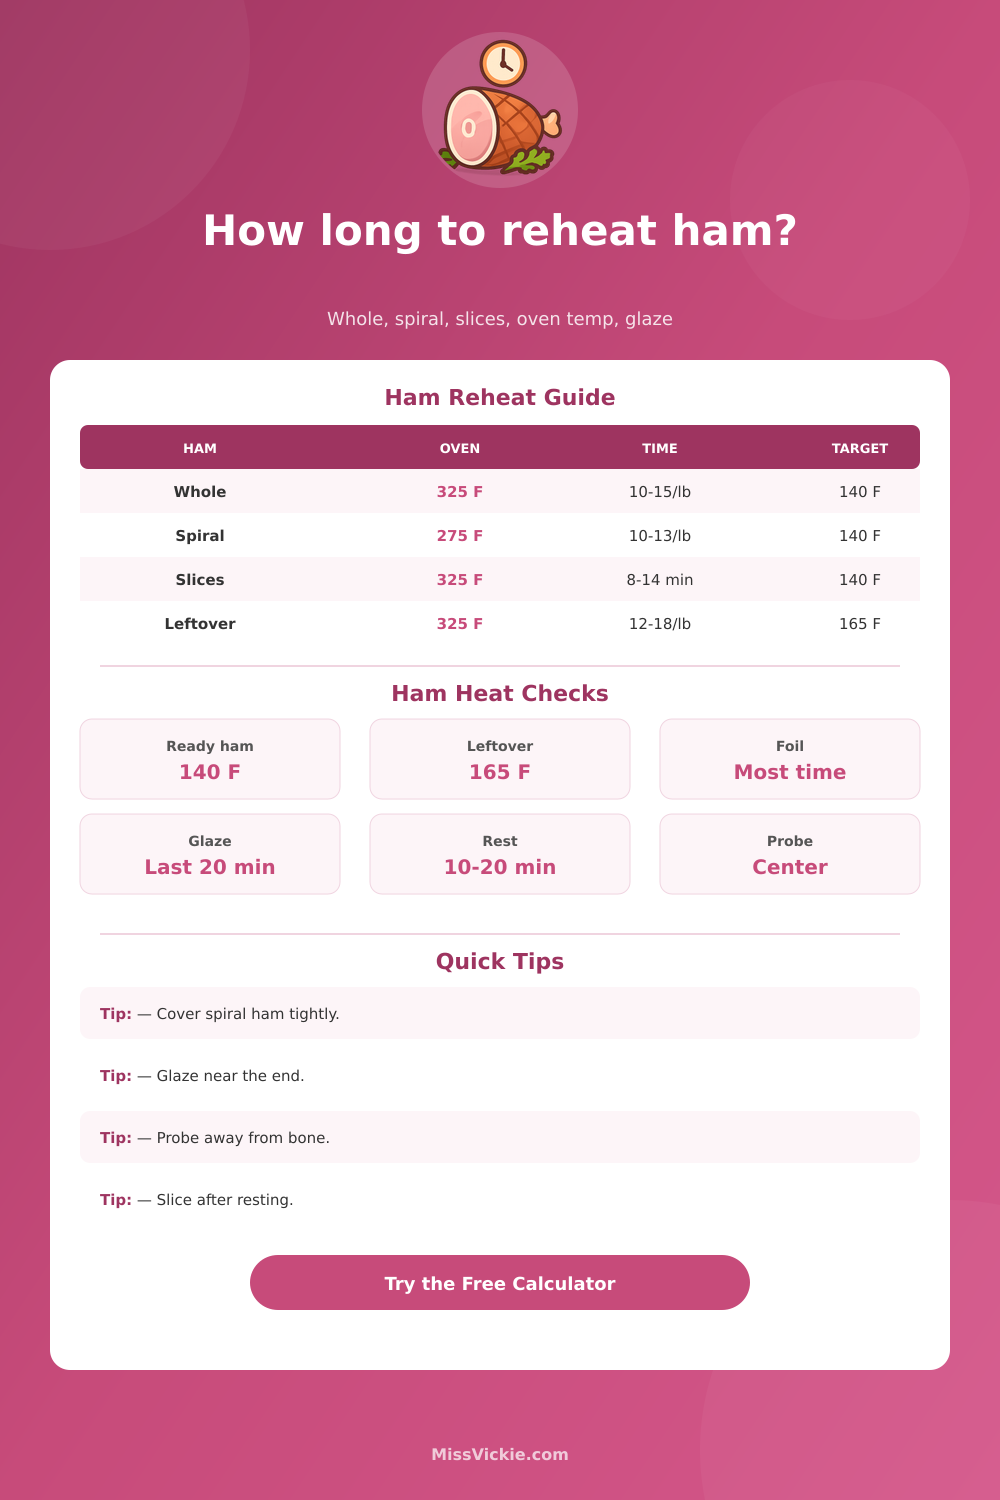
| Ham Style | Best Oven Range | Typical Time | Foil Plan | Best Probe Point |
|---|---|---|---|---|
| Whole bone-in ham | 300 to 325 F | 12 to 16 min per lb | Tight foil until glaze | Deep center beside bone |
| Half ham | 300 to 325 F | 10 to 15 min per lb | Tight foil on cut face | Thickest center, off bone |
| Spiral-sliced ham | 250 to 300 F | 10 to 13 min per lb | Very tight foil | Center of stack |
| Boneless ham roast | 300 to 350 F | 9 to 13 min per lb | Foil tent or cover | Middle of roast |
| Carved slices | 300 to 350 F | 8 to 18 min total | Covered shallow pan | Center of slice pile |
| Glaze Timing | Use For | Moisture Effect | Burn Risk | Calculator Behavior |
|---|---|---|---|---|
| No glaze | Plain ham, sandwiches, meal prep | Depends on foil and liquid | Low | No glaze window shown |
| Last 10 minutes | Small ham, slices, hot oven | Keeps sugar from drying surface | Low to medium | Sets late brush reminder |
| Last 20 minutes | Most whole or half hams | Good shine without long exposure | Medium | Default glaze window |
| Last 30 minutes | Large ham at gentle oven temp | Thicker sticky finish | Medium to high | Adds extra uncovered time |
| Glaze from start | Low sugar or savory coating | Can darken edges early | High | Adds caution and early checks |
| Start Temp | What It Means | Time Change | Texture Note | Kitchen Action |
|---|---|---|---|---|
| Briefly tempered | Out less than 30 minutes | Shorter | Edges warm sooner | Start checking early |
| Refrigerated | About 40 F | Baseline | Best planning assumption | Use normal foil timing |
| Very cold fridge | 34 to 36 F | Longer | Center lags behind surface | Add one extra probe check |
| Partly frozen | Ice crystals or firm center | Much longer | Uneven heating likely | Thaw first when possible |
| Frozen cooked ham | Frozen solid or nearly solid | Longest | Dry edges before center warms | Thaw before reheating |
| Target Temperature | When To Use | Best Ham Types | Probe Location | Serving Note |
|---|---|---|---|---|
| 140 F / 60 C | Fully cooked packaged ham | Whole, half, spiral, boneless | Coolest thick center | Moistest reheated result |
| 145 F / 63 C | Hotter table service | Bone-in or boneless roast | Center, away from bone | Still fairly juicy |
| 150 F / 66 C | Very hot slices or buffet | Carved ham and steaks | Middle of stack | Watch for drying |
| 165 F / 74 C | Leftovers or unknown source | Repacked, stored, or leftover ham | Coolest point after rest | Prioritize thermometer check |
The tables are planning guides. Brand, water content, pan material, slice depth, and oven accuracy can change real timing.
⚖ Ham Method Comparison Grid
Best for spiral-sliced ham because tight foil and gentle heat protect the exposed cut surfaces.
Works for most whole, half, picnic, and boneless hams with a predictable glaze window.
Carved slices or steaks heat quickly in a covered shallow pan with a splash of liquid.
Brush glaze near the end, then uncover so the surface sets without burning the sugar.
💡 Reheating Tips
Imagine this: you’ve got a ham sitting in the refrigerator. You’re anxious because now that you’ve taken it out, you need to get it up to serving temperature. The problem is that it’s already fully cooked; so what you’re doing is just heating it up. But how do you bridge the distance between refrigerator temperature and serving temperature? Let it sit in a hot oven long enough and it gets all dried out and tough, yank it out before it’s ready and there’s still ice in the middle. What you want to do is gently manage its thermal state.
You don’t want to overcook it by letting it heat too long (too much heat will drive moisture off those exposed surfaces). You don’t want to under-cook it by taking it out prematurly. More than memorizing some general rule, you need to understand these factors.
How to Reheat Ham Without Drying It Out
All ham are not created equal. How it’s cut matters; it affects the physics. Whole bone-in roasts will be slow to heat up due to the layer on their outside. Spiral hams is a different beast, each slice of meat is bathed in air. Be careful or they’ll dry out quickley.
Once you input the type and weight into this handy-dandy calculator, it do the math for you. No need to guess how much extra time to add for just the outer exposed area. Just put in the number and let the tool calculates the added cooking time for you. While you don’t need to understand exactly what thermal conductivity means when applied to cured pork, you should of been aware that spiral hams need some care.
You can’t rush it: Cranking the heat will be your greatest temptation; turning that dial to four hundred degrees F seems like the solution, right? Wrong. That’ll cook the outside before heating through the middle. Low and slow is the only reliable strategy here. For most conventional reheat jobs, three hundred twenty-five degrees F are ideal. By cooking slowly, you don’t boil the exterior juices out immediately, but still get the heat to penetrate to the thickest part of meat. If you’re reheating a spiral ham, drop the temp down to two hundred seventy-five degrees. The calculator takes into account whatever temp you select and tells you how long it will take. Don’t worry, it won’t make you wait too long if you want to go easy on it.
The ham needs moisture to be good. And once it’s gone, it’s gone. For most of its time in the oven, the ham need to be wrapped tightly with foil. Why? The foil creates a hot and consistent environment while trapping the water inside. Only remove the foil just before you want to finish cooking, or add the glaze.
Glazes burns fast in the oven. They need timing. If you apply honey and brown sugar at the beginning, the outside will burn long before the middle is warm. That’s where the tool comes in, helping to plot when you can open up the ham and have the glaze caramelize without burning. It changes how it look at the end.
Use a temperature probe (and be aware: if you’re cooking bone-in cuts, the bone will read too high; it’s an insulator). Don’t let the thermometer touch bone (it’ll read higher then what you want). The temperature should be taken in the muscle meat close to the bone. Also, don’t forget to take it out of the oven and set it aside to rest. Why? This allows the juices to redistribute within the fibers, otherwise they will run all over the cutting board when you attempt to slice up the ham.
Ham reheating is less about how it cooks, as much as it’s about letting things happen (and being patient). It’s transferring heat into a dense thing that don’t like to change temperature. Letting time do its thing helps. It also helps to understand meat densities, cover the ham to keep the moisture in and avoid burning it. That thermometer tells you what the meat is doing; the phone’s timer is just a hint.
Let the warmth sneak up on it. Don’t burn it. And don’t worry if it’s still moist. The probe will tell you when it’s done. The juice stays inside, and everybody gets their ham nice and hot.