
By paying close attention to time and temperatures, anyone has the power to change an otherwise disastrous kitchen experiment into actual impressive dish. A pork chop goes from “oh boy I think I’m doing something right here” to “oh no” in a matter of seconds, seconds which can be spent staring at a ringing phone or watching skillet full of sizzle. Pork chops gets pulled off the heat when you feel as if they’ve had enough; you cut them open expecting tender deliciousness and instead see cardboard with seasoning on it.
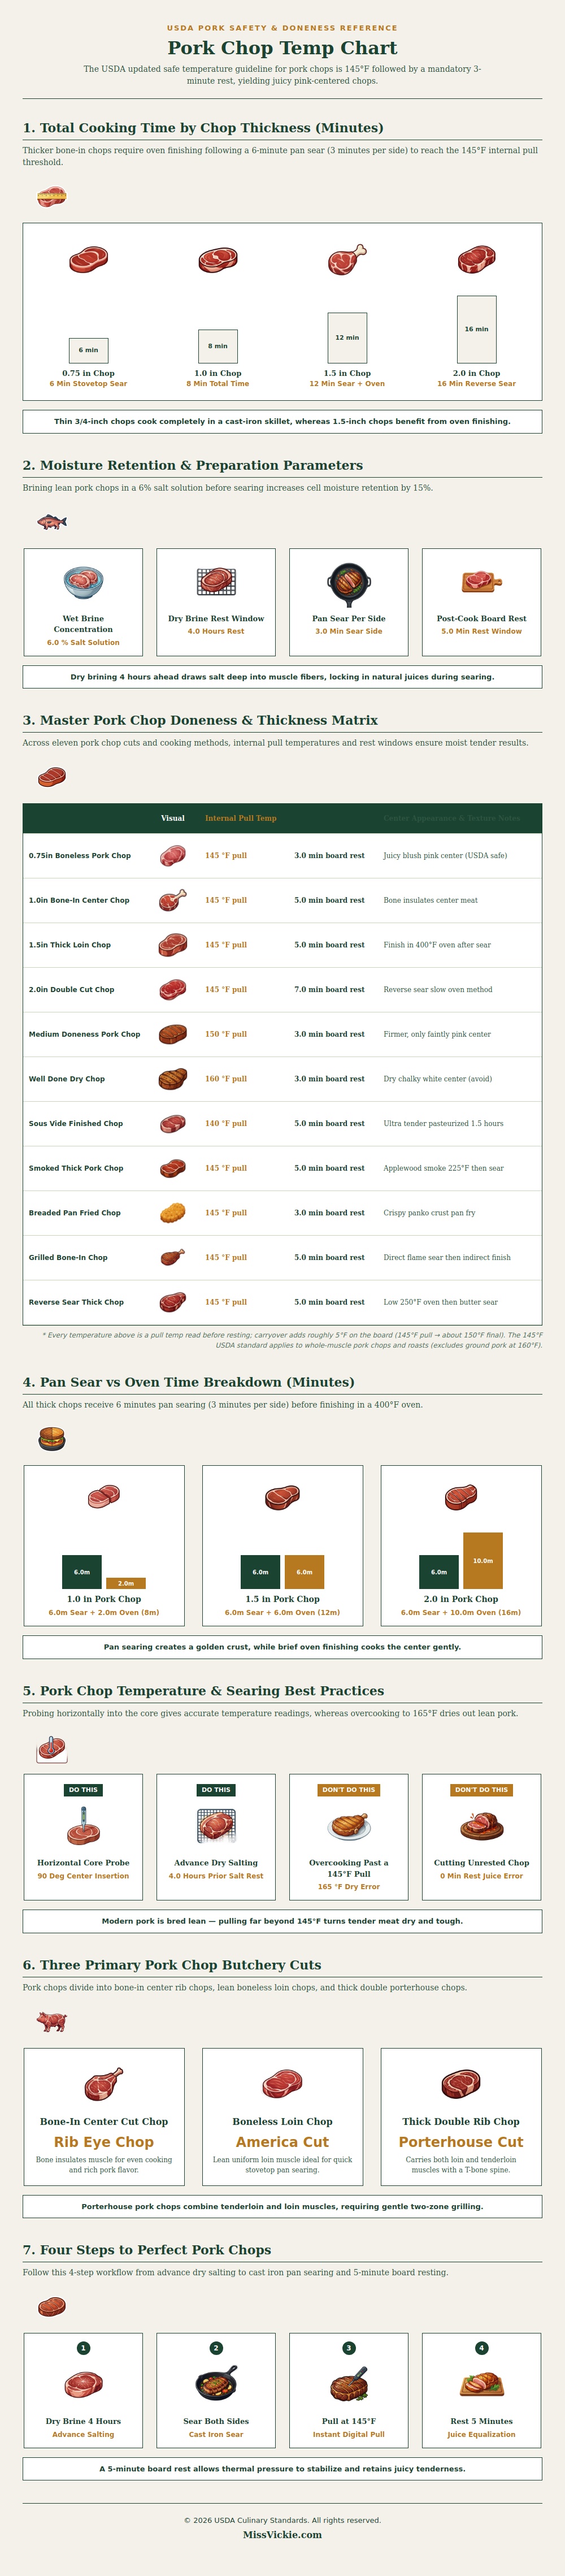
It’s not inevitable! It’s almost always due to impatience with letting your meat rest and some confusion over how long and how hot things need to cook. The image above explain exactly how to ensure you don’t make this cooking mistake.
How to Cook Perfect Pork Chops
People now accept pink as the new normal for pork. This is perhaps most significant change in recent pork cooking. A generation ago, we were all instructed to ensure pork reached a grayed-out state at every point from snout to tail which left us with meat that was dry and unsavory. Now we know that whole-muscle cuts is safely cooked to an internal temperature of 145 degrees Fahrenheit if they’re allowed to rest for three minutes off the heat.
What does this mean? It means we can enjoy juicy pork chops with a pink center, still moist inside. Why wait those three minutes? Because during that time, muscle fibers relaxes and pull the juices that have migrated toward the surface back into place. Don’t cut into your chop too soon; drain the pan but don’t drain your plate.
When it comes time to cook these chops, the thickness of your cut is important (more so than you’d expect). If they are only an inch or three-quarters of an inch thick, you could go all out on the stovetop. Just a couple minutes of searing should do the trick and they will have reached the right internal temperature. But if you’re working with thicker chops, say about two inches thick, that’s another story. If you seared them as they were for long enough to actually cook through, you’d scorch the outside well before reaching proper doneness on the inside.
To get them cooked to temperature without burning outer surface, we need to take a half-and-half strategy: First we form a nice crust over high heat in hot skillet, and then transfer them to oven to finish cooking at a gentler pace. That way, the exterior remains crispy but the inside gets cooked slowly and evenly.
The preparations start well in advance of applying the heat. Pork these days is far leaner than what we are used to, resulting in less built-in fat to help ensure juiciness throughout the cooking process. Many cooks has adapted by adopting the practice of “dry brining” their pork, which means seasoning the chops with salt a few hours before cooking. The salt then permeates the muscle fibers and assists in keeping the meat’s own juices locked in while being cooked. This may seem like a minor detail, but it makes a huge difference in the finished product. Much the same effect can also be achieved through wet brining (in a salty solution), but dry brining is easier and doesn’t require any additional appliances aside from some time and a plate.
How done? Everyone has different preferences, but there’s a limit to doneness. USDA says it’s safe when pork reaches 145 degrees, but many people like their pork just barely shy of well-done, pulled from the heat at 150 degrees. At this point, you’ll still see just a trace of color in the center and it will be firm. Beyond that, say 160 degrees (or even higher), you’re likely into dry, chalky territory, tough to make tender. Finding the balance between safety and enjoyment is the challenge. A trusty instant-read thermometer is your friend here, you can’t go wrong. Anything else is guesswork, which means overcooked meat, particularly on leaner cuts with little room for error.
Another factor that determines how you’ll cook it is the cut of pork. Because the bone retains some heat and insulates the meat from it, thicker cuts like bone-in chops will take a bit longer than thinner ones (boneless loin chops). Bonus: this allows you more time to build up that nice crust before they’re done in the middle. If you want dinner on the table fast, boneless loin chops is more even and quicker. Porterhouse chops, which contain both the loin and the tenderloin, need special care because the two parts cook at slightly different paces. Knowing your cut’s anatomy will help you tailor not only your technique but your expectations as well.
There’s no fancy technique to mastering pork chops; just some respect for the scientific process of cooking with protein and heat. Let the protein rest after it comes out of pan, pull it when it’s done, and give those juices a chance to settle back into place. And voilà! Tender. Juicy. Pink-in-the-middle goodness. A tiny culinary triumph, sure, but it rounds out dish like nothing else. The next time you pick up a pork chop, recall: Patience is the key ingredient here.