
A raw standing rib roast might make you panic. It’s on the table. It’s the star of the show. And it’s going to cost you. Oh, and there’s the whole business of cooking it so that it doesn’t overcook.
Those cuts of meat is only part of equation, and you’re supposed to pull the meat out before its internal temp reaches target. But who pulls it out too soon? How soon is more than too soon? Then comes sitting time before serving. How much sitting time, exactly?
How to Cook a Perfect Roast
The uncertainty of how long to let it sit are what turns a potential showstopper into a dry, gray dissapointment. Too much, and you’ll have an inedible gray disappointment. But the cooking doesn’t stop when the roast leaves the oven. In fact, the biggest change in temperature occur after it comes out of the oven and sits on your cutting board.
A roast has so much heat stored in it. A big seven-bone roast like this are no different. Its outer part will be hotter then its center, and that heat will move inward. When you remove meat at the right temperature to serve, there’ll still be some carryover cooking, which will send it past well-done. You need to factor in that increase.
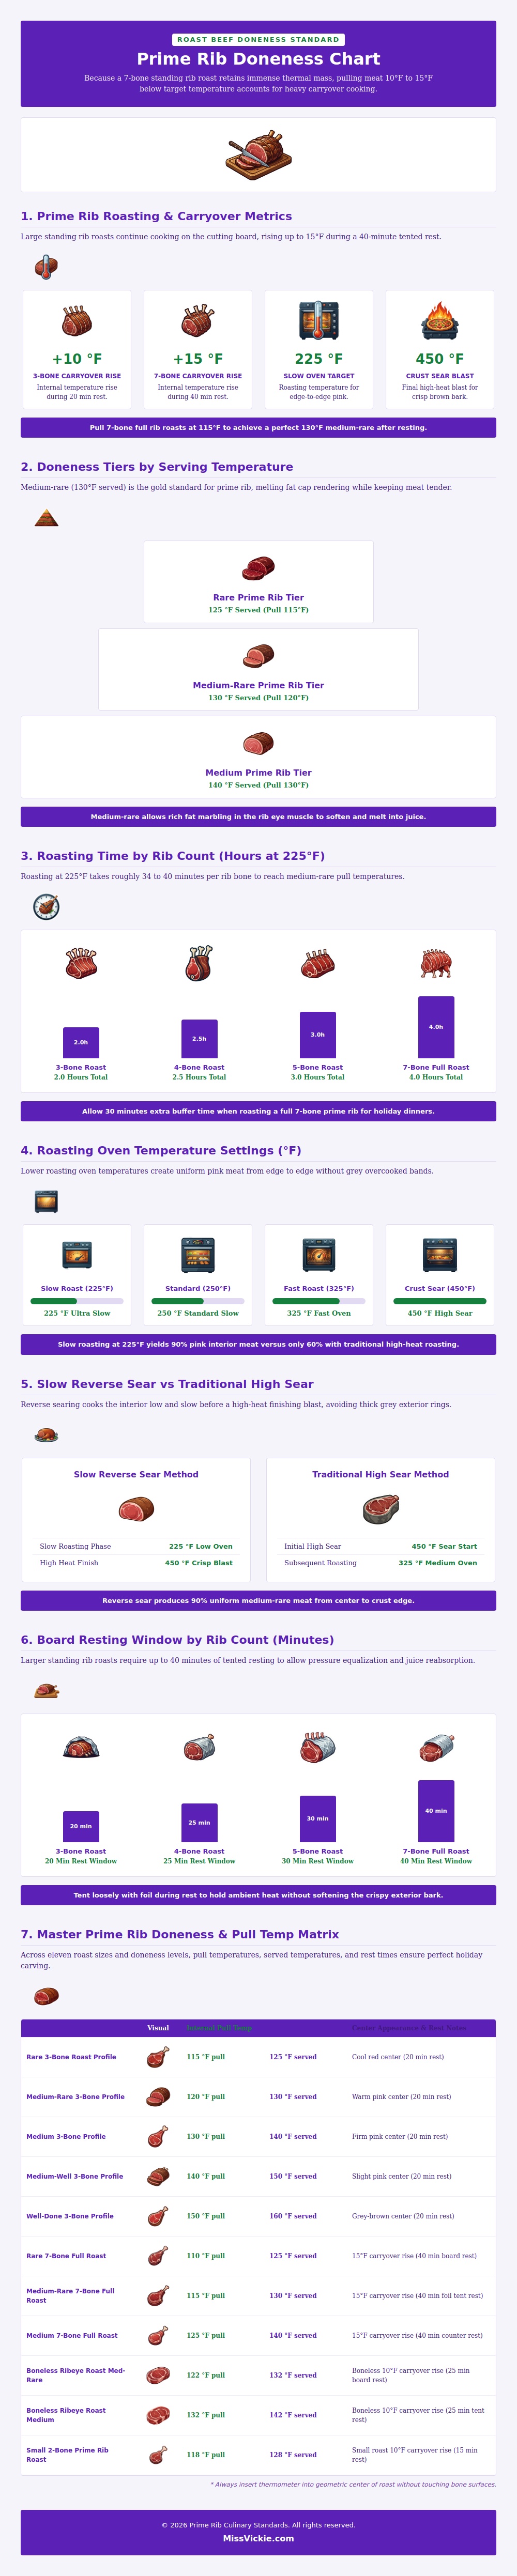
Left to rest properly, the internal temperature rise fifteen degrees or so. That makes all the difference between a juicy medium-rare and a chewy medium. As the infographic demonstrates, with a big roast you’ll want to pull it off 15-degrees shy of your finished temp. That’s because the beast will continue to cook a lot during its tented time under foil.
With a smaller roast (such as a three-bone) the temperature doesn’t go up as much. It only rises about ten degrees so you don’t need to pull it off quite as early. Pulling a small cut too soon mean the middle will be underdone.
And then it gets interesting… the chart plots all those levels of doneness against corresponding rest times per roast size. No more guessing. Follow the number: how many bones? what level of doneness are you looking for?
Many cooks try to speed this up by cranking the oven to a high heat, thinking a faster cook means better results. In their minds, if it’s fast, it must be good. Unfortunately, it isn’t. High heat result in a wide band of overcooked meat just under the crust. You’re stuck with a small area of perfectly cooked meat in the middle.
Cooking slowly at about two hundred twenty-five degrees allow the heat to penetrate equally throughout. The end result is that you have a perfect, even pink interior (edge to edge). It has a nice brown crust without compromising the tender meat inside. Because it’s such a dense cut, going slow and low respects its nature.
Once the roast comes out of the oven, there’s no rest for the wicked: It takes time for the inside to cool down and reach the same temperature as the outside, and also for its juices to re-distribute. Slice early, and those tasty juices will flow away from the roast to the cutting board rather than remaining within the meat itself.
As the chart shows, a whole seven-bone roast must rest for forty minutes. Loosely tent the meat with foil to keep it warm while keeping the crust crisp. This logic hold true in the reverse sear method as well. Begin with a low slow roast, bringing the inside up to temperature, and end with a quick blast at higher heat to crisp up the outside.
You would of had no more thick gray bands from traditional high-heat roasts. It’s forgiving and consistent. Instead of fighting the thickness of the roast, you’re now working based off it. Physics and patience are key to prime rib.
Trusting your thermometer and understanding the concept of carryover cooking are vital. Follow the chart. Your goals is exact. Let it all happen. Wait until the rest is done. And then you’ll be rewarded with a perfect, tender, juicy slab of pink perfection. It’s worth it.