
When looking at a raw piece of beef tenderloin, knowing that your friends will be over within forty-five minutes, you might start to panic. This thing is an investment! And it’s lean! Why? Because it’s tender, but the reason it’s tender is because it’s lean, which means that if you screw it up…well, it’s screwed.
Whether or not you’ve seasoned it correctly, whether or not you’re a good knife-slicer, doesn’t matter. The whole equation come down to managing temperature; and here’s exactly how to do it: The biggest takeaway is carryover cooking.
How to Cook Beef Tenderloin
As the name implies, this means the temperature of meat will keep rising even though it isn’t on stove or in oven anymore. Because tenderloin is such a lean cut of beef and lacks fat found in other cuts, it will immediately react to changes in temperature. So if you take roast off as soon as thermometer hits your desired doneness level, you’re already too late.
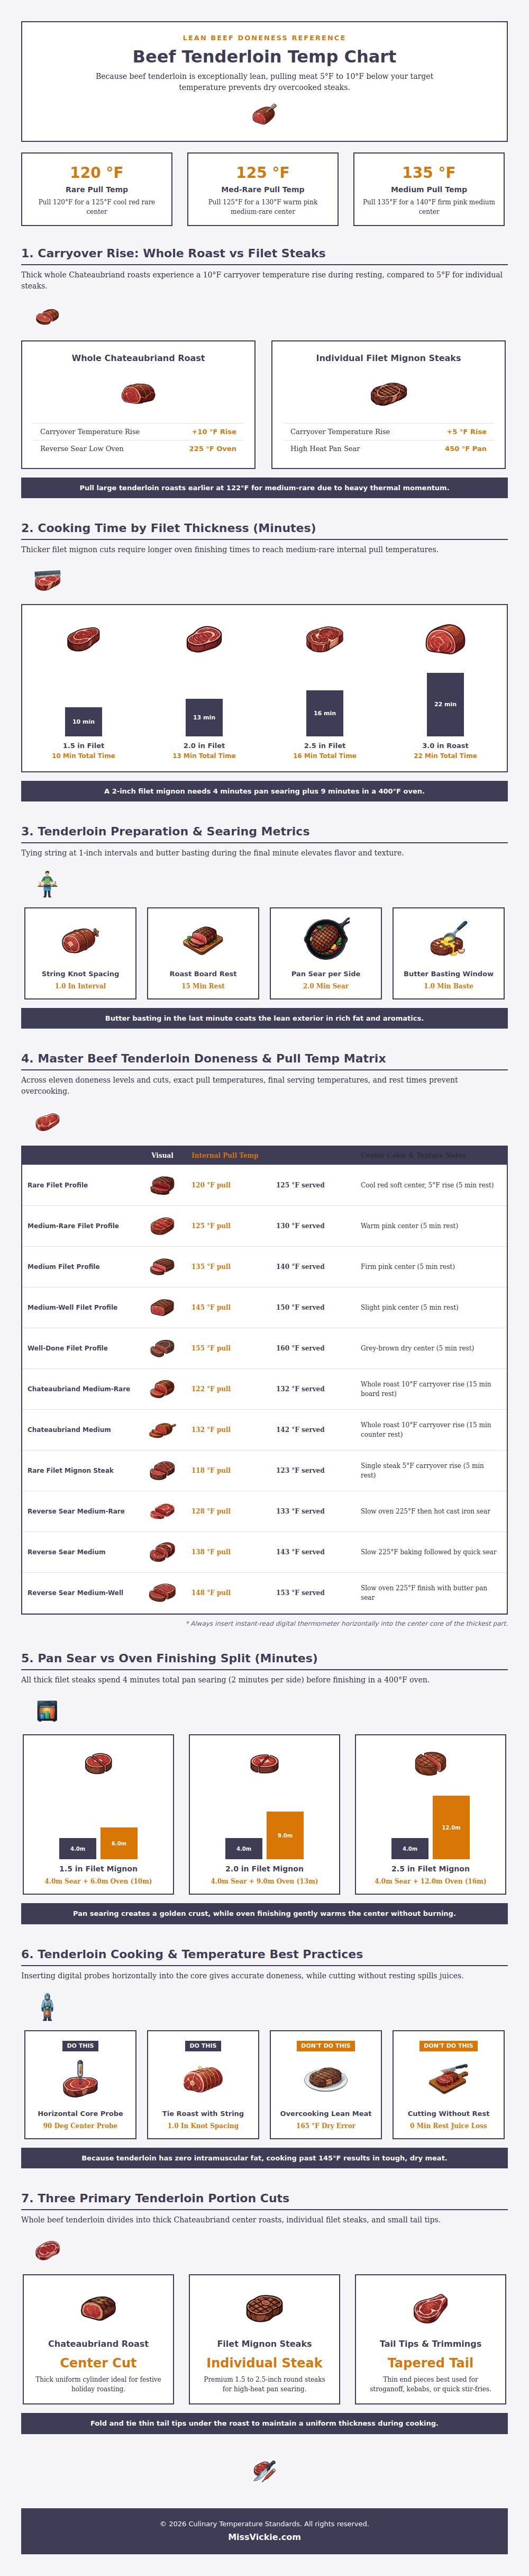
The chart shows that you should of take it out 5-10 degrees shy of whatever temperature you’d like it to be. That gives proteins time to relax and let the remaining heat finish the job. It is a small difference that has big impact on the texture.
There’s one other factor: What size piece of beef are you working with? Obviously, a huge roast like a Chateaubriand will hold much more heat compared to thin steak like a filet mignon. According to the infographic, an entire, large roast can increase ten degrees while resting, while most steaks will only rise five. When you remove it from oven, this makes a difference.
Are you roasting up a big ol’ cylinder as part of your holiday feast? Because there is so much heat staying in such a heavy piece, you’ll want to plan ahead. Pulling a whole roast at medium-rare might require removing it when it reads 122 degrees Fahrenheit on your thermometer. This allows it to continue cooking until it hits 132 degrees.
Steaks is different… You have a smaller rise and a narrower window to work with. Temperature’s only half of the equation; timing matters, too. For thicker cuts, it needs to be a hybrid: some high-heat, some lower.
To get the Maillard reaction, flavor compounds created via browning, you need to go high-temp, but if you do that alone you burn the outsides (no good!). The answer, according to the data, is what I call the Seer-and-Bake method: Sear first, then shift it to the oven.
For example, a two-inch filet goes into a hot pan for only four minutes total. The two sides together, then into a 400-degree oven. That way, the outside gets browned fast and the inside gently, evenly warmed all the way through. You will have no more gray band of overdone meat at the center which ruins otherwise properly seared steaks cooked completely on stovetop.
The finishing touches, which might look like nothing, makes all the difference. The kitchen string tied around the roast, spaced inch apart, holds its cylindrical form. If you don’t do this, you’ll be wasting meat by overcooking thinner ends while leaving the thickest part undercooked and raw.
In the last minute of cooking, butter basting enriches the otherwise lean exterior, making up for what the interior lacks in fat. These aren’t artistic decisions. Rather, they’re practical actions that preserve the integrity of the cut.
But you gotta rest it! If you cut into a cooked tenderloin right away, you’ll find the juices drained off the cutting board and onto the plate…leaving you with some pretty dry meat. Rest times depend on roast size, but for a whole roasted tenderloin, expect it to rest on the cutting board for as long as fifteen minutes before carving.
Why? Because while the meat rests, those juices has time to circulate back into the fibers. It makes all the difference between having a satisfying meal and something that leaves you feeling like you just ate too fast.
Trust the thermometer. Respect the rest period. Let the carryover heat do its thing. That’s what keeps your roast so tender and the center still pink.