
At some point (typically after your 3rd cook), you’ll have one of those moments as a first-time grill owner: the grill’s clean, the meat’s marinating, you’re ready to whip up something decent for the fam. The steaks come out and go onto the grill. Within seconds, they’re stuck to the metal. So you scrape them free, destroying their appearance, and now you’ve got a slate-grey, tough-as-nails dinner to serve. What happened? Your seasoning wasn’t it. Chances are, it had nothing to do with seasoning at all; it was your lack of temperature management.
When it comes to grilling, there is much more to heat than meets the eye; once you understand this difference, however, it’ll change everything. See below for our breakdown of what preheat time, chamber gradients, and surface heat mean in practice. This will help you get real-time control over your grilling process.
Mastering Grill Temperature
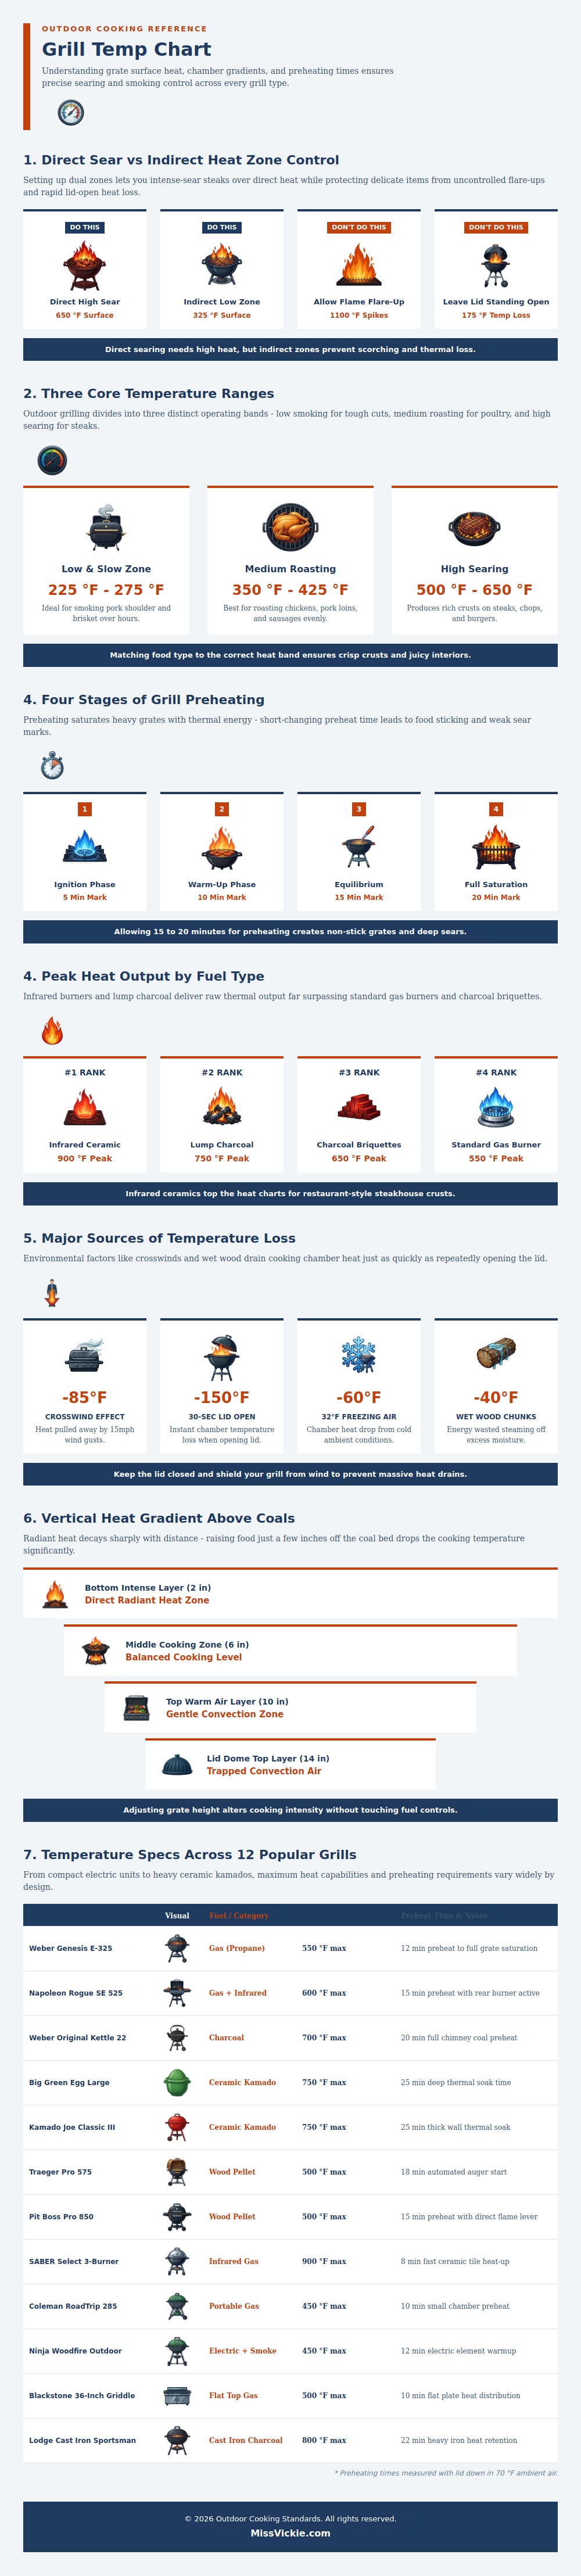
When you first start grilling, most of us think we can just set the dial on the grill and cook at that exact number. We assume everything cooks uniformly once it hits 400 degrees. It doesn’t. As infographic shows, your grill operates in three different bands that tell you how it affects your food.
There is low and slow land, which is between two-hundred twenty-five and two-hundred seventy-five degrees, where meaty cuts such as briskets gets soft over time for several hours. There is medium roasting land, from about two-hundred seventy-five to three-hundred fifty degrees, which is where pork loins and whole chickens comes in, and they need to reach done without blackening the skin. And then there is high sear zone, over five-hundred degrees, which is only good for getting that Maillard reaction crust on your chops and burgers. If you mix all of this stuff up, well, that’s why so many people burn the outsides of things but still leave them raw in the middle. Match the food to the heat, don’t just guess.
The biggest thing they miss by rushing is the preheat. They spend big bucks on nice grills, then they hurry through the pre-heat stage (as shown in the chart), and their food sticks. Most of us will turn on the burner, let it roar for five minutes, assume we’re good to go, and drop our meat on the grates. Uh-uh. It’s going to take fifteen or twenty minutes before metal grates really soak up the heat, then the heat immediately transmits to your meat instead of dissipating to the iron underneath. What happens if you do that? It sticks.
What can I say? It’s psychology more than anything else. The trick is mostly psychological because we hate waiting, but those extra minutes prevents a ruined dinner. But you’ll thank me later when you don’t screw up dinner.
It’s not just about how much heat you have, though; it’s also about where that heat comes from. The type of fuel you use makes all the difference in the world when it comes to output. Lump charcoal and infrared ceramic grills provides raw thermal power, giving you much more heat then standard gas models. When you’re after that steakhouse-level crust, you need something capable of reaching those high temps. Standard gas grills max out at roughly five hundred and fifty degrees (good enough for burgers but not ideal on a thick ribeye). Charcoal, on the other hand, can reach beyond seven hundred fifty degrees, allowing for a fast and hard sear followed by no overcooked insides. Understanding what your fuel can do will determine if you should invest in new grill or simply lower your expectations.
But all that planning won’t mean a thing without some consideration for environmental factors. The enemy of consistent heat is wind. It doesn’t take long for a gentle breeze to rob degrees from your cooking chamber and force your fire go to work extra hard just to keep up. Worse yet: open the lid. A quick peek at dinner will cause your cooking chamber to lose more than a hundred and fifty degrees in just seconds, completely resetting the clock on your cook time. Just close the lid and trust the timer.
Speaking of lids, when cooking with wood for smoke, be sure to use seasoned wood. Burning wood creates heat, but wet wood uses the energy necessary to steam the moisture out. This cools down the fire. It lowers your chamber temperature and introduces unneeded water vapor into what you’re cooking.
Height also surprisingly affects temperature control. Because of its steep gradient over the coals, when you raise your grate a few inches, you’re not only on top of the searing hot coals; you’re now surrounded by more gentle convection heat. So you don’t need to fiddle with your vents and knobs as much. If something needs finishing, slide it into a cooler part of the grill. Use the height to your advantage. No additional tools needed. It is free.
All that said, learning how to master grilling temperature really boils down to following the science (i.e., the physics) rather than going by feel. No matter what type of grill you’re working with, whether it’s a hefty ceramic kamado or a smaller, portable one, they all follow the same laws of heat transfer and retention. That’s where the information in table above can be your guide. The art is knowing when to trust the process and feeling out the heat. That’s the art of it all.
Next time you fire up the grill, fight the urge to rush things. Let that metal get hot. Keep the lid closed. And let the temp do the rest. Your steaks will thank you, and so will your guests.