
Follow the recipe (one you’ve made several times before), push “start” on the pressure cooker, and then wait for gauge to rise and seal the steam valve.
But what happens if you’re cooking from a couple of thousand feet up? The air around you is thinner and that alter how heat is transferred. To use pressure cookers effectivey, you need to understand how to adjust for altitude.
How to Cook with a Pressure Cooker at High Altitude
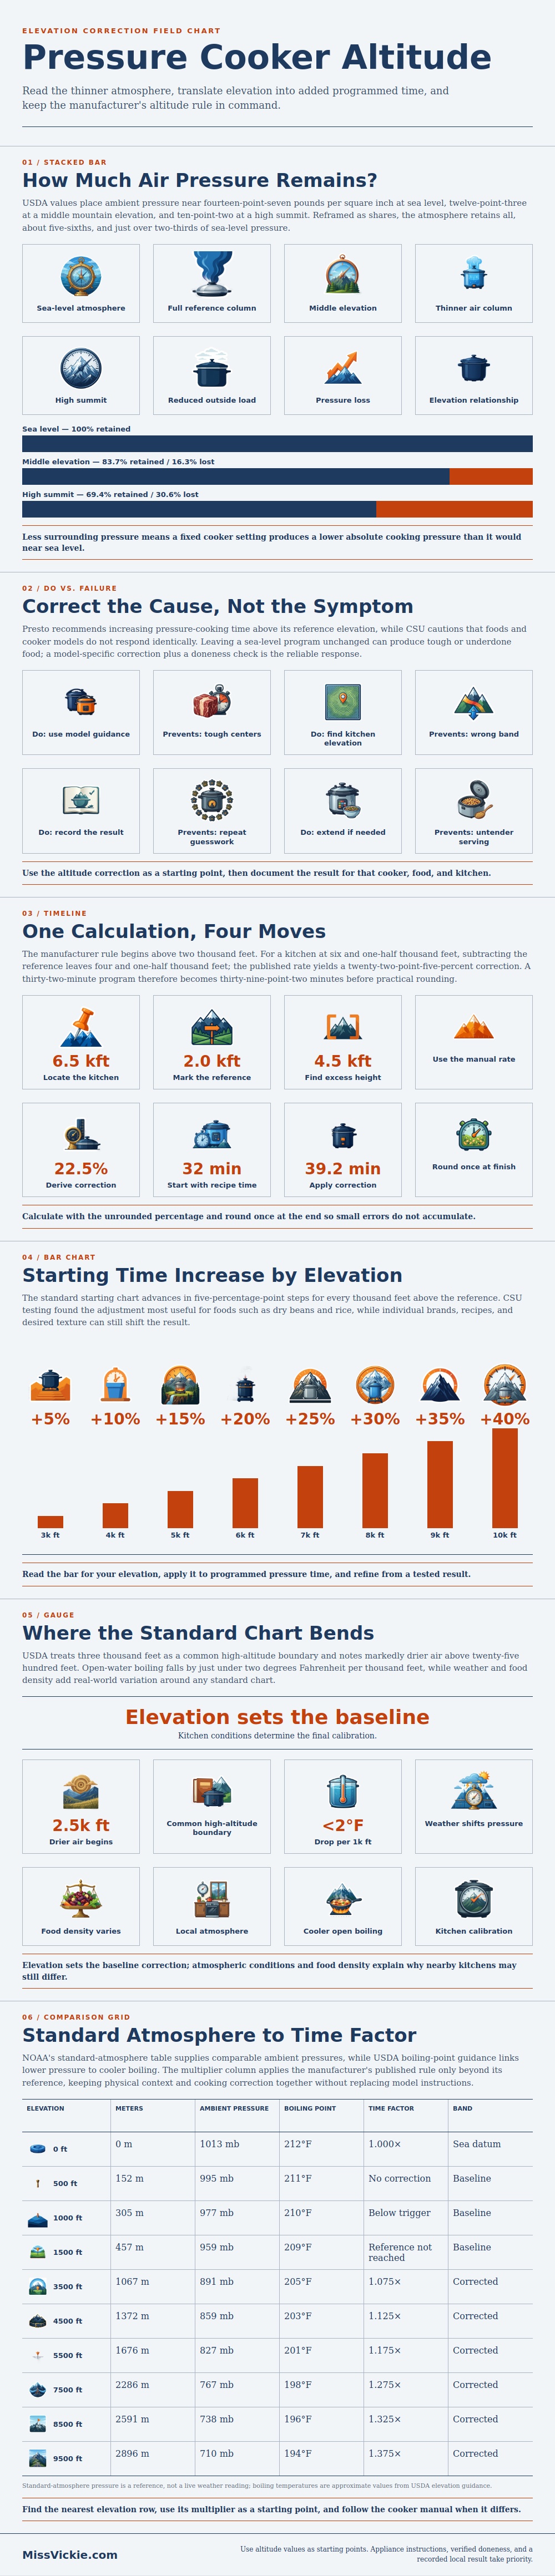
The graphic demonstrates how atmospheric pressure decreases with increased altitude. This means that food will also cooks at lower temperatures. The atmosphere presses down on everything with an average pressure of fourteen point seven pounds per square inch at sea level. That’s why water boils at two hundred twelve degrees Fahrenheit. Because the atmosphere is pressing down on everything at sea level, it keeps water boiling at two hundred twelve degrees Fahrenheit.
However, as you ascend above sea level, atmospheric pressure decreases. It’s about 12.3 pounds at middle mountain elevation. On a high summit? Well, it can be as low as ten and a few tenths pounds. As atmospheric pressure decreases so does the amount of heat the air will hold back. In other words, the internal temperature of the cooker is actualy below what it was at sea level.
This results in meat that doesn’t shred well, tough beans, or chewy rice. You might hear people say they had bad luck with their timer. The variable, however, is atmosphere.
The easy rule of thumb given by most manufacturers is that you increase your cook time by five percent per thousand feet over two thousand feet. As you can see in the chart, the climb starts here. Five percent if you are at three thousand feet. It is ten percent if you are at four thousand feet.
Why does it work? Because it recognizes that there is less oxygen in the air. Find out how high above the two thousand foot starting line you are and then figure out what percentage up you go, then plug that into initial recipe time. This is simple math for the kitchen.
Suppose you’re following a recipe that says to cook something for half an hour. At your altitude of 6,500 feet above sea level, you’re also 4,500 feet higher than the baseline. That gives you a 22.5 percent adjustment, which means multiplying starting number by that amount. So about forty minutes or so. Here’s what that looks like in the graphic. Calculate with the unrounded percentage before rounding final time.
A tiny bit of error in the math will alter how tender your dish turns out. It is a small detail but worth thinking about.
But charts are merely beginnings. The food itself change things. The weather and the humidity change things too. Altitude and where it’s in the room also matter. What happens if the air is drier? How fast will that moisture evaporate? What if you’re cooking in a pot full of heavy stew compared to a small amount of light rice? Even if two person are on same floor, having kitchens next to each other might lead to different results.
Best thing: Use the chart as a place to start and then experiment. Cook up a small batch to see if it is done. Is it soft? Shorten the next batch. Is it firm? Add time.
Pressure and temperature has a relationship. So how does it all work? How does pressure relate to cooking temperature? The simple answer is that less outside pressure equals a lower internal cooking temperature. This relationship makes sense when you understand it.
Adjustments start to make sense. You don’t guess anymore, instead you adjust with purpose. It becomes manageable. You know what your elevation is first and then you can add some time if necessary. Your dinner will be ready on time, and your food will cook correctly. It’s thinner up there, but your results shouldn’t of been.