Chuck Roast Cooking Time Calculator
Estimate chuck roast timing from roast weight, oven or braise method, oven temperature, cover style, liquid depth, starting temperature, target tenderness, sear, shape, and rest.
🥩 Chuck Roast Presets
Choose a real roast setup, then fine-tune the pan, liquid, and tenderness target before cooking.
⚖ Roast And Pan Inputs
Your Chuck Roast Timing
Calculated timing appears here.
Timing Breakdown
Cooking Notes
- Check liquid at the midpoint and add hot broth if the pan is nearly dry.
- Begin probing before the end of the estimate so the roast does not oversoften.
- Rest covered, then slice across the grain or shred back into cooking juices.
- Use tenderness as the final signal because chuck varies by thickness and marbling.
📊 Quick Chuck Roast Benchmarks
🔥 Method Comparison Grid
Best all-purpose pot roast timing with broth, aromatics, and a tight lid.
Heavy pot holds steady heat and is forgiving for fork-tender chuck.
Longer cook with gentler fibers; useful when you want a cleaner slice.
Removes the lid near the end for darker edges after tenderness is close.
🌡 Beef Temperature And Tenderness Table
| Target | Pull Temperature | Texture | Best Use |
|---|---|---|---|
| Food-safe minimum | 145 F plus rest | Safe but tough for chuck | Not ideal for pot roast texture |
| Sliceable pot roast | 190 to 195 F | Moist slices with some chew | Plated roast with gravy |
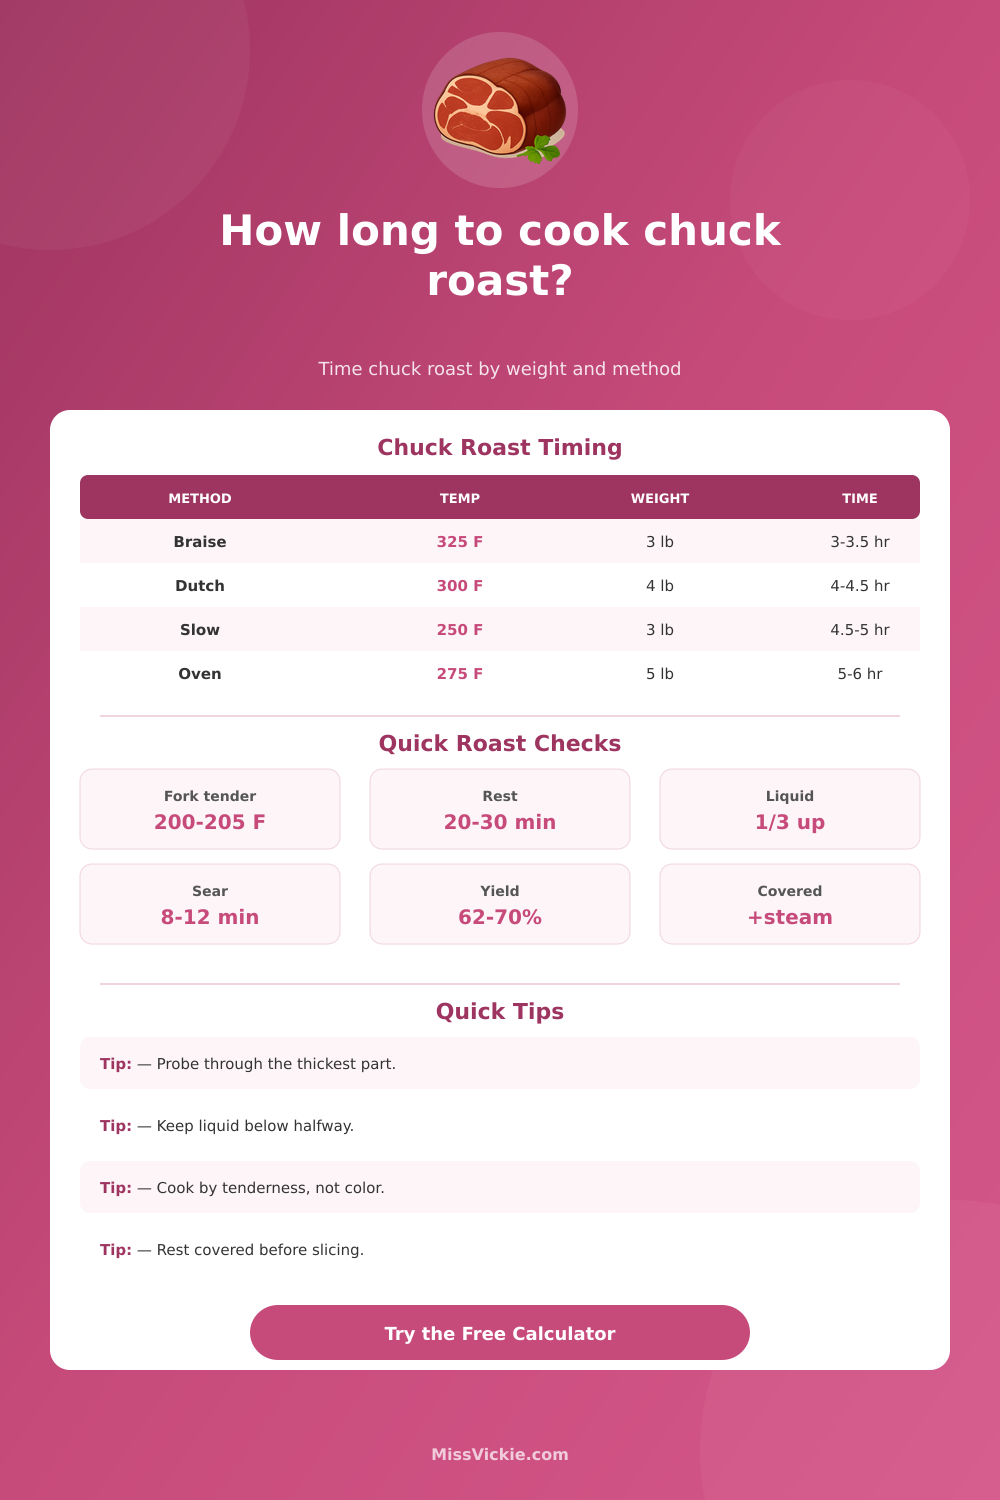
| Fork tender | 200 to 205 F | Probe slides in with little resistance | Classic pot roast dinner |
| Shreddable beef | 205 to 210 F | Pulls apart easily | Sandwiches, tacos, bowls |
| Extra soft braise | 210 F plus | Very soft fibers | Chopped beef and saucy fillings |
USDA safety guidance uses 145 F with rest for whole beef cuts, but chuck roast usually needs much higher collagen-softening temperatures for tenderness.
⏱ Common Chuck Roast Cooking Data
| Roast Setup | Typical Oven Temp | Approx Time | Liquid And Cover |
|---|---|---|---|
| 2 to 2.5 lb small chuck | 325 F | 2 hr 30 min to 3 hr 15 min | Covered, 3/4 to 1 inch liquid |
| 3 to 3.5 lb classic pot roast | 300 to 325 F | 3 hr 15 min to 4 hr | Covered, one-third up roast |
| 4 to 4.5 lb family roast | 300 F | 4 hr to 4 hr 45 min | Tight lid, hot broth if needed |
| 5 to 6 lb large chuck | 275 to 300 F | 5 hr to 6 hr 15 min | Covered, avoid submerging fully |
| Low slow sliceable roast | 225 to 250 F | 4 hr 30 min to 7 hr | Light liquid, covered or wrapped |
💧 Liquid Depth And Covered Cooking Table
| Liquid Level | What It Means | Timing Effect | Best For |
|---|---|---|---|
| Dry pan or splash only | Little steam, faster evaporation | Add 15 to 25 percent | Uncovered roast with browned crust |
| 1/2 to 1 inch | Light braise in shallow pan | Neutral to slight increase | Small roasts and foil pans |
| One-third up roast | Classic pot roast braise | Most predictable | Fork-tender dinner roasts |
| Halfway up roast | Moist braise with more steam | Slightly faster tenderizing | Shredded beef and large roasts |
| Nearly submerged | Stew-like simmer more than roast | Can soften edges early | Chopped beef, not neat slices |
🍴 Yield And Serving Reference
| Raw Chuck Roast | Estimated Cooked Beef | Meal Portions | Notes |
|---|---|---|---|
| 2 lb | 1.25 to 1.4 lb | 4 to 5 portions | Good for a small dinner |
| 3 lb | 1.9 to 2.1 lb | 6 to 7 portions | Classic family pot roast |
| 4 lb | 2.5 to 2.8 lb | 8 to 10 portions | Allows leftovers for sandwiches |
| 5 lb | 3.1 to 3.5 lb | 10 to 12 portions | Use a roomy covered pan |
| 6 lb | 3.7 to 4.2 lb | 12 to 15 portions | Start checking early for uneven thickness |
💡 Chuck Roast Timing Tips
A chuck roast is delicious if prepared properly, cheap, and something you buy. You get it home, throw it in a pan, and then things gets fuzzy. Primarily, there’s two problems: one of them isn’t dangerous. One is whether or not the collagen become gelatin. There are certain temperatures and times at which that happens. Most people don’t guess right about the range.
After you plug in your weight and cooking method, the calculator figure out what needs to happen. This means you won’t second-guess yourself while the roast is baking for another hour.
How to Cook Chuck Roast Perfectly
How heavy is it? A five-pound roast isn’t just slightly bigger than a three-pounder. That extra two pounds take longer to cook, heat has farther to travel. To make up for that, tool takes account of dimensions of your cut. Even if two roasts weighs the same, a chunky round one might require a longer time in the heat compared than a flatter one. This is why people ask about starting temperature and shape as inputs.
Placing a cold-from-the-fridge roast directly into the heat means its outer surface will be overcooked long before interior has softened. An hour of letting it rest at room temperature balances the temperatures on either side of the roast, which would otherwise cause dryness on the edge. It is a tiny adjustment, but it stop those dry edges.
Another factor affecting time is how deep your liquid cover the meat. It’s not a stew; don’t boil the beef in broth. That’ll soften the texture and hide the flavor. What you want is a braise, with a gentle heat and some steam doing there thing. To achieve this, the liquid needs to covers about one-third of the side of the roast.
The calculator takes into account if you’re using a loose foil or a tight lid. If the Dutch oven is tightly closed, it will hold more steam and thus tenderize a little faster than when uncovered. Speed = control: there’s a give-and-take here. You can caramelize the outside by leaving the lid off at the end, but keep an eye on it so you don’t burn the food instead of just drying it out.
Food science meets personal preference, where tender is as tender does. Do you prefer your pot roast sliced? Do you want it to have some chew left? Or do you want it to fall off the fork? That’s a matter of how tender you want it. And tenderness target depends on internal temperature, and how long the meat was cooked. At 195 F, you can pull it and get nice slices. At 205 F or beyond, you have shreddable taco- or sandwich-filling beef.
This chart on the page makes that very clear, showing the effect of increased time on breaking down collagen and creating different textures. There’s no shortcut here. Just because you seared something doesn’t mean it will make up for insufficient roasting time to soften the meat’s connective tissue. You should of known that.
The last step is to rest. Hours of cooking has filled the muscle fibers with fat and juices. Slice it right away, and it will all be gone from the cutting board. Letting the roast rest for half an hour or more allows those juices to redistribute. When the tool tells you how long to wait for dinner, it tacks on the rest time, so you always know. It’s not a question of patience. It’s a question of flavor and moistness.
Mastering Chuck Roast is all about mastering both the heat AND expectation. Physics + normal yields = the best starting point (thanks, calculator). But ultimately, your probe thermometer and your nose will be the judges.
Early is better; begin poking in there. Don’t watch the clock, look for the meat’s resistance to melt away. Slide that fork inside when it goes in easy. Success! Heat has transformed this once-tough cut of meat to tender goodness. That’s what braising does. And now you know the recipe for getting it right each and every time.