Ribs Smoking Time Calculator
Estimate smoked rib timing by rack type, rack weight, smoker temperature, wrap method, membrane choice, tenderness target, sauce timing, pit behavior, and rest.
📌Rib presets
Choose a rack style to load a realistic smoke plan, then adjust pit heat, wrap style, sauce timing, membrane prep, and tenderness. Ribs finish by feel, so the calculator builds a check window rather than a single hard minute.
⚙Smoke setup
Your rib smoke plan
Run the calculator to estimate smoke window, wrap check, sauce timing, rest, yield, and tenderness cues.
Timing breakdown
Rib doneness checks
📏Rack type reference
Internal temperature on ribs is helpful but imperfect because bones and thin meat make probing tricky. Bend, pullback, and probe feel should agree before slicing.
🔥Smoking tables
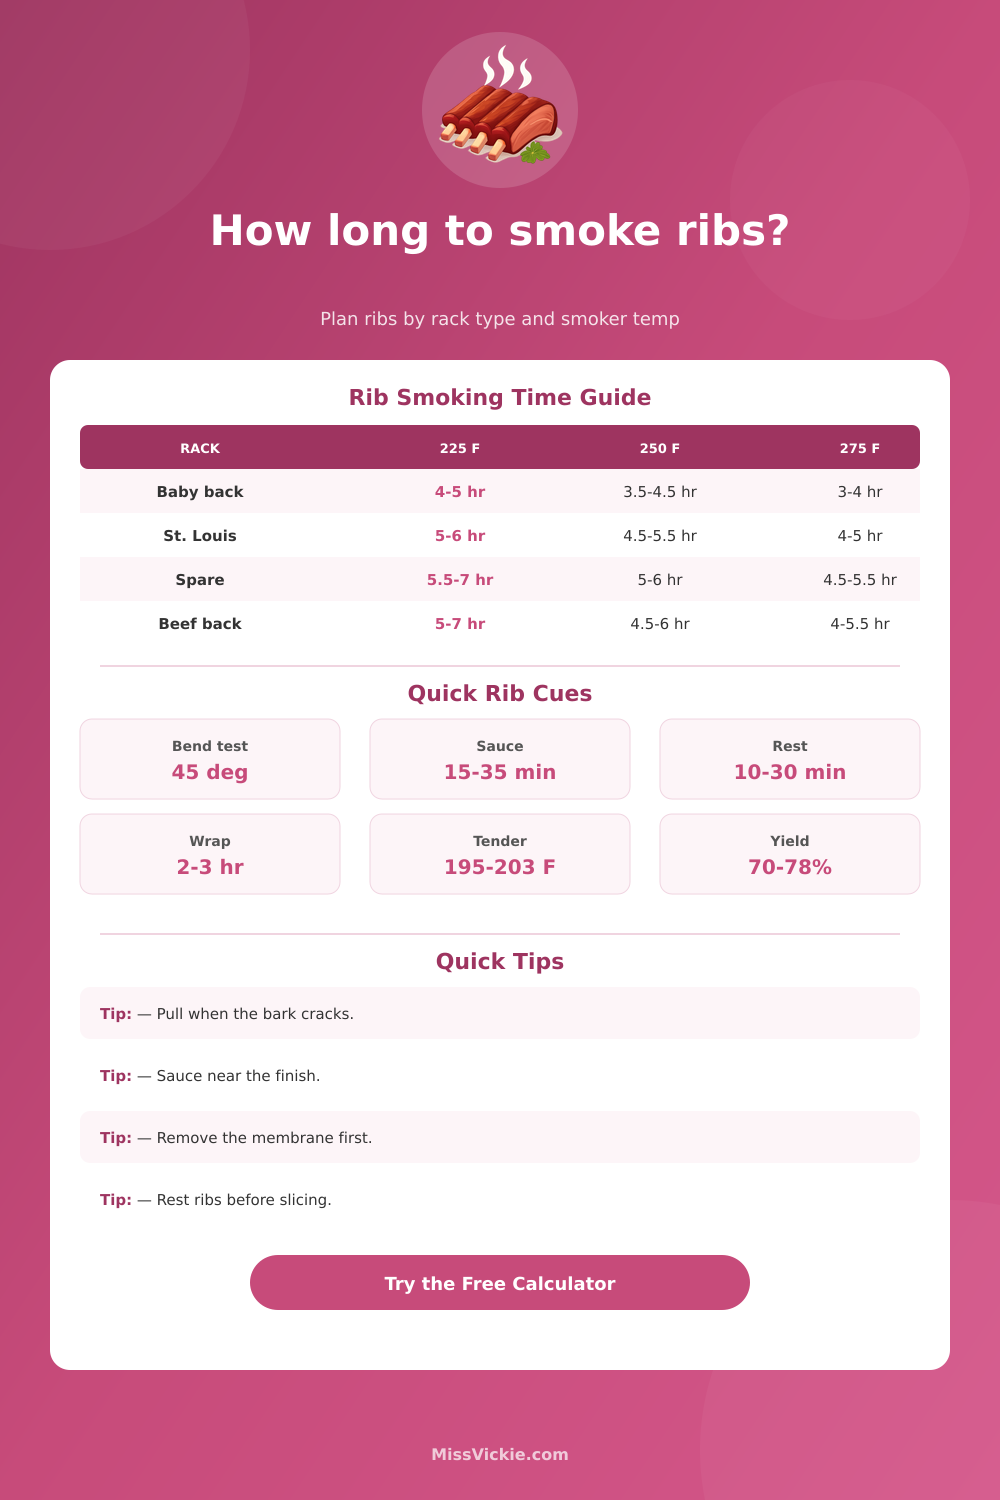
| Rack Type | Typical Weight | Classic Timing | Best Finish Cue |
|---|---|---|---|
| Baby back ribs | 1.8-2.8 lb per rack | 4-5 hours at 225 F | Bends 35-45 degrees with small bark cracks. |
| St. Louis ribs | 2.5-3.8 lb per rack | 5-6 hours at 225 F | Meat pulls back and a toothpick slides between bones. |
| Full spare ribs | 3.5-5.5 lb per rack | 5.5-7 hours at 225 F | Flat bends cleanly and thick end probes tender. |
| Country-style ribs | 0.5-0.9 lb each | 3-4.5 hours at 250 F | Probe tender like pork shoulder pieces. |
| Beef back ribs | 3-5 lb per rack | 5-7 hours at 250 F | Meat jiggles and probes with little resistance. |
| Beef short rib plate | 4.5-8 lb per plate | 7-9 hours at 250 F | Probe tender around 200-205 F. |
| Smoker Temp | Timing Effect | Wrap Check | Best Use |
|---|---|---|---|
| 200 F | Very slow, add 20-30% | Later bark set | Gentle smoke when holding dinner is easy. |
| 225 F | Classic low-and-slow baseline | 2.5-3.5 hours | Balanced smoke, bark, and tenderness. |
| 250 F | Shortens most racks 8-12% | 2-3 hours | Reliable backyard rib timing. |
| 275 F | Shortens most racks 18-24% | 1.75-2.5 hours | Good for same-day cooks and foil wraps. |
| 300 F | Hot-fast, watch sugar closely | 1.5-2.25 hours | Foil or boat cooks with late sauce only. |
| Wrap Method | Time Change | Bark Result | When To Choose It |
|---|---|---|---|
| No wrap | Longest cook | Firmest bark | Dry rub ribs or stronger smoke flavor. |
| Butcher paper | Small speed boost | Breathable bark | St. Louis ribs when bark matters. |
| Foil wrap | Fastest tenderizing | Softer bark | Family-style tender ribs or hot-fast cooks. |
| Foil boat | Moderate speed boost | Top stays exposed | Sticky sauce or ribs with rendered fat. |
| Late rescue wrap | Only helps near finish | Mostly preserved | Use when thick ribs lag behind dinner. |
| Finish Cue | Clean Bite | Very Tender | Fall-Off Soft |
|---|---|---|---|
| Bend test | 30-40 degree bend | 45-55 degree bend | Deep bend, almost splitting |
| Meat pullback | About 1/4 inch | About 1/2 inch | 1/2 inch or more |
| Probe feel | Some tug remains | Slides in easily | Very little resistance |
| Sauce look | Optional or thin | Tacky glaze | Soft set, not scorched |
🧭Method comparison grid
Long foil phase gives tender ribs but can push thinner racks past a clean bite.
A better starting point for smaller racks that dry out faster than spares.
Needs patience and steady humidity, but the surface stays smoky and firm.
Protects the bottom while keeping the top bark exposed for sauce or glaze.
💡Two rib timing tips
If you’re smoking at a certain temperature with a certain kind of rack, this will tell you how long it should take. It takes the guesswork out of understanding how those factors works together. Humidity and airflow also play a big role in how things turn out. While time is one factor, there’s no hard-and-fast clock that trumps handling and heat.
I once set an alarm for six hours and came back to meat that had dried out because my smoker ran hotter then the dial suggested. Fat holds moisture while breaking down collagen. Lean muscle fibers dry out and becomes tough but won’t break down the way fat does when exposed to heat.
How to Cook Ribs
Ribs is more complicated than a cut of beef such as brisket or steak. They are a bunch of different muscles connected together by connective tissue with bits of fat, cartilage, and bone. Baby backs tend to be leaner and smaller, which means they will cook up faster but you don’t really have much wiggle room until they gets all tough. St. The thinner the piece, the faster it will be done.
A full spare or thick cut like a louis takes longer to cook through because they is fatter and thicker. But the tool adjusts for this automaticly. Just be aware of what you’re cooking.
And when leaving the membrane attached to the back of the rack: Don’t expect your seasoning to penetrate very well. The membrane acts as chewy barrier between the meat and smoke. For good texture, you’ll have to remove it. This is a five-minute job that pays off in every bite. Scoring will help, but better yet, remove it.
How fast? That’s dictated by temperature. Low-and-slow at 225 degrees Fahrenheit will develop a nice bark and deep smoke ring. A slightly higher temp of 275 or 300 degrees will cook quicker. Great if you’re on a schedule but dangerous for novice cooks who might scorch the sugar in their sauce. Each incremental step of 25 degrees changes your sauce and wrap windows (refer to the reference table). As the heat increases, the window tightens. There is less time to allow the glaze to set without burning.
The foiling debate is all about wrapping. Also referred to as the Texas crutch, wrapping in foil traps steam and helps braise the meat in its own juices, speeding up the process while ensuring tenderness. But it can also soften the bark you’ve worked hard to create. To keep ribs moist without letting them stall out, I use butcher paper because it lets ribs breathe, preserving more texture while foil wraps guarantee tenderness by trapping steam.
The total time is adjusted by the calculator depending on whether you chose to wrap or not. If you do not wrap them, the cook time are longer and meat surface is drier, which requires constant monitoring. It’s a texture versus speed trade off. A lot of home cooks find that using a foil boat works best, protecting the bottom, allowing exposure on the top for basting.
There’s one reason why most rib recipes fall short: timing with the sauce. If you brush on sugary barbecue sauce an hour before removing the ribs, it’s going to burn into bitter black tar. Why? Because sugar has a certain temperature at which it caramelizes, and anything past that point turns flavor into ash. To prevent this, the tool suggests slathering on sauce in the final 15-30 minutes. That way the glaze can tack up and stick, without turning to cinder.
Once you’ve pulled the ribs from the heat, let them rest for at least 20 minutes. Why? Because allowing the ribs to rest helps the juice redistribute back into the meat; otherwise they’ll spill all over your cutting board as soon as you try slicing. And it gives the sticky sauce time to harden so that it stays on the bone (instead of sliding off).
Follow your eyes and hands. Not any gadget. There’s no substitute for the bend test of doneness: With tongs, lift a rack at one end. It should flex well and be cracker-crisp on top. If not, let it go longer. If it’s stiff, snap it down again because it’s not ready yet. An internal temperature probe helps, though beware of inserting one too near any bone (false reading). Go for a tenderness that yield slightly to your pressure.
Cooking ribs is part art and part science, and much more. Perfect that combination of timing and feel and you’ll move a good dinner up a notch to memorable. That first night, the timer was off. But if only you would of searched for the crackling bark…