Salmon Cooking Time Calculator
Estimate salmon cooking time for fillets, steaks, and whole sides by method, thickness, starting temperature, skin, doneness target, glaze, rest time, and batch spacing.
🍲 Salmon Presets
Choose a common salmon situation, then adjust the cut, thickness, method, start temperature, glaze, and doneness to match your fish.
📏 Inputs
Salmon timing estimate
Adjust the fields above to calculate a method-specific cooking window.
Timing Breakdown
Cooking Plan
- Preheat fully before cooking.
- Turn or rotate when the surface sets.
- Add sweet glaze near the end.
- Probe the thickest center early.
🌡 Target Temperature Guide
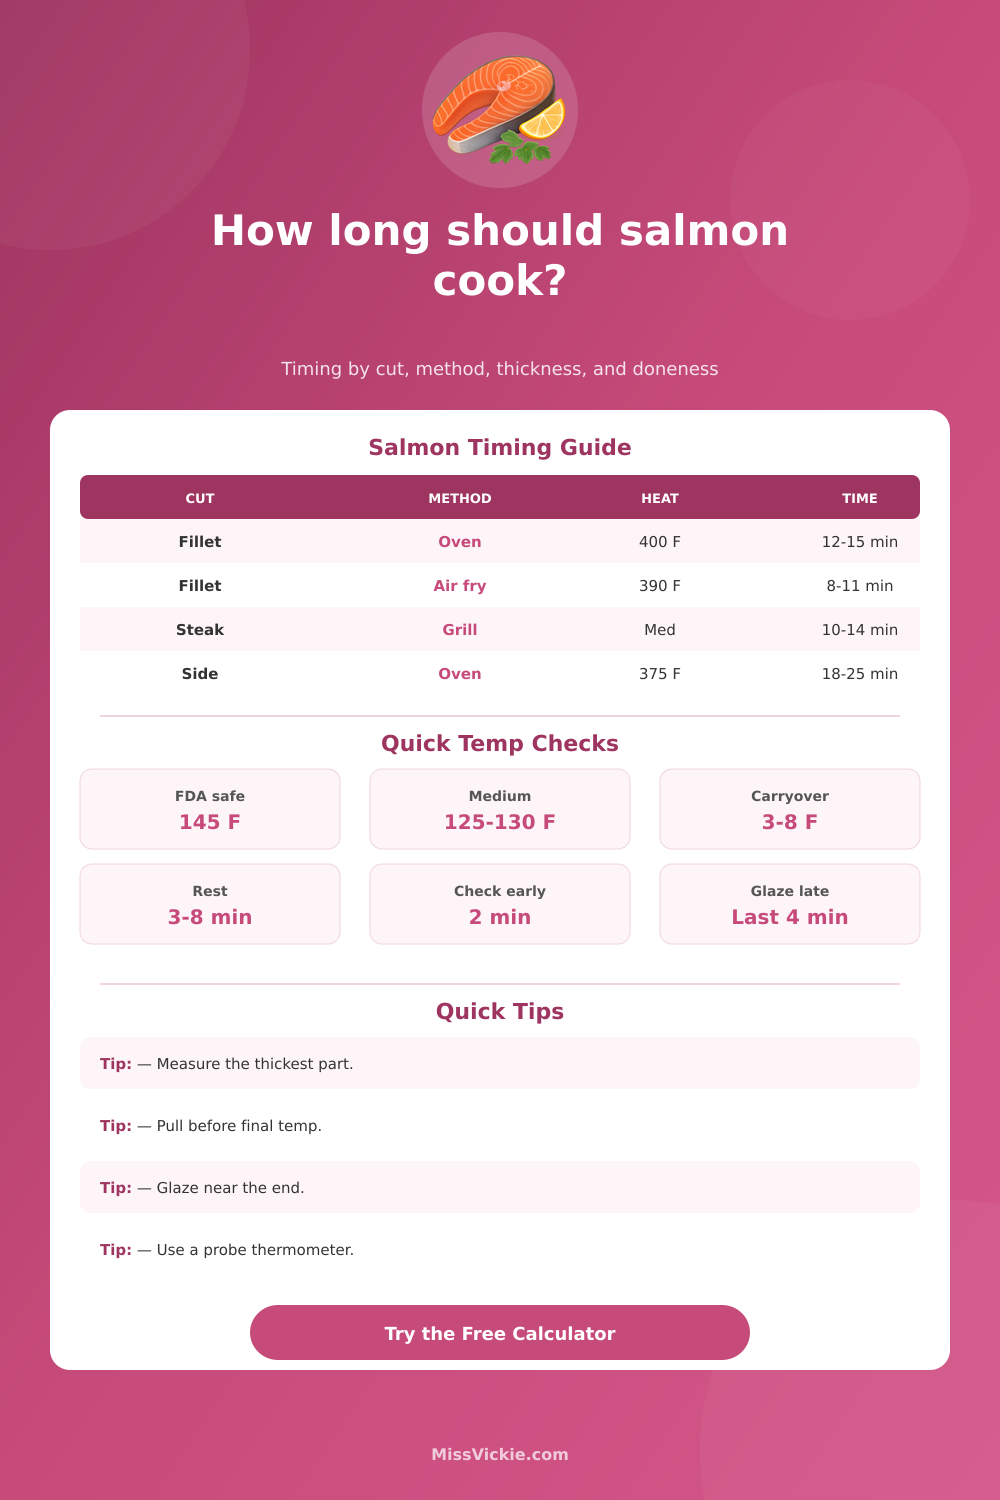
The calculator estimates pull temperature after rest. For safety-sensitive meals, use 145°F as the final internal temperature and verify with a thermometer.
🍳 Method Timing Table
| Method | Typical Heat | Best Cut | One Inch Fillet | Timing Note |
|---|---|---|---|---|
| Oven bake | 375-425°F | Fillet portions or whole side | 10-16 minutes | Steady and forgiving; whole sides need extra edge checks. |
| Air fryer | 375-400°F | Portions, skin-on fillets | 7-12 minutes | Fast airflow browns the top and can dry thin tail pieces. |
| Skillet | Medium to medium-high | Skin-on portions | 8-13 minutes | Most time is skin-side down, then a short finish on the top. |
| Covered grill | Medium heat | Steaks or thick fillets | 9-15 minutes | Grate heat plus lid heat cooks both surface and center. |
| Broiler | High top heat | Thin to medium fillets | 6-10 minutes | Keep thicker salmon farther from the element to avoid scorching. |
| Poach | 170-185°F liquid | Skinless fillets | 8-13 minutes | Gentle heat keeps the surface pale and moist. |
| Foil packet | 375-425°F | Portions with vegetables | 12-18 minutes | Steam slows browning but protects the fish from direct heat. |
🐟 Cut and Thickness Table
| Salmon Cut | Common Thickness | Cooking Behavior | Best Methods | Check Point |
|---|---|---|---|---|
| Tail fillet | 0.5-0.8 inch | Edges finish quickly and can overcook before the center looks opaque. | Broil, pan, air fryer | Start checking at 5-7 minutes. |
| Portion fillet | 0.8-1.3 inches | The most predictable cut for weeknight baking and skillet cooking. | Oven, pan, air fryer | Probe the center of the thickest piece. |
| Center-cut fillet | 1.2-1.8 inches | Needs a longer window but gives a juicy center when rested. | Oven, grill, pan-roast | Check 2 minutes before the calculator low time. |
| Salmon steak | 1.0-1.5 inches | Bone and round shape slow the center slightly. | Grill, broil, pan | Probe beside the center bone. |
| Whole side | 0.7-1.5 inches | Tail and belly finish before the thick shoulder section. | Oven, foil, grill plank | Check both the tail and the thick shoulder. |
| Cubes or skewers | 0.75-1.25 inches | Many exposed sides cook quickly and dry if crowded. | Grill, broil, air fryer | Turn once and check early. |
📋 Start Temperature and Rest Table
| Starting State | Time Effect | Texture Risk | Best Practice | Rest Effect |
|---|---|---|---|---|
| Very cold | Add about 8% | Outer flakes firm before the center warms. | Pat dry and start checking early. | Normal carryover. |
| Fridge cold | Baseline | Predictable for most home recipes. | Cook directly after seasoning. | 3-6°F rise. |
| Tempered | Reduce 4-7% | Less edge overcooking. | Keep short and food-safe. | Slightly lower rise. |
| Partly frozen | Add 25-35% | Surface may finish while the center stays cold. | Use oven or foil, not hard sear. | Probe twice. |
| Frozen solid | Add 45-60% | Uneven cooking and albumin are more likely. | Covered oven heat works best. | Rest before final probe. |
🍯 Glaze and Skin Table
| Surface Choice | Timing Adjustment | Heat Warning | Best Move | Calculator Effect |
|---|---|---|---|---|
| Skin-on exposed | Near baseline | Skin buffers direct heat. | Cook skin side down first for pan or grill. | Small carryover bump. |
| Skinless | Slightly faster | Bottom surface dries more quickly. | Use oil, parchment, or lower heat. | Shorter cook window. |
| Crisp skin | Longer first-side sear | Top can stay underdone if not finished. | Finish gently after crisping. | Adds sear split note. |
| Sweet glaze | Usually late addition | Sugar can scorch under broilers and air fryers. | Brush on for the final 3-5 minutes. | Adds glaze timing cue. |
| Crumb crust | May need lower heat | Top browns before the center finishes. | Use middle rack and probe through the side. | Adds a small buffer. |
| Foil or covered | Longer but moist | Less browning and more carryover steam. | Open briefly at the end if browning is wanted. | Increases rest rise. |
⚖ Method Comparison Grid
Best for thinner fillets when you can watch closely and avoid sugar scorch.
Gives the most control over skin texture and a gentle finish.
Good for mixed portions, family dinners, and whole salmon sides.
Steam protects lean fish, vegetables, and partly frozen fillets.
Low liquid heat gives pale, delicate salmon with minimal browning.
💡 Salmon Timing Tips
Salmon is one of those foods that most people at home think about as basic math equation: thicker + hotter = delicious meal. Place it in the oven, time it according to some online guide, remove it and discover that you’ve produced a dried-out, crumbly brick of sadness. But your oven isn’t broken. Recipes don’t consider variables that determines whether the heat travels through the fish efficienty or not. By asking you for details like these, our calculator works it out for you. It turns guesswork into a gameplan that takes in consideration the real-life conditions of your own kitchen (not some theoretical best-case scenario).
Thickness. This is the one that matters most of all. What about weight? Weight doesn’t matter nearly as much than height. A whole side with a thin tail and thick side cook at two different speeds simultaneously (which is why you should measure thickness instead of relying on weight). So what does this mean? The key is to measure the fillet/steak at its absolute thickest point. That’s the dimension that controls how fast the heat gets through to the inside of fish. If you don’t account for thickness and just go by weight, you’re almost guaranteed to overcook the thinner edge portion while waiting for the thicker center to be “done.” The tool handles that conversion for you automatically. It changes the window accordingly for thick-center cuts vs. Tail pieces, no need to memorize a half-dozen rules.
Why Most Salmon Recipes Fail
The other variable is one that few recipes mention: starting temperature. Salmon on the counter, at room temperature, will take less time than cold fish pulled straight from the fridge. And if the fish is frozen solid, it’s a whole different ballgame, as the outside will likely burn to a crisp before the inside defrosts. This chart on the page explains the variables; how much longer you’ll be waiting for fish in the middle to thaw if it started out iced or frozen solid. And yes, if you’re starting with partially-frozen food (which is very common when you’ve been doing some sort of meal prep), don’t expect your usual bake time. You’re going to have to keep the surface protected with foil or lower the heat and wait longer for the center to catch up.
That’s where food-safety advice diverges from people’s taste preferences. According to the FDA, salmon should be cooked to 145 degrees Fahrenheit. While this is technically safe, the end result can be closer to canned than fresh. Chefs tend to like their fish pulled when it hits about 125 or 130, still somewhat translucent in the middle which is why they call for “medium.” That’s where knowing about carryover cooking is essential. Once off the heat, the salmon will continue to cook so you’ll want to pull it before it reaches its target temperature. For instance: if you want an internal temp of 130, you must plan accordingly. Failing to account for the residual increase in temperature is what causes restaurant-fresh fish to become rubbery on your plate at home.
There’s one other factor: surface treatments. Glazes are great, but they can be tricky when exposed to high heat. This is especially true in broilers and air fryers that cook with intense heat. If the cook starts off with a glaze like teriyaki or honey, it will almost certanly result in a charred outside. Better to brush on any sweetness toward the end of cooking. That way the glaze caramelizes without burning while the fish finishes cooking perfectly underneath.
Where you put your skin makes a big difference too. Start with skin side down to keep direct heat away from the fragile meat, and to render some of the fat for a crispier exterior. With skinless fillets, you must watch them carefully to ensure they do not dry out or stick.
Putting too many pieces on the sheet tray or in the pan interferes with air circulation. You don’t want steam, which happens when things get crowded. You want roast. Spacing is as important as temp. The more your pieces of salmon touch each other, the longer they’ll take to cook; and the paler they’ll be compared to ones given room to breathe. A rack keeps fish up off surface so there’s space for the heat to flow around beneath and cook everything evenly.
All that said, there’s still one thing that no computer or calculator will ever be able to do: substitute a thermometer. While these estimations is a solid place to start, every oven is different with some producing much more (or less) than they claim on their dials. Think of the estimate as a starting point rather than a strict limit. Two minutes prior to the low-end of the range, insert the thermometer probe into the center of the thickest part. Monitor the rise of the temp. As soon as it reaches a few degrees shy of your desired number, remove the fish. Allow it to rest; let the carryover heat finish cooking it before you serve it. This last measure assures that what hits your fork is what you wanted, not what a recipe assumes you want.