Chicken Breast Cooking Time Calculator
Estimate chicken breast cook time from thickness, bone, method, cooking temperature, start temperature, brine, target doneness, rest time, and batch spacing.
🕒Chicken Breast Presets
Load a real kitchen scenario, then adjust thickness and temperature to match the pieces on your board.
📏Inputs
Estimated chicken breast timing
Adjust inputs to calculate the timing window.
Timing breakdown
🌡Quick Poultry Checks
🍳Method Comparison Grid
Best for even batches, bone-in breasts, stuffed pieces, and hands-off weeknight cooking.
Fastest for thin or pounded pieces. Thick breasts usually need lower heat or a covered finish.
Strong airflow cooks quickly and browns well, but crowded baskets need extra checks.
Good browning with lid-down heat. Move thick pieces away from direct flame after searing.
Gentle and moist for salads or shredding. Use a bare simmer and verify the center.
📋Thickness Timing Table
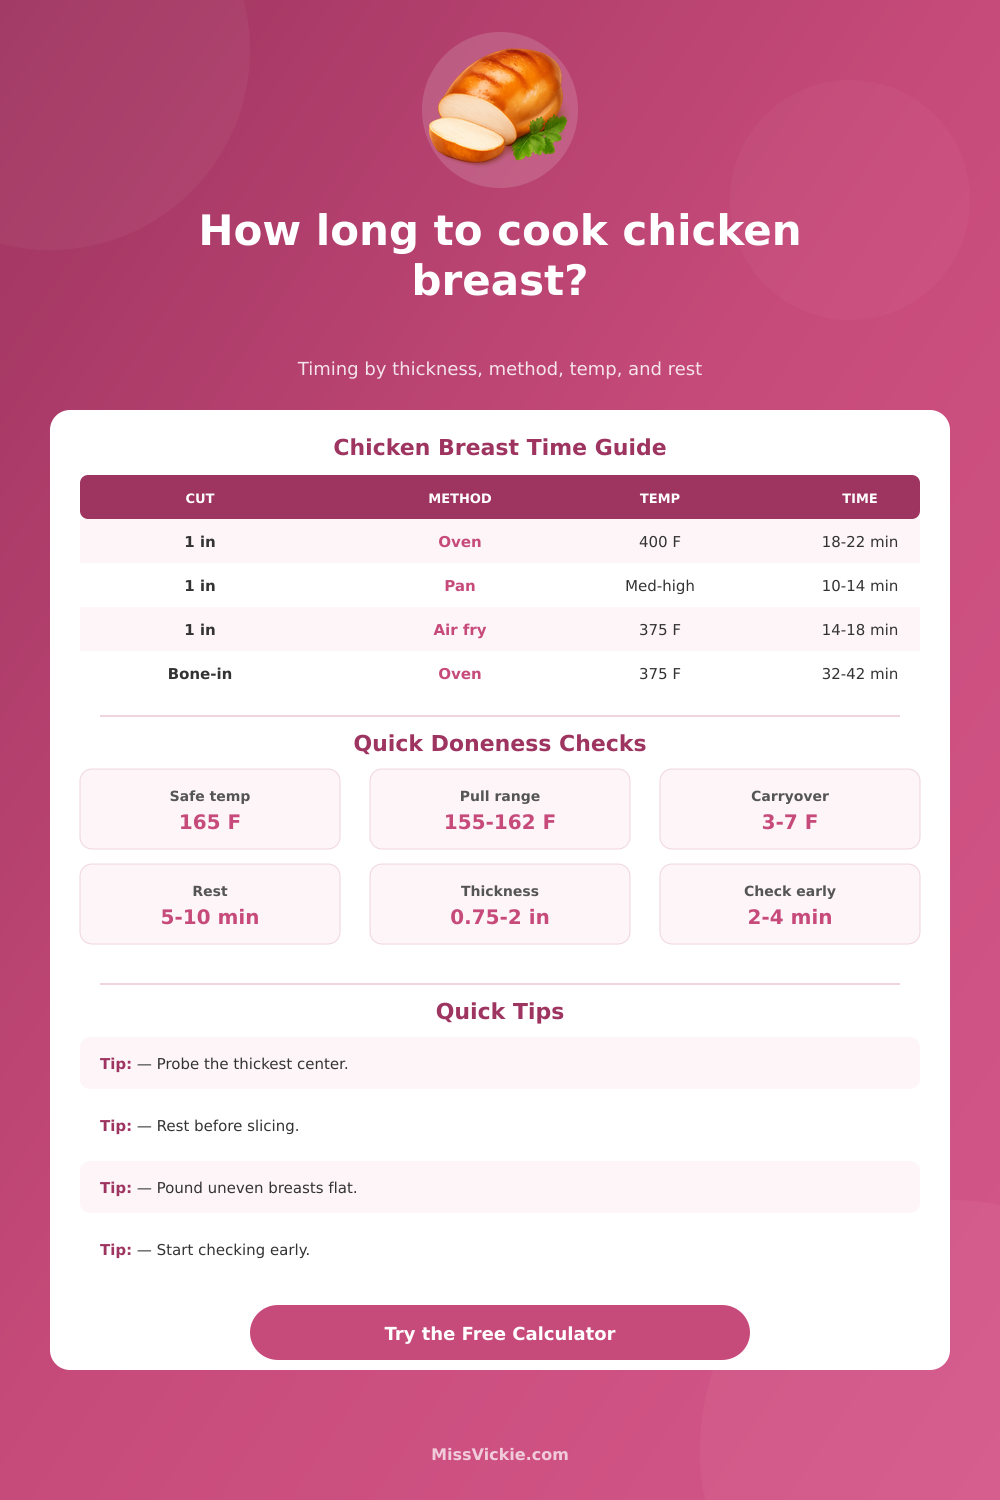
| Thickest point | Oven at 400 F | Skillet | Air fryer at 375 F | Best use |
|---|---|---|---|---|
| 0.5 in / 1.3 cm | 10-14 min | 5-8 min | 7-10 min | Cutlets, paillards, sandwich pieces |
| 0.75 in / 1.9 cm | 14-18 min | 8-11 min | 10-14 min | Small boneless breasts or tenderloins |
| 1.0 in / 2.5 cm | 18-23 min | 10-15 min | 14-18 min | Average boneless breast |
| 1.5 in / 3.8 cm | 28-36 min | 18-25 min | 22-30 min | Large breast, covered finish recommended |
| 2.0 in / 5.1 cm | 40-52 min | 28-38 min | 32-42 min | Very thick or stuffed pieces |
Table times assume fridge-cold boneless pieces, light oil, moderate spacing, and thermometer confirmation at the thickest center.
🔥Temperature and Method Table
| Method | Typical temp | Effect on timing | Watch point |
|---|---|---|---|
| Oven bake | 375-425 F | Lower settings cook more gently but add minutes. | Use a rack or open pan for even airflow. |
| Skillet | 350-400 F surface | Quick surface browning, slower center on thick pieces. | Reduce heat or cover after searing. |
| Air fryer | 360-400 F | Airflow shortens time and boosts carryover. | Do not stack pieces in the basket. |
| Covered grill | 375-450 F lid temp | Direct heat starts fast; indirect heat finishes safer. | Avoid flame-ups with sugary marinades. |
| Poach | 175-190 F liquid | Gentler heat takes longer but stays moist. | Keep liquid below a hard boil. |
🔬Cut, Target, and Carryover Table
| Input | Timing effect | Carryover effect | Calculator note |
|---|---|---|---|
| Boneless skinless | Baseline | Moderate | Thickness matters more than package weight. |
| Bone-in split breast | Adds about 25-35 percent | Higher | Probe near bone without touching bone. |
| Stuffed breast | Adds about 30 percent | Moderate | Center filling must also reach 165 F. |
| Pull early plan | Shortens active heat | Needs rest | Only use if you will rest and recheck. |
| Direct 165 F plan | Adds a few minutes | Less reliance | Useful for thin pieces with little carryover. |
🧂Start Temperature and Brine Table
| Choice | Timing change | Texture effect | Practical check |
|---|---|---|---|
| Fridge cold | Baseline | Predictable | Best default for food safety and planning. |
| Tempered 15-30 minutes | Slightly faster | More even center | Do not leave raw poultry out for long periods. |
| Frozen or icy | Much slower | Uneven risk | Thaw first when possible; probe several spots. |
| Dry or wet brine | Slightly faster | Juicier slices | Salted surfaces can brown sooner. |
| Sugar glaze | May slow finish | Sticky surface | Lower heat if browning gets too dark. |
💡Two Chicken Timing Tips
When it comes to cooking chicken, things don’t happen as predictably as most home cook assume. Two chicken breast are cut from the same pack, one thick and one tapered-thin. They is cooked side by side at the same temperature. One comes out perfectly moist, but the other is still raw at its core. But when the thick one is finally safe, the thin one is now like leather.
It typically boils down to thickness, the single variable you don’t know about until it’s too late, which has a much bigger impact on how much time things take then weight does. Why? When we measure our meat, we don’t measure its weight or number of packages. Instead, we measure its thickest part (the part where the heat has to penetrate farthest).
Why Thickness Matters More Than Weight
Why does it feel like extra effort to measure with a ruler? Well, heat doesn’t move outwards from the bone. It’s all about how much heat penetrates from the outer surface. If you have an eight ounce breast that you pound out into a flat shape versus one that’s still dense and thick, the first will cook twice as fast as second.
The calculator takes that into consideration by asking you to enter the thickness at the center, setting the distance the heat needs to travel to get to safe levels. And it also considers type of cooking vessel: Grilling, frying, baking…they all distribute heat at different rates. It’s all about airflow. The rapid circulation of hot air in an air fryer shorten the cook time and increases the carryover rise once you pull it out of basket. Direct intense heat applied via a heavy cast-iron skillet cooks the exterior quickly and deeply, but struggles to reach into thickest part without burning the surrounding area.
This is why the calculator provides a window (instead of one exact minute), factoring in the physical reality. It also teaches you how crowding the pan keeps steam trapped inside, which lengthens the cook time and slows browning. Adjust the estimate accordingly if your pieces are stuck together; that moisture barrier means it will take longer.
Most people underestimate how important the initial chicken temperature is. If it’s cold right from fridge, it will take far longer to come up to temp all the way through compared to one that was brought to room temperature by sitting on the counter for twenty minutes. Food safety rules tells us not to let raw chicken just hang around too much, but giving it some time does do something nice: it smooths out how heat spreads inside bird.
The tool allows you to select fridge cold, tempered, or even frozen, adjusting the timeline accordingly (the latter being a dangerous gamble; the outer parts cook long before inner part thaws). The calculator reflects this risk by extending the time estimate and suggesting earlier checks.
There is one additional twist on time and texture: brining. Wet brines (and even dry salting) pull water into muscle fibers. This can change how quickly heat travels, but it usually means faster browning because the surface proteins react first. Those surface treatments are factored into the final estimate of window, and may help inform your decision about pulling the bird early, say at one hundred fifty-five, and allowing it to rest, versus cooking all the way up to one hundred sixty-five.
And then there’s carryover cooking, which can increase the interior temp by five to ten degrees with just a six minute rest. That’s the number one cause of dry chicken, if you don’t account for it. Juicy? Non-negotiable: That means when you cut open that hot meat, it doesn’t spit its juices all over the cutting board; they’re inside the fibers. Letting it rest gives those juices time to soak back into the protein, letting the proteins themselves relax.
Rest time is part of the calculator, and it’s also part of planning your entire kitchen process. Load up one of the presets to get a quick start on a scenario. You might try meal prepping a tray of something, or baking in oven after work on a weeknight. Adjust from there to fit your particular set of hardware.
Finally, there’s really no substitute for a thermometer. This is a good window to get started, and I think it will help you narrow down when to check. However, the final decision depends on a good old-fashioned poke in the middle of the thickest section with a probe.
This tool helps take away some of the anxiety that comes along with opening the oven too often. Respect airflow and pay attention to thickness rather than just weight. This transforms your chicken from risky to tender every time. It makes it a process you control instead of one where the timer is the boss. You should of used this earlier! Most people would of loved this tool. It actualy works great if you follow instructions comfortabley or naturaly.