
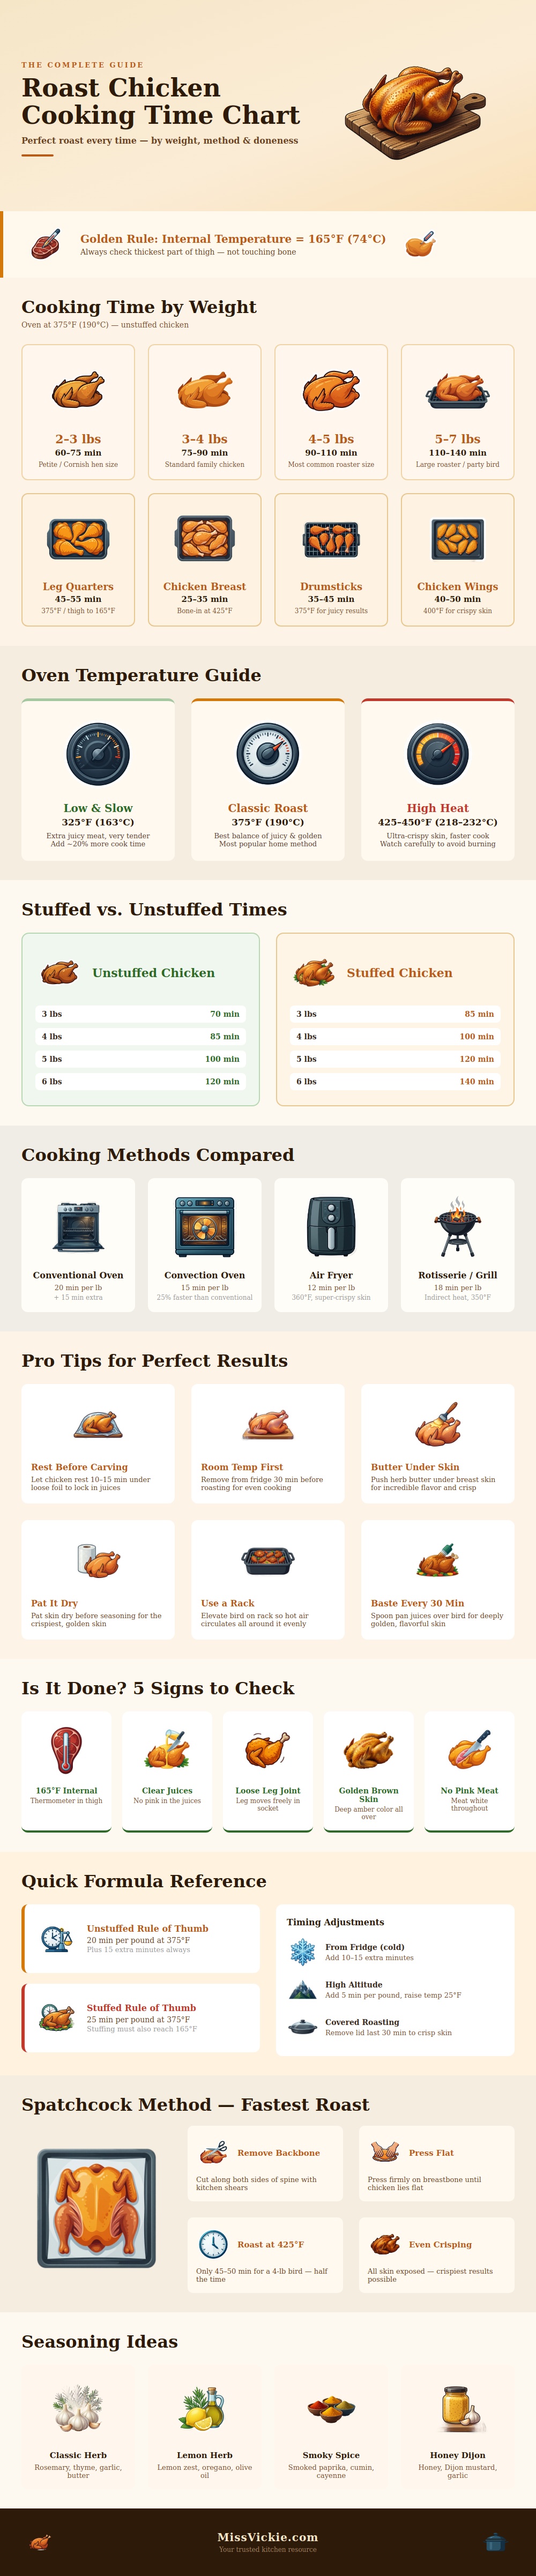
The timing on roasting a chicken is such that if you take it out of the oven too early or leave it in to late, you’ve ruined dinner. You’ll have either toughened-up rubbery meat or dried-out leather. It all comes down to how you manage heat and your patience. Is there a way for you to screw up your roast chicken? Yes.
As with most dishes in your kitchen, the cook-time is more of a guideline than a strict deadline. What’s important? How big is the bird? When do you want it ready to eat? If I’m looking at eating around 7:00 PM, then I’ll check the weight of my bird against the chart to see how much time it needs; however, keep in mind that factors like stuffing the cavity can adds significant time to your clock.
How to Roast a Chicken Perfectly
This is a visual guide. The chart helps break down the cooking time according to size. So it illustrates how much longer a large bird will take than a small one. If you’re in a hurry, it’s nice to have this chart. But experienced home cooks realizes that the oven dial isn’t as important as thermometer. Those times in the chart are estimates based off an average weight. They assume your oven is perfectly accurate and you have a room-temperature chicken to begin with. That’s not real life.
Next, remove the chicken from fridge at least half an hour before cooking it. Why? Because letting it come to room temperature will help ensure that the outside doesn’t burn before the inside has had time to reach safe temperatures. While the bird is resting on the counter, pat it dry all over; excess moisture will prevent crispiness; let’s get golden instead.
Next: give it some flavor. Pushing in softened herb-flavored butter underneath the breast skin helps keep the white meat moist from the inside out. Good roast chicken versus great roast chicken? Separates ’em.
When you select your oven temperature, consider the texture you want. For example, meat cooked at a lower temp of about 325 degrees will be extra-tender but won’t get as browned and will take longer. Want a crispier skin? Turn up heat to closer to 425 or even 450 degrees. Just be sure to keep an eye on things; don’t let it burn while waiting to cook through. Most people find the middle range, like 375 degrees, strikes a good balance between color and juiciness in their bird.
Stuffed birds also need more time because the heat must penetrate the thick stuffing. The chart reflects that adjustment by giving you a longer cook time.
Testing for doneness is half science and half intuition. Clear juices coming from the thigh joint? Check. Leg wiggling freely in its socket? Check. Classic indications of doneness, but not necessarily conclusive. For absolute proof you need the instant-read thermometer. Poke it into the center of the thickest section of the thigh (avoiding the bone). The target temperature is 165 degrees Fahrenheit. As soon as you reach this point, remove the bird from the oven.
Don’t carve it yet. Cover loosely with foil and let rest for about ten or fifteen minutes. This gives the juices time to spread out within the muscle fibers. If you cut into a still-warm chicken, all those juices will run down the cutting board (leaving you with dry meat).
If you’re pressed for time, consider spatchcocking your bird: Flattening it and removing the back bone will expose more of it to the heat, which promotes even browning while cutting the cook time almost in half. It requires some courage (and a set of kitchen shears), but the payoff is always worth it.
Whichever route you take, flat or upright like tradition, the desired goal is this: tender, yielding meat and cracklingly crisp, shattered skin. These are the tricks that turn an ordinary piece of protein into something memorable. Even most basic recipes reward close attention.