
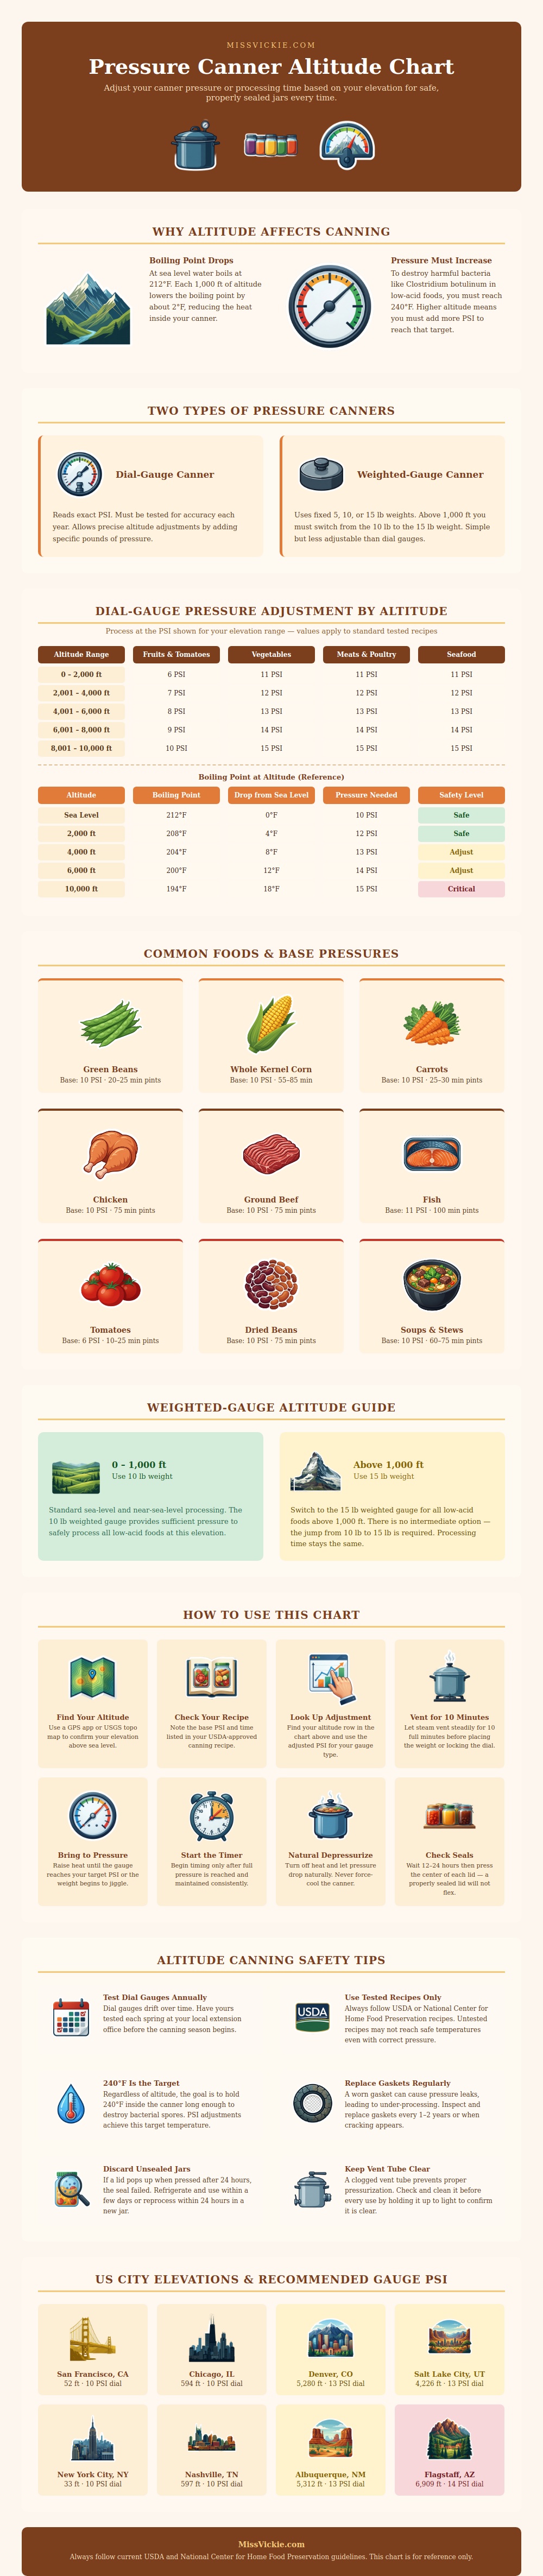
If you’re at high altitudes, be sure to adjust your pressure canning settings: The higher up you are, the lower your boiling point, water doesn’t boil until it reaches 212°F at sea level, but at elevations of 1,000 feet above that, it will only get down to roughly 210°F. So if you live in one of those high-elevation cities (such as Salt Lake City or Denver), know that the water in your canner isn’t quite hot enough. To kill any potential Clostridium botulinum spores (which cause botulism), you must achieve a temperature of 240°F. If you don’t have high enough heat, those spores will remain alive and continue to multiply in your sealed jar.
To adjust the dial, determine which pressure you need to use with your particular set-up. On dial-gauge canners, which show you the exact pounds per square inch inside the pot, you adjust precisely up and down based off your altitude. Just apply more (or less) pressure as required; you’ll know what’s right for where you are. On weighted-gauge canners, the fixed weights bounce, or rock, when they reach certain pressures. Above 1,000 feet, you generally switch from a 10- to a 15-pound weight. Knowing exactly how high you are will tell you whether that’s called for before you start filling those jar.
Adjust Your Canner for High Altitudes
It’s not a fast process; it takes careful attention to detail and patience. Begin by placing the empty jars in your canning pot, add water, cover with the lid and then bring to a boil, this boils off the cold air inside the canner so that heat comes from beneath (boiling water) as opposed to any trapped atmosphere within. The first 10 minutes should of been spent doing this, after which you seal the lid and begin timing. Without this venting phase, you will get inaccurate pressure readings and thus unsafe processing times. Rush through here, as many novices do because it seems like a waste of time. It isn’t. For your thermal safety, you MUST do this.
Besides altitude adjustment, make sure your gear is in check too. Your dial gauge should be recalibrated each year at a local extension office; they tend to show lower pressure than what is actualy inside and will eventually get out of whack. They’re also susceptible to being worn out or having a leaking vent tube or gasket. Which drops the temp down into unsafe ranges. Steam appears the same regardless of whether it’s 230°F or 240°F inside, so don’t use your eyeball judgement on this one: The timer and the gauge are the only things to rely upon.
When you turn off the heat, let the canner cool on its own; forcing the pressure to release by pouring cold water onto the lid will cause liquid to siphon from the jars, break the seal and ruin the food. (What a waste, after all that effort!) Wait until the weight stops or the dial reaches zero before lifting the lid on the canner. Let the jar cool and seal in place undisturbed for at least 12 more hours.
Home food preservation is all about understanding the science of how things work. And there is nothing more important than knowing how to adjust for your elevation, which helps ensure safety for your family. Whatever you’re preserving, whether it’s chicken broth on Flagstaff or green beans back in Nashville, correcting with an eye to your elevation makes each jar a sure thing different than one to hope for. When the lids ping down and seal properly, you’ll know just how to make it happen.