Pressure cook time to covered oven braise timing
Instant Pot to Dutch Oven Converter
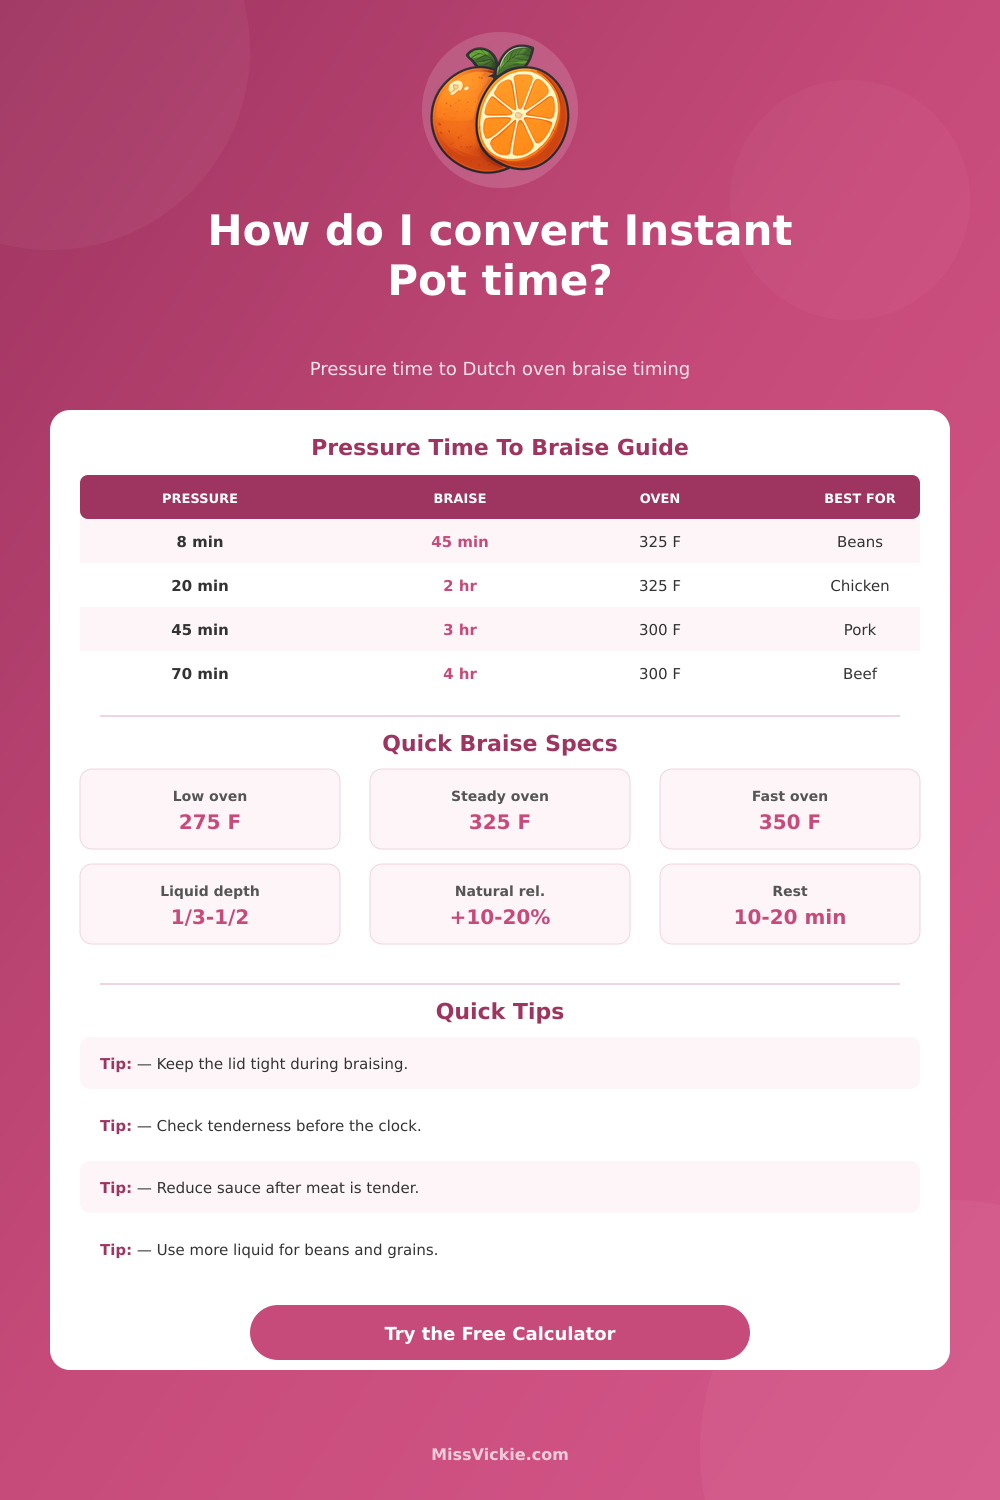
Convert pressure-cooker recipes into Dutch oven braises using pressure time, release type, oven temperature, braise liquid, food category, weight, lid coverage, and tenderness goal.
Load a common pressure-cooker recipe, then adjust pressure time, release style, oven temperature, liquid depth, food weight, and final tenderness.
Conversion Breakdown
High pressure speeds starch hydration and collagen softening without much evaporation.
Covered oven heat uses time, steady simmering, and evaporation control for similar tenderness.
Natural release continues cooking, so it counts as extra gentle braise progress.
Pressure recipes often need less liquid; Dutch ovens need enough liquid to cover the braise floor.
| Food Category | Typical Pressure Time | Dutch Oven Start Point | Tenderness Cue |
|---|---|---|---|
| Beef stew cubes | 25 to 40 minutes | 2 to 3 hours at 300 to 325 F | Cubes split with a spoon but still hold shape |
| Chuck roast or short ribs | 45 to 75 minutes | 3 to 4.5 hours at 275 to 325 F | Probe slides in and meat pulls from seams |
| Pork shoulder | 45 to 70 minutes | 3 to 4 hours at 300 to 325 F | Shreds with light pressure after resting |
| Chicken thighs or whole chicken | 10 to 28 minutes | 45 minutes to 2 hours at 325 to 350 F | Safe internal temperature plus loose joints |
| Beans, lentils, and grains | 6 to 35 minutes | 35 minutes to 2.5 hours at 300 to 350 F | Starch is tender without a hard center |
| Pressure Release | Braise Interpretation | Timing Effect | Best Match |
|---|---|---|---|
| Quick release | Stop cooking quickly | Shortest carryover credit | Vegetables, fish, firm grains, lean poultry |
| 5-minute natural, then quick | Small gentle finish | Add a little covered oven time | Chicken pieces, rice, lentils, saucy dishes |
| 10-minute natural release | Moderate carryover | Good default for braise conversion | Stew meat, pork chunks, beans, chili |
| Full natural release | Long carryover and slow depressurizing | Use lower oven or a longer tenderness window | Large roasts, tough beans, collagen-rich cuts |
| Intermittent release for foam | Protects starchy or foamy foods | Favor more liquid and gentle simmering | Beans, grains, split peas, thick soups |
| Braise Liquid Level | Approximate Depth | Timing Change | Use For |
|---|---|---|---|
| Minimal liquid | Just covers pot bottom | Faster reduction, more browning risk | Pre-cooked sauces and small tender cuts |
| One-quarter up food | Shallow braise | Moderate reduction and stronger flavor | Chicken, pork chunks, short pressure recipes |
| One-third up food | Classic meat braise | Balanced tenderness and sauce body | Stew, pot roast, short ribs, pork shoulder |
| Halfway up food | Moist covered braise | Slightly longer but safer for lean foods | Beans, whole chicken, tougher roasts |
| Mostly covered | Soup or stew simmer | Slowest reduction, most hydration | Beans, grains, lentils, brothy stews |
| Dutch Oven Temperature | Braise Behavior | Adjustment | Watch Point |
|---|---|---|---|
| 275 F | Very gentle collagen conversion | Add time for large roasts | Best when sauce should not scorch |
| 300 F | Steady low braise | Good for tough beef and pork | Check liquid every 60 to 75 minutes |
| 325 F | All-purpose covered braise | Default conversion temperature | Check tenderness near the first window |
| 350 F | Faster simmer and more evaporation | Useful for chicken, beans, and shorter dishes | Add liquid if sauce reduces too quickly |
Dutch oven estimates are planning ranges. Use food-safe internal temperatures for poultry and ground meat, and use tenderness checks for braises that depend on collagen or starch texture.
Pressure cooking and oven braising is two different methods of cooking food. Additionally, they produce different results due to the difference in the heat environments in which the food simmer. A pressure cooker trap the steam within the appliance, which raise the boiling point of the liquid within the cooker.
As a result, the starches within the food hydrates faster within a pressure cooker, as do the connective tissue. In contrast, an Dutch oven allows for the evaporation of the steam from the food, and relies upon the passage of time to allow for the same chemical change to the food. Unlike a pressure cooker, the time for which food simmers in an oven do not need to match the time for which food simmers in a pressure cooker; pressure cooking takes place at a much faster rate than braising food in an oven.
How to Convert Pressure Cooker Time to Oven Braising Time
Another variable to consider when converting pressure cooking time to oven braising time is the weight of the food being cook. Food weight impact cooking time, as well as the amount of liquid needed to cook the food. For instance, a three-pound cut of roast meat will take longer to fully heat the meat to an internal temperature that cooks the meat to doneness than a one-pound batch of beans will take to heat the beans.
Additionally, the starting temperature of the food will also impact the time required to fully cook the food. Meat that starts at a cooler temperature will take longer to fully cook than a warmed sauce. Thus, another consideration in determining the time during which food should be cooked in an oven is to account for the starting temperature of the food.
Another consideration in converting pressure cooker times to oven braising times is the depth of the liquid within the food. Since a pressure cooker retain the moisture of the food, recipes for pressure cookers will typically require less broth to cook the food than recipes for oven braised foods. For the same reason, however, some of the moisture of the food will naturaly escape from the pot of food when it simmer in an oven, even with the lid placed on the pot.
Thus, more liquid may be required in an oven braised pot than would be require in a pressure cooker. The temperature to which the oven is heated will determine the rate at which the liquid evaporates from the pot of food, as well as the rate at which the simmer of the food simmers. At lower temperatures, such as 275 degrees, the collagen within the meat will have time to melt, and the lower temperatures are useful in simmering meat that is large and tough.
At higher temperatures, such as 350 degrees, the heat will cook food such as chicken or beans more quickly. Additionally, higher oven temperatures are useful in cooking food that does not require cooking for several hour. Additionally, the time at which the sauce simmers uncovered may also be decided with the knowledge of the oven temperature; higher temperatures will cause the sauce to thicken more fast.
One last variable to consider is the method of releasing the pressure within the cooker once cooking is complete. If the pressure is released quickly, cooking will cease immediately within the food. If the pressure is released naturally, however, the food will continue to cook for periods of ten or twenty minute after the lid is placed upon the pot.
In these cases, braising time in an oven can be shortened if natural release of pressure is utilized; therefore, the converter tool for cooking time account for natural release of pressure from the cooker. Another variable to consider is the tenderness of the food that is to be cook. Meat that is simmers until it becomes fork tender will fall apart into shreds if simmers for too long.
Additionally, beans that simmer for too long will become too creamy and fall apart. Thus, the converter tool for cooking times also allow for extra time to be added to ensure the food simmers until it reaches a shredded or creamy texture; shredded or creamy textures require more breakdown of the food than meat that is cooked to a firm texture. Refer to the reference tables to determine normal cooking times for food to reach specific texture.
Another last consideration of time is the shape and size of the pot in which the food simmers. A wide Dutch oven will allow the food to simmer in a wider area than a narrow Dutch oven. Additionally, a wide Dutch oven will allow the moisture within the food to escape from the pot.
Additionally, the same rule apply for food that is crowded within the pot; some adjustment of the amount of liquid may be required for crowded food. Food should be frequently checked during the braising process because the converter tool will provide a range of cooking time for which to braise food; the tool is only an estimate. Food should be tasted to determine if the meat has reached the desired tenderness or if the beans have lost their hard center.
Once the desired texture has been achieved, the sauce may be reduced or the food may be removed from the pot to serve. Thus, the converter tool is only a tool to help chefs determine how long to braise food in an oven if the food was first pressure cooked.