Slow Cooker to Dutch Oven Converter
Convert slow cooker low or high recipes into covered Dutch oven braises with oven temperature, pot material, liquid depth, meat cut, lid style, and batch weight adjustments.
Load a common slow cooker recipe, then fine-tune the meat cut, weight, original slow-cooker time, Dutch oven temperature, braise liquid, pot material, and lid style.
Conversion Breakdown
Gentle bottom and side heat with very low evaporation.
Even heat, tight lid, good browning before the braise.
Stores heat strongly and may need slightly lower oven settings.
Responsive heat and more evaporation around the lid edge.
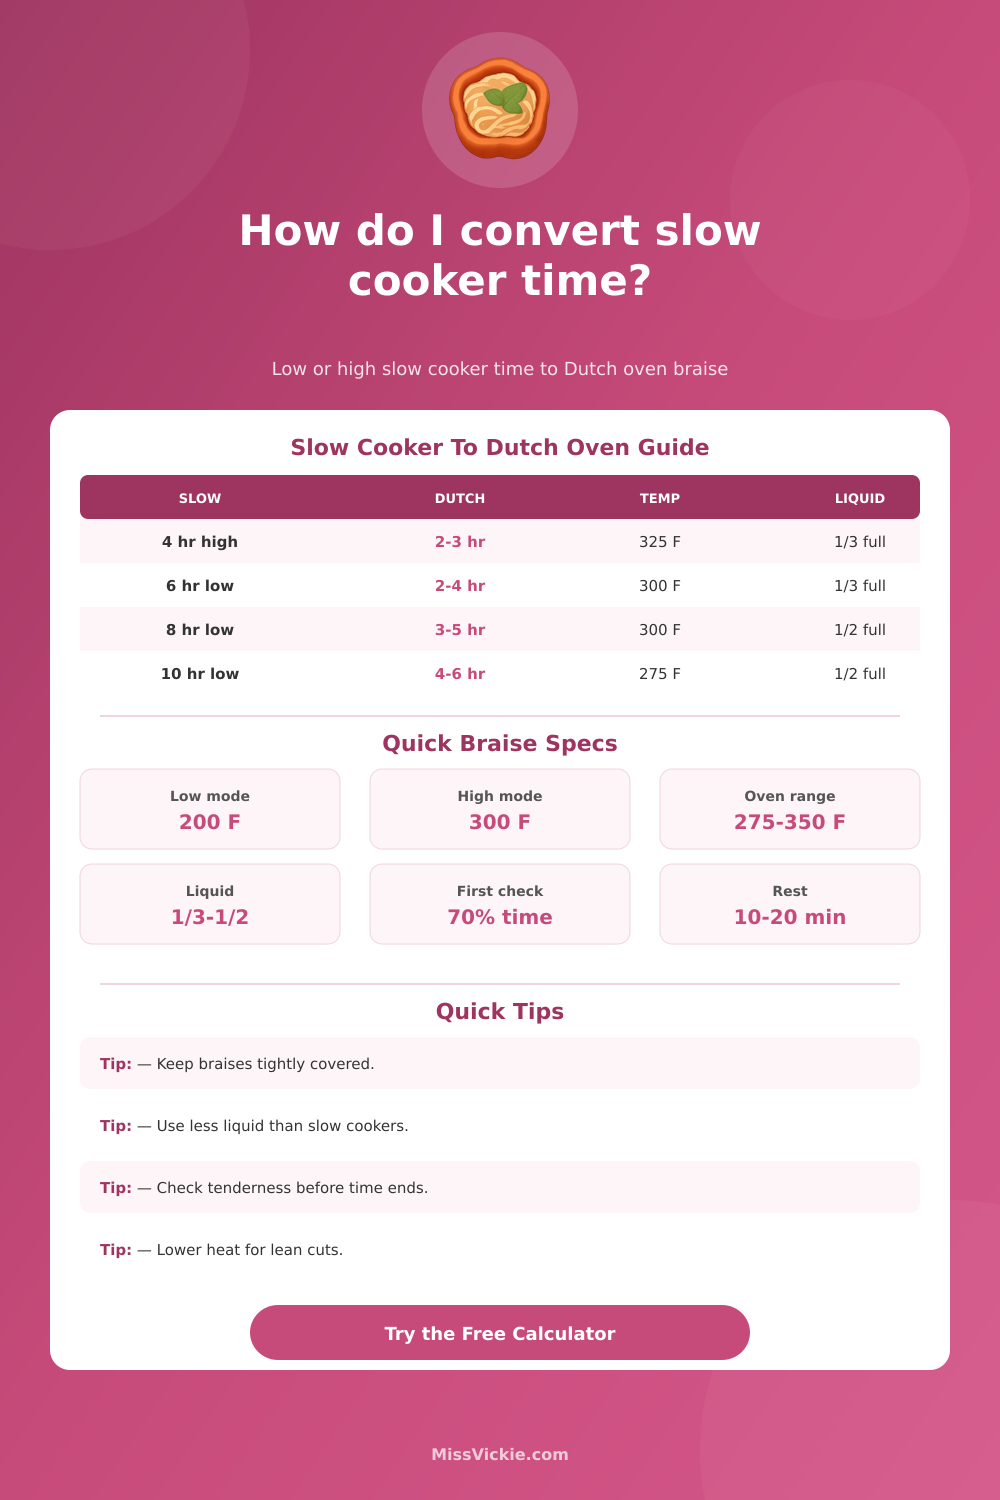
| Original Slow Cooker Time | Typical Dutch Oven Range | Best Oven Temperature | When To Start Checking |
|---|---|---|---|
| 3 to 4 hours on high | 1.5 to 2.75 hours | 325 to 350 F for quick braises | After about 70 percent of estimated time |
| 5 to 6 hours on low | 2 to 3.5 hours | 300 to 325 F for most cuts | When meat is firm but yielding |
| 7 to 8 hours on low | 3 to 4.75 hours | 285 to 315 F for tough cuts | At the 3 hour mark for large roasts |
| 9 to 10 hours on low | 4 to 6 hours | 275 to 300 F for collagen-rich cuts | Start probing well before the recipe end |
| 11 to 12 hours on low | 5 to 7 hours | 250 to 285 F for overnight-style braises | Check liquid level every 90 minutes |
| Cut Or Main Food | Liquid Depth | Dutch Oven Temp | Best Doneness Cue |
|---|---|---|---|
| Beef chuck roast | One-third to halfway up the meat | 285 to 325 F | Fork slips in with light resistance |
| Pork shoulder | One-third up the roast | 300 to 325 F | Shreds at the center, not just the edges |
| Short ribs or lamb shanks | Halfway up the bones | 285 to 315 F | Meat pulls from bone but stays moist |
| Chicken thighs or turkey breast | Shallow liquid, under one-third | 300 to 325 F | Safe internal temperature plus tenderness |
| Beans, chili, or vegetables | Covered by sauce or broth | 275 to 325 F | Creamy beans or tender vegetables |
| Setup | Time Effect | Liquid Effect | Conversion Note |
|---|---|---|---|
| Enameled cast iron with tight lid | Baseline timing | Moderate evaporation | Best all-purpose Dutch oven match for slow-cooker recipes. |
| Bare cast iron Dutch oven | 3 to 6 percent faster | Moderate evaporation | Holds heat strongly; lower the oven if sauce scorches. |
| Stainless Dutch oven | About 5 percent faster | More evaporation at lid edge | Add a splash of liquid if the sauce reduces early. |
| Ceramic covered casserole | 5 to 10 percent slower | Gentle evaporation | Needs full preheat time and steady oven placement. |
| Foil-covered roasting pan | Slower and less even | Can leak steam | Crimp foil tightly and rotate once during long braises. |
| Batch Weight | Time Adjustment | Liquid Start Point | Checking Rhythm |
|---|---|---|---|
| 1 to 2 pounds | Check 10 to 20 percent early | About 1/2 to 1 cup | Check every 15 minutes near the end |
| 3 to 5 pounds | Use baseline calculator time | About 1 to 2 cups | Check every 20 to 30 minutes near the end |
| 6 to 8 pounds | Add 10 to 20 percent | About 2 to 3 cups | Rotate pot once if oven has hot spots |
| 9 pounds and up | Add 20 percent or more | Enough to stay one-third covered | Probe several areas before declaring tender |
Dutch oven conversions are planning estimates. Food thickness, actual simmer strength, oven calibration, and pot fit can move the final tenderness window.
When a person are converting a slow cooker recipe to a Dutch oven recipe, a person must understand the different methods of heat transfer of each of these two types of cookware. Slow cookers is a sealed plastic environment that retains the steam and heat that is added to the slow cooker, and allow the food to remain moist. Dutch ovens, in contrast, sit within the oven, and the air within the oven circulate around the dutch oven, allowing some of the moisture to escape from the dutch oven.
As a result of this escaping moisture, Dutch ovens reach higher temperature than slow cookers, and take less time to cook the same recipe. Because of these different cooking times, a person must adjust the amount of liquids and ingredients to be used in the Dutch oven. The calculator include specific inputs for several reason related to the outcome of the recipe.
How to Convert Slow Cooker Recipes to a Dutch Oven
For instance, the user must enter the slow cooker time that will be used for the recipe into the calculator. Additionally, the cut of meat that will be used will impact the time that the recipe must simmer for; pork shoulders take longer to cook than chicken thighs due to the need for the collagen in the pork to breaking down into gelatin. Additionally, chicken thighs is more tender than pork shoulders, and require less liquid to cook due to the skin and bones of the chicken thighs.
Because Dutch ovens can lose some of the liquid from a recipe, the user must adjust the amount of liquid used in the Dutch oven to compensate for the liquids that can escape from the dutch oven. Slow cookers retain the liquids from the food; dutch ovens does not. As a result, the type of liquid that is used will also impact how long the meat simmers within the dutch oven; thicker sauces release heat at a slow rate than liquids like broth or wine.
Additionally, the thick sauces may require more care in that they may scorch on the bottom of the dutch oven. Additionally, acidic liquids may slow the tenderizing process of the meat within the dutch oven. Additionally, the material that the dutch oven is made of will impact the cooking time.
Dutch ovens made of enameled cast iron retain the heat well, and are a common type of dutch oven. Bare cast iron loses heat quickly. Stainless steel may respond quickly to change in temperature, but allows some of the heat to escape from the dutch oven.
Finally, ceramic casseroles take longer to heat up and cool down; therefore, it may be necessary to add ten or fifteen percent more time to the recipe if these types of cookware is used. These types of materials has an impact on the cooking time, which the calculator factors into the calculations that are performed with the calculator. The size of the batch of meat that is to be cooked will also have an impact upon the cooking time within the dutch oven.
A single large roast will heat to the required temperature more slow than cubed stew meat that is more easily cooked to the desired doneness; the calculation of cooking time account for the shape of the meat that will be cooked, and the way that the meat will be “crowded” within the dutch oven. Small batches of meat cooked in large dutch ovens will lose some of the moisture from the batch, again due to the exposure of the food to the dry air within the oven. It is also important to check the doneness of the cooked meat, rather than relying solely upon the clock to determine when the meat is done cooking.
If the lid to the dutch oven is opened too often, some of the steam will escape, and some of the heat will escape. Loss of steam and heat will result in the cook time taking longer to reach the proper doneness. A person can evaluate the doneness of the meat by pressing a fork into the cooked meat; if the cooked meat allows the fork to slip into the meat, the meat is done cooking.
Additionally, chuck roast that contain more fat will cook to doneness in less time than lean chuck roast. When converting a slow cooker recipe to a Dutch oven recipe, individuals has more control over the cooking process. You can brown the meat prior to cooking; the cook can adjust the sauce while the meat simmers; the cook can remove the lid to allow the sauce to thicken.
Additionally, the time and amount of liquid needed for cooking can be removed from the guesswork to ensure the success of the cooking process. Thus, individuals can easily move recipes from one type of cookware to the other while maintaining the quality of the cooked food.